Our latest feast

Thursday, December 20, 2012

Christmas Favourites and A WINNER!!

Busy busy with preparations for Christmas which is being held at our house this year. 

Some baking that will take place over the next couple of days will include:


Gingerbread House


Mince Pies

And to announce our winner of the OrgoPot - we have selected K8 for not only a wonderful sounding dish but for including the recipe which just made my husbands mouth water.

Congratulations K8!!


Wednesday, December 12, 2012

Pulled Pork and Bean Burritos & an ORGOPOT giveaway

Another spell between posts but I am still busy as a bee, my work changed dramatically the other week with a department reshuffle - not the best outcome but something I have to deal with!!

Despite the sweltering heat of Melbourne today I needed to post tonight.  So with having decided that I must blog and with it being such a warm day I knew dinner would need to be easy and flavoursome.  Mexican on a warm day was my first thought strangely.  Easy to cook easy to eat was my theory behind the choice!! 

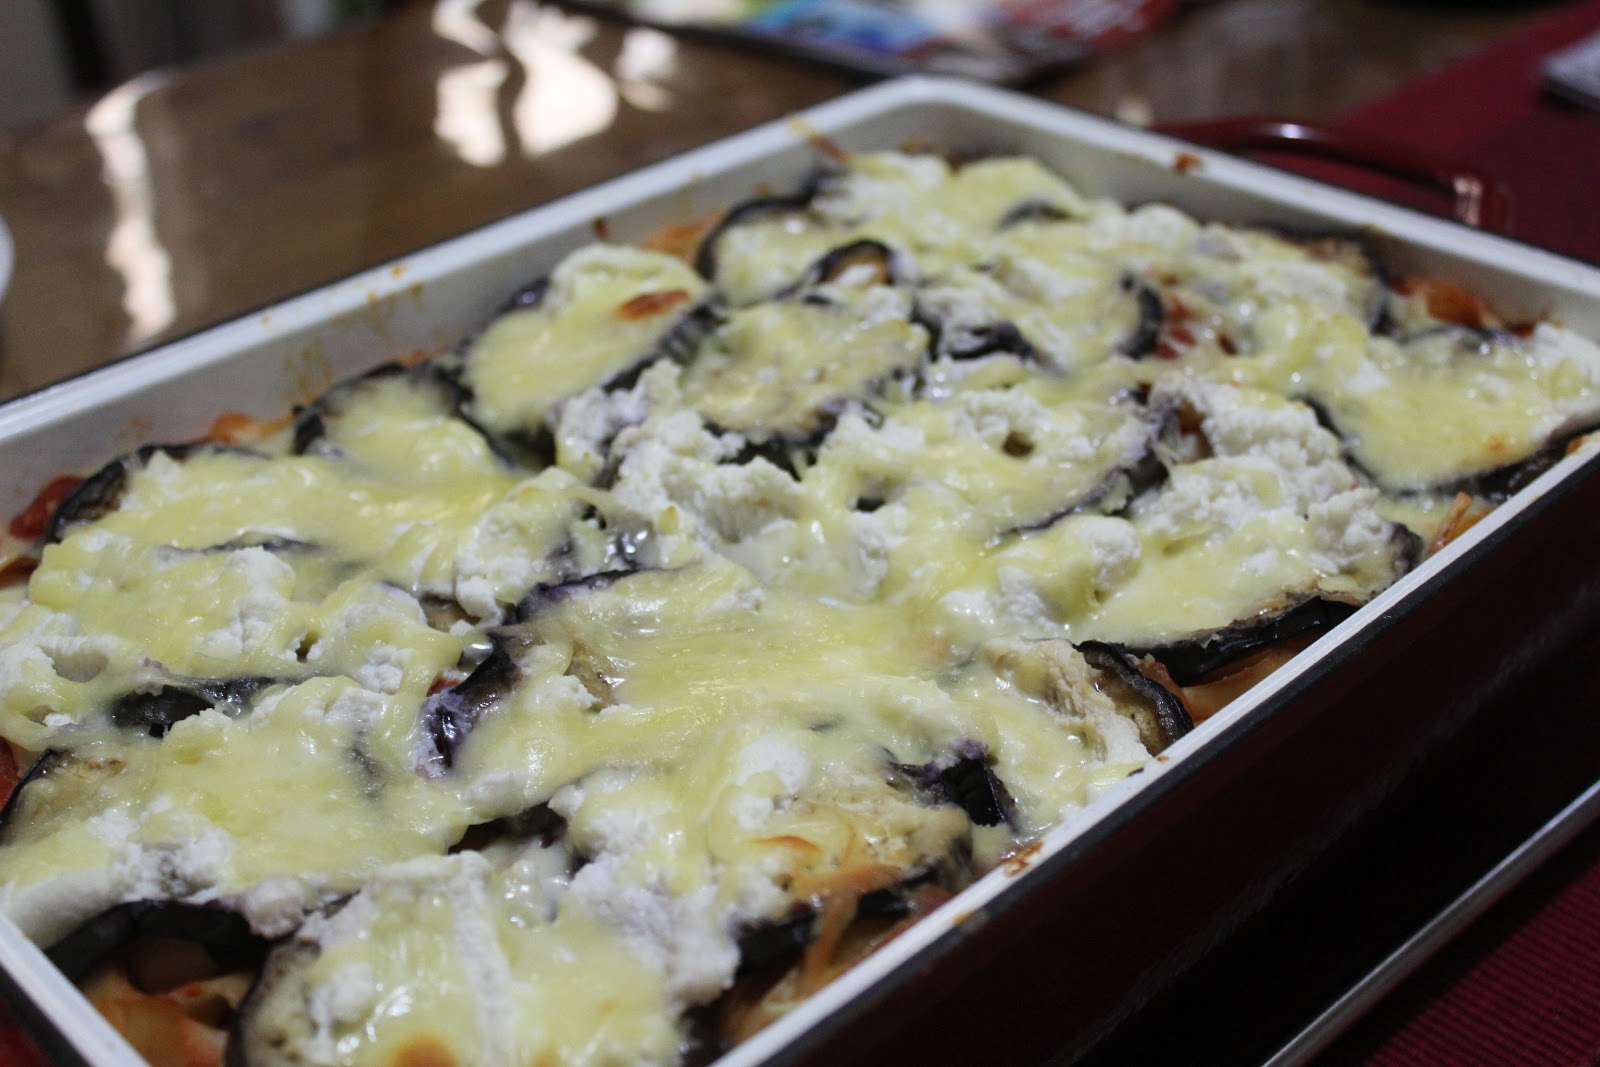
These Pulled Pork and Bean Burritos by all means fit the bill... the pork was slow cooked in an Orgopot for a few hours on a low heat so there was no over the stove top sweats with the preparation.  Shredded and mixed with kidney beans and the sauce it was cooked in gave the meat texture and also a nice delicate yet a little spicy flavour.  A quick colourful salad all combined in a tortilla wrap ensured this was the perfect meal.


Pulled Pork and Bean Burritos
(recipe sourced from WW Takeaway At Home Cookbook)
Serves: 4
ProPoints per Serve: 12
1 tablespoon olive oil
400 gram peice of lean pork neck (scotch fillet) fat trimmed
1 brown onion, chopped
2 cloves garlic, crushed
1 teaspoon ground cumin
1/2 teaspoon ground chilli
2 tablespoons tomato paste
3/4 cup chicken stock
400 gram can kidney beans, rinsed and drained
2 cups (150 grams) finely shredded red cabbage
1 carrot, cut into matchsticks
1 red capsicum, thinly sliced
100 grams snow pea sprouts
1 tablespoon lime juice
8 x 20cm flour tortillas

Preheat oven to 160 degress Celsius or 140 degrees Celsius fan forced.

Heat half the oil in a medium stove/oven proof pan over high heat.  Cook pork, turning for 5 minutes or until browned. Set aside.

Heat remaining oil in the same pan over medium heat.  Add onion and cook, stirring, for 5 minutes or until softened.  Add garlic, cumin and chilli and cook, stirring, for 30 seconds or until fragrant.  Stir in tomato paste and stock.

Place pork on top of onion mixture.  Cover with foil and bake for 2 hours or until very tender.  Uncover and cool slightly.  Using 2 forks, shred pork.  Add beans and stir to combine.

Combine cabbage, carrot, capsicum, sprouts and juice in a medium bowl.

Heat tortillas following packed instructions.

Divide pork mixture among tortillas.  Top with cabbage salad and roll to enclose filling.  Serve.


(click here for a printable version of this recipe)

Tonight's post also brings a special giveaway. 

I recently brought two Orgopots for my own use through a work colleague's recommendation who had purchased one herself.  Bottom line all I can say is that they are wonderful to use.  Both for use on the stove top and in the oven these pots make cooking a dream and I have also noticed that due to the pan surface I have actually reduced the use of oil while cooking.  The pots are lightweight, dishwasher safe, metal utensial safe and very easy to clean.  Measuring 28cm in diameter, 9.5 cm deep and hold 4.5 litres.  A glass lid also allows you to see what you are cooking at a glance.


Now for the giveaway - I have one of these Orgopots (valued at $69 each) to giveaway.  To be in with a chance of winning please tell me what is your family favourite "one pot wonder" recipe that you love to cook.  Leave a comment on this post - if I like the sound of your dish I may even cheekily request the recipe.  Should you leave an anonymous comment please ensure you leave your name and email address on the comment or email me me confirmation of your comment including contact details to houseofmurray@optusnet.com.au so I can contact you.

To ensure that the winner will recieve this brilliant prize in time for Christmas (I must say what a wonderful Christmas present) the competition will close Sunday 16th December 8pm EST and unfortunately for my overseas friends this competion is only available to Australian residents.

However should you wish to own your own Orgopot it's easy to purchase one. You can own one for $69 each plus delivery of $9.95. Total being: $78.95.
You can order your Orgopot by clicking here.  I have been told by the supplier, Orgolife, that if you order before Christmas you will not be charge Postage and Handling - so you will save $9.95!!

Here is a video of OrgoPot in action, the Youtube link is: http://youtu.be/xltzljs1Ix4.

Good luck to all that enter and I will be contacting one of you Sunday night via email.

Monday, November 26, 2012

Baked Vegetable Fettuccine

I have been hankering a vegetarian meal for a while just to take a step back from meat which we seem to have every night of late with the exception of the occasional fish dish.  I remembered a pasta dish I used to cook and new that would be exactly the taste and comfort that I wanted.

Not too heavy but definitely hearty and very basic to make.  The flavour intensed by the garlic and the nuttiness of the eggplant is complimented with the creamy layers of two cheeses, ricotta and mozerella.

This meal is not only very easy to make but it's very enjoyable and is also great the next day as the flavours do develop even more.


Baked Vegetable Fettuccine
(recipe adapted from WW Pure Points Cookbook)
 
Serves: 8
ProPoints per serve: 10
 
cooking spray
2 medium eggplants, sliced thinly
2 onions, chopped
1 tablespoon minced garlic
3 x 400 grams can diced tomatoes
freshly ground black pepper
500 grams fettuccine
500 grams extra light ricotta cheese
300 grams reduced fat mozzarella cheese, grated

Preheat oven to 220 degrees Celsius.

Coat a frying pan with cooking spray and heat.  Add the eggplant slices in batches and good for 3 - 4 minutes on each side until golden brown.  Set aside.

Respray the same pan with cooking spray, heat and add onion and garlic.  Cook, stirring, until the onion is softened.  Stir in tomatoes and black pepper, reduce heat to a simmer and cook for 20 minutes.

Meanwhile, cook the fettuccine in a pan of boiling water as per packet instruction or until tender.  Drain well.  Stir the tomatoe mixture into the fettuccine.

Spread 1/2 the pasta mixture over the base of the prepared dish. Top with 1/2 the eggplant, 1/2 the ricotta and 1/2 the mozzarella cheese.  Repeat layers finishing with a layer of mozzarella cheese.  Bake for 20 minutes or until the cheese is hot and bubbling.


(click here for a printable version of this recipe)

Sunday, November 18, 2012

Italian Lamb Shanks


I have a few favourite kitchen appliances but the slow cooker would have to rate number one.  I love the fact I can get the meal ready, turn it on and know that our dinner will be cooked by the time that we get home from work.  In this case, although Sunday I had quite a lot of things to do so preparation was the key.
 
Lamb shanks are so tender and juicy when slow cooked so it was no surprise that this dish went down a treat in the House of Murray.
 
The thick tomato based sauce with tender vegetables and beans complimented the lamb shanks beautifully especially with the added kick of the A very hearty italian style one dish dinner.... that due to the brilliant work of the slow cooker made a wonderful dinner.
 

Italian Lamb Shanks
(recipe sourced from WW Food You'll Love Cookbook) 

Serves: 4
ProPoints per serve: 10
 
1 tablespoon olive oil
4 x 250 gram lean French trimmed lamb shanks, all visible fat removed
6 eschalots, halved
2 celery sticks, thinly sliced
6 medium carrots, cut into 2 cm peices
1 eggplant, cut into 2 cm peices
2 garlic cloves, crushed
1/2 cup dry red wine
1 1/2 cups beef stock
400 gram tinned diced tomatoes
1 tablespoon tomato paste
400 gram tin cannellini beans, rinsed and drained
salt
freshly ground black pepper
1/2 cup coarsley chopped basil leaves

Preheat oven to 160 degrees Celsius. 

Heat half the oil in a large non-stick frying pan over medium - high heat.  Cook lamb, turning, for 5 minutes or until browned.  Transfer to a plate.

Heat remaining oil in the same pan over medium heat.  Add eschalots, celery and carrot and cook, stirring occasionally, for 5 minutes or until eschalots are softened.  Add eggplant and garlic and cook, stirring, for 2 - 3 minutes or until eggplant is golden.

Stir in wine, stock, tomatoes and paste.  Season with salt and freshly ground black pepper.  Bring to the boil.  Return lamb to the pan.  Cover and bring to the boil.  Transfer to a large ovenproof dish and bake, covered, for 1 hour and 30 minutes. 

Stir in beans and return to oven.  Bake, uncovered, for 30 minutes or until meat is very tender and starts to fall off the bone.

Sprinkle with basil and serve.

Or alternatively

Follow instructions and cook in slow cooker on low heat for 7 - 8 hours.


(Click here for a printable version of this recipe)

Saturday, November 10, 2012

Spaghetti with Mussels, Chilli and White Wine Sauce

As you all know I have a love affair with mussels and am always on the look out for another recipe to try.  When I saw this recipe, which was originally for Vongole (Clams) I just knew it would be perfect with mussels.

This was not only a recipe jam packed with flavour but it was a very simple dish to pull together.  The fresh flavours of the tomatoes, capsicums, garlic along with a hint of chilli make this a perfect italian dish.


Spaghetti with Mussels, Chilli and White Wine Sauce
(recipe adapted from WW Take Away At Home Cookbook)
 
Serves: 4
ProPoints per serve: 11

300 grams spaghetti
1 kgs mussels, debearded, rinsed and drained
1 tablespoon olive oil
250 grams cherry tomatoes, halved
1 brown onion, thinly sliced
1 red capsicum, finely chopped
4 garlic cloves, crushed
1 long fresh red chilli, finely chopped
1/3 cup reduced salt chicken stock
1/2 cup dry white wine
1/4 cup chopped fresh flat leaf parsley leaves
1/4 cup coarsely chopped fresh basil leaves

Cook spaghetti in a large saucepan of boiling salted water, following pack instructions, or until just tender.  Drain.

Meanwhile, place mussels in a large saucepan over high heat.  Cover with a tight fitting lid.  Cook, shaking pan occasionally, for 5 minutes or until mussels open.  Remove mussels from pan with a slotted spoon, discarding any liquied and any mussels that do not open.

Heat oil in a large, deep frying pan over medium high heat.  Add tomatoes, onion, capsicum, garlic and chilli and cook, stirring for 5 - 7 minutes or until capsicum and onion have softened.

Add stock and wine and bring to the boil.  Stir in parsley and basil.  Add pasta and mussels.  Toss gently to combine.  Serve.


(Click here for a printable version of this recipe)

Sunday, November 4, 2012

Beef Nachos with Chunky Guacamole

My normal version of "Quickie" Nachos is very simple no where near the decadence of these luxurious Beef Nachos.  

Saying that these were very easy to make, full of flavour and such a different take on this popular Mexican dish.

I love the way that there were hidden vegetables in the beef mixture which not only gave me great pleasure that the kids were getting their vitamin hit but they also added to the texture of the dish.  No-one left the table hungry as the portion sizes were very generous.


Beef Nachos with Chunky Guacamole
(Recipe adapted from WW Take Away At Home Cookbook)
 
Serves: 4
ProPoints per serve: 14
 
1 tablespoon olive oil
1 brown onion, finely chopped
500 grams extra lean beef mince
35 grams packet taco seasoning mix
2 tablespoons tomato paste
3/4 cup water
100 grams sweet potato (kumara), grated
2 medium carrots, grated
1 medium zucchini, grated
400 gram can red kidney beans, rinsed and drained
4 white corn tortillas
cooking spray
1 avocado, chopped
1 tomato, cjopped
2 green shallots, thinly sliced
2 tablespoons coarsely chopped fresh coriander leaves
80 grams 50% fat reduced grated tasty cheese

Preheat oven to 200 degrees Celsius.

Heat oil in a large non-stick frying pan over medium-high heat.  Add onion and cook, stirring , for 5 minutes or until softened.  Add beef and cook, breaking up any lumps, for 3 - 5 minutes, or until browned.

Stir in taco mix, tomato paste and water and bring to the boil.  Add sweet potato, carrot, zucchini and beans.  Reduce heat and simmer, covered, for 10 minutes or until vegetables are tender.

Meanwhile cut each tortilla into 8 wedges.  Lightly spray a large prepared baking tray with cooking spray.  Arrange tortilla wedges on tray in a single layer and spray with a light mist of cooking spray.  Bake for 6 - 8 minutes, turning once, or until golden and crisp.  Cool.

Combine avocado, tomato, shallots and coriander in a small bowl.  Set guacamole aside.

Spoon beef mixture into shallow heatproof serving bowls.  Sprinkle with cheese and bake for 5 minutes or until cheese has melted.

Arrange tortilla chips around beef and top with guacamole.


(Click here for a printable version of this recipe)

Tandoori Chicken, Roasted Vegetables & Cucumber Sambal

Having a strong love of Indian food in this household means that cooking a curry or a tandoor dish will always be eaten with no hesitation what so ever.  We love tandoori, often having Tandoori Lamb Cutlets, so I knew this dish would be a winner before I even started cooking.

I have cooked another version of Tandoori Chicken before, this recipe is only a little different but served with roasted vegetables, a fragrant Cucumber Sambal, naan bread and of course, Mint Raita it is a complete meal and one well worth the effort.


Tandoori Chicken, Roasted Vegetables & Cucumber Sambal
(Recipe sourced from WW Take Away At Home Cookbook)

Serves: 4
ProPoints per serve: 9

2 tablespoons tandoori paste
200 gram tub reduced fat natural yoghurt
4 x 100 gram chicken thigh fillets, fat trimmed
4 x 70 gram chicken drumsticks, skin removed
1/2 teaspoon fennel seeds, crushed
4 roma tomatoes, quartered
3 zucchini, chopped
cooking spray
salt
freshly ground black pepper
2 x 70 gram pieces naan bread
2 Lebanese cucumbers, finely chopped
1/3 cup coarsely chopped fresh coriander leaves
1/4 cup coarsely chopped fresh mint leaves

Preheat oven to 200 degrees Celsius.

Line 2 baking trays with baking paper.

Combine curry paste and 1/4 cup yoghurt in a large glass or ceramic dish.  Add chicken and turn to coat.  Place chicken in a single layer on 1 of the prepared trays.  Sprinkle chicken with fennel and bake for 40 - 45 minutes ir until browned and cooked through. 

Meanwhile, place tomatoes and zucchini on remaining prepared tray.  Lightly spray with oil and season with salt and freshly ground black pepper.  Bake with chicken for 40 - 45 minutes or until golden and tender.

Warm naan bread as per packet instructions.

Combine cucumber and coriander in a small serving bowl.

Combine mint and remaining yoghurt in another serving bowl.

Serve tandoori chicken with roasted vegetables, naan, cucumber sambal and mint raita.


(Click here for a printable version of this recipe)


Saturday, November 3, 2012

Quick Sausage Casserole

As a working mam I know that it's often very hard to have a tasty and interesting meal on the table mid week especially is less than an hour.... it's often a dream.

This Quick Sausage Casserole fits the bill... quick, tasty and interesting.  A few different ingredients make this sausage casserole stand out and be noticed.  Not to mention the fact that it was delicious and served with Mint and Green Pea Mash it was enjoyed by one and all.

 
Quick Sausage Casserole
(Recipe sourced from WW Cook Hearty Cookbook)
 
Serves: 4
ProPoints per serve: 7
 
2 teaspoons olive oil
1 medium red onion, chopped
1 large red capsicum, cut into 2.5cm pieces
200 grams buttom mushrooms, sliced
2 garlic cloves, crushed
400 gram can diced tomatoes
500 gram extra lean pork sausages
2 teaspoons fresh thyme leaves
1 fresh bay leaf
salt
freshly ground black pepper
400 gram can chickpease, rinsed and drained

Heat oil in a large saucepan over medium-hgh heat.  Add onion and capsicu, and cook, stirring, for 5 minutes or until softened. Add mushrooms and garlic and cook, stirring, for 3 - 4 minutes or unti softened.  Add tomatoes and bring to the boil.  Reduce heat to low and simmer, uncovered, for 5 minutes.

Meanwhile, lightly spray a medium non-stick frying pan and heat over a medium heat.  Cook sausages, turning, for 5 minutes or until browned.  Remove from pan and cut each sausage into 3 thick slices.

Add sausages to tomato mixture with thyme and bay leaf.  Season with salt and freshly ground black pepper.  Simmer, covered for 20 minutes or until sauce thickens.  For a thicker sauce take off the lid after 10 minutes of cooking.  Add chickpeas and cook for 2 minutes or until heated through.  Serve.


(Click here for a printable version of this recipe)

Mint and Green Pea Mash

Smooth and creamy mashed potato is a staple side dish in our house as it accompanies anything but having the Quick Sausage Casserole for dinner I decided to take up the suggestion in the cookbook and try a different variation of the trusty mashed potato.

Tasty and colourful this mash sure packed a punch with a creamy minty flavour.  And it was just as easy as normal mash to make.


Mint and Green Pea Mash
(recipe sourced from WW Cook Hearty Cookbook)
 
Serves: 4
ProPoints per serve: 3
 
500 grams desiree potatoes, peeled and chopped
2 cups frozen peas
1/3 cup warm skim milk
1/3 cup shredded fresh mint leaves
salt
freshly ground black pepper
extra mint leaves to garnish
 
 
Boil, steam or microwave potatoes and peas seperately until tender.  Drain.
 
Place together in a large bowl and mash until almost smooth.
 
Add skim milk and shredded mint leaves.  Season with salt and freshly ground black pepper.  Stir to combine.
 
Served topped with extra mint leaves.
 

Salami and Tomato Pizza

Once again I offer up apologies - due to my ever increasing work load lately with some travel required I have become complacent with sharing our culinary adventures with you all.  It's not because I didn't want to as I have missed my blogging and am truly saddened by not being able to partake in my hobby but as per usual that doesn't mean that we haven't been cooking - of course we have!  So now it's going to be catch up time with some meals we have enjoyed recently.

This was a simple pizza.  A tomato and garlic base with low fat hot salami (but you can use mild if you prefer), cherry tomatoes and a few other vegetables.... voila - mouthfuls of flavour that were not only very fresh but also very tasty.  Better than a take away pizza that's for sure.....


Salami and Tomato Pizza

Serves: 2
ProPoints per Serve: 11
 
cooking spray
1 large wholemeal pita bread (100g)
2 tablespoon tomato paste
1 teaspoon crushed garlic
1 teaspoon dried oregano
50 grams Don 50% less fat Hot or Mild Salami, halved
100 grams button mushrooms, sliced
1/2 brown onion, sliced
1/2 green capsicum, sliced
150 grams cherry tomatoes, halved
8 baby bocconcini balls, halved
8 black pitted olives, halved lengthwise

Preheat oven to 200 degrees Celsius.

Spray a pizza tray with cooking spray and place pita bread on the tray.

In a small bowl mix together the tomato paste, garlic and oregano.  Spread over pizza base (pita bread).

Layer with toppings - the salami, mushrooms, onions, capsicum, tomatoes, bocconcini and olives.

Place in oven and cook for 15 - 20 minutes or until cooked through and cheese has melted.

(Click here for a printable version of this recipe)

Thursday, September 13, 2012

Butter Chicken and Vegetables

Butter chicken is a favourite indian dish - all of us like it.  But it is always so rich and heavy not to mention fattening.  Needless to say I don't cook it that often but am always on the lookout for a healthier version so loved the fact that the new Weight Watchers cookbook, Take Away At Home, had this recipe.

This version was delish - a smooth, creamy and delicately balanced sauce coupled with the sweetness of the sweet potato and the crunch of the green beans.  Having the vegetables made it very filling I didn't even feel the need to have rice with my serve.

A different butter chicken but it was enjoyed and would recommend that you give it a go.


Butter Chicken and Vegetables
(recipe sourced from Weight Watchers Take Away At Home Cookbook)
 
Serves: 4
ProPoints per Serve: 10
 
1/3 cup (50 grams) raw unsalted cashews
2 teaspoons sunflower or canola oil
600 grams lean chicken breast fillets, fat trimmed, cut into 3 cms pieces
1 brown onion, thinly sliced
2 tablespoons tandoori paste
1 tablespoons finely grated fresh ginger
700 grams tomatoes, chopped
1/2 cup chicken stock
400 grams sweet potato (kumara), thinly sliced
400 gram can chickpeas, rinsed, drained
100 grams green beans, cut into 3cm lengths
1/3 cup low fat natural yoghurt

Place cashews in a food processor.  Process until finely ground.

Heat half the oil in a large saucepan over medium-high heat.  Cook chicken, in batches, for 3 - 5 minutes or until browned.  Transfer to a plate.

Heat remaining oil in pan.  Add onion and cook, stirring, for 5 minutes or until softened.  Add tandoori paste and ginger and with tomatoes, stock, sweet potato and ground cashews and bring to the boil.  Reduce heat and simmer, covered, for 20 - 25 minutes or until sweet potato is tender.  Add chickpeas and beans for the last 10 minutes of cooking.

Stir yoghurt into butter chicken.  Serve.

Serve with steamed rice - add 3 propoints value per serve for 1/2 cup steamed rice.


(click here for a printable version of this recipe)

Monday, September 10, 2012

Lamb and Vegetable Hot Pot with Herb Dumplings

Following an enjoyable Roast Lamb dinner on Sunday evening there is always the big question of what to do with the left over lamb.  I am not a lover of having roast two nights in a row.  Call me fussy but it never tastes the same the second night in my opinion.  It normally gets turned into a hearty Lamb Stew but this time I was determined to do something different.

I had been spying this recipe for awhile now but had steered clear as I know Noel is not a lover of dumplings from the last time I cooked them many many years ago - I haven't been game to broach the topic of dumplings again.

I left the recipe on the bench overnight and told the family this was my plan.  They all agreed to give it a go dumplings or no dumplings!

I was running late from work tonight and to my surprise my wonderful husband took the challenge of not only cooking the recipe but adapting it to suit cooked meat instead of the raw meat as called for.

This dish was amazing..... and I must add cooked to perfection.


Lamb and Vegetable Hot Pot with Herb Dumplings
(recipe adapted from Weight Watchers Cook Hearty Cookbook)

Serves: 4
ProPoints per Serve: 13

1 tablespoon olive oil
700 grams lean lamb leg steaks or cooked roast lamb, cut into 3cm pieces
1 brown onion, diced
2 carrots, chopped
200 grams button mushrooms, halved
1 tablesppon finely chopped fresh thyme leaves
1 tablespoon plaing flour
1 tablespoon Worcestershire sauce
2 cups chicken stock
1 cup self raising flour
50 grams Weight Watchers Canola Spread
1 egg, lightly beaten
2 tablespoons chopped fresh flat leaf parsley leaves
1 tablespoons finely chopped fresh rosemary
1/3 cup skim milk

Preheat oven to 180 degrees Celsius.

Heat oil in a 2 litre capacity shallow flameproof casserole dish over high heat.  Cook lamb, in batched, turning, for 2 - 3 minutes or until browned.  If using cooked meat just fry in oil for 1 - 2 minutes.

Add onion, carrot, mushrooms and thyme to dish and cook stirring for 5 - 7 minutes or until vegetables are softened.  Add plain flour and stir to coar.  Combine Worcestershire sauce and stock in a jub.  Gradually add stock mixture to vegetable mixture in dish, stirring until combined.  Cover and bring to the boil.  Transfer dish to oven and bake for 1 hour and 10 minutes.

Meanwhile, place self raising flour and spread in a large bowl.  Using fingertips, rub spread into flour until mixture resembles breadcrumbs.  Stir in egg, parsley, rosemary and enough of the milk to make a soft, sticky dough.  Add a little more milk if needed.

Remove dish from oven.  Increase oven temperature to 220 degrees Celsius.  Drop heaped teaspoons of dough, about 3 cms apart, on top of the hot pot and lightly spray with oil.  Bake, uncovered, for 15 - 20 minutes or until dumplings are lightly browned and cooked through.  Serve.


(click here for a printable version of this recipe)

Sunday, September 9, 2012

Bacon Mushroom and Tomato Medley

As with every year by the time the football season is over we are over egg and bacon for breakfast on a Sunday.  Today is the first Sunday since April we have our Sunday's back.  Don't get me wrong we love junior football but it takes the whole day with games, helping out and presentations on a Sunday evening.  It's for a good cause though - the kids.

This morning I decided to use a punnet of mixed tomatoes along with some mushrooms and bacon to create a lighter yet filling brunch.  Such a mixture of vegetables, some herbs, a little bacon all served on a toasted slice of Pane di Case - YUM!!

To be perfectly honest this would make a lovely pasta topping or as a side dish with a meat.


Bacon Mushroom and Tomato Medley
 
Serves: 4
ProPoints per serve: 1
 
cooking spray
1 red onion, diced
125 gram packet Weight Watchers Bacon, thickly sliced
200 grams buttom mushrooms, quartered
1/2 bunch fresh thyme sprigs, leaves removed
400 gram punnet Mixed Baby Tomatoes
freshly ground black pepper
fresh basil leaves to serve

Heat a large frying pan over high heat, spray with cooking spray.  Add onion and bacon cook, stirring, for 2 - 3 minutes or until onion has softened.  Add mushrooms, stirring, for a further 5 minutes.

Add thyme and tomatoes, season with freshly ground black pepper to taste.  Reduce heat to low, cover and simmer for a further 5 - 8 minutes or until tomatoes have softened.

Serve sprinkled with fresh basil.


(Click here for a printable version of this recipe)

Saturday, September 8, 2012

Sticky Pork

There are so many version of this Thai favourite.  We recently cooked this version of Slow Cooked Sticky Pork which was delish. I have purchased a new cook book so I am trying out another recipe.  The new cookbook is Takeaway At Home available from Weight Watchers.

This is not the meal that I had menu planned for tonight but as I couldn't find any Gummy Shark that meal will have to wait for another night. I wanted something quick, simple but jam packed with flavour.  Not to mentiom dished up in lettuce leaves finger dinner never tasted so good.

While the meal itself was nice both Noel and I found it very sweet not having all the usual qualities of a Thai dish.  The acutal sweetness overpowered the chilli component and the lime flavour.  We will cook again as it was pleasing to eat but add some kaffir lime leaves and fresh red chilli to the mix.


Sticky Pork
(recipe sourced from WW Takeaway At Home Cook Book)
 
Serves: 4
ProPoints per Serve: 8
 
2 teaspoons sesame oil
4 green shallots, thinly sliced
1 green capsicum, finely chopped
500 grams lean pork mince
1/4 cup lime juice
227 gram can sliced water chestnuts, drained, finely chopped
1/3 cup sweet chilli sauce
2 tablespoons soy sauce
1 tablespoon hoisin sauce
2 small carrots, grated
1 celery stick, finely sliced
280 grams baby cos lettuce leaves

Heat a wok over high heat.  Add oil and heat for 5 seconds.  Add shallots and capsicum and stir fry for 2 - 3 minutes or until sofetened.  Add pork and stir fry, breaking up any lumps, for 5 minutes or until browned.

Add juice, water chestnuts and sweet chilli, soy and hoisin sauces and stir fry for 2 minutes or until heated through.  Stir in carrot and celery.  Spoon pork mixture into lettuce leaves. Serve.

Serve with: Brown Rice: Add 3 ProPoints values per serve for 1/2 cup steamed rice.


(Click here for a printable version of this recipe)

Wednesday, September 5, 2012

Creamy Chicken Casserole

Dinner tonight - courtesy of my hubby Noel cooking it while I was working late.  The house has a yummy aroma the moment I opened the front door.

This dish was really yummy - a nice thick sauce full of vegetables and tender chicken who could ask for more?  Me - I could have eaten seconds and thirds.

The flavour was impressive - the meatiness of the chicken, the vegetables and the tarragon all in every mouthful brought back memories of food my mother used to cook.... mmmmm!

Served with crunchy bread this was a perfect mid week dinner that was enjoyed by all.


Creamy Chicken Casserole
(recipe sourced from WW Food You'll Love Cookbook)
 
Serves: 4
ProPoints per Serve: 9
 
1 tablespoon olive oil
2 tablespoons plain flour
2 teaspoons mustard powder
500 grams lean chicken thigh fillets, fat trimmed, thickly sliced
1 leek, thinly sliced
125 grams Weight Watchers Bacon, thinly sliced
2 garlic cloves, crushed
3 carrots, thickly sliced
600 grams potatoes, cut into 2 cm pieces
1 tablespoon finely chopped fresh tarragon leaves
3 cups chicken stock
2 tablespoons reduced fat thickened cream
2 cups baby spinach leaves

Heat half the oil in a laege heavy-based saucepan over medium heat.  Combine flour and mustard powder in a small bowl.  Add chicken to the flour mixture and toss to coat, shaking off the ecess.  Cook chicken, in batches, turning, for 5 minutes or until browned.  Transfer to a plate.

Heat remaining oil in the same pan.  Add leek and bacon and cook, stirring, for 5 minutes or until leek has softened.  Add garlic and cook, stirring for 1 minute or until fragrant.

Return chicken to the pan with carrot, potato, tarragon and stock and bring to the boil.  Reduce heat and simmer, uncovered, for 45 - 50 minutes or until vegetables are tender and chicken is cooked through. 

Add cream and spinach and cook, stirring, for 2 minutes or until spinach is just wilted.  Serve.


(Click here for a printable version of this recipe)

Tuesday, September 4, 2012

BBQ Glazed Beef and Pork Mini Meatloaves

Being back into routine and in my kitchen, which I love, I had menu planned good ol' Meatloaf for dinner. I got home from work excited to cook my easy quick meatloaf for dinner only to hear "meatloaf is fine with me but child who I won't name doesn't want it!" from Noel. The other child states that they will eat anything.

So to try something different I jazzed up my usual meatloaf recipe.  I decided to do away with the usual service style of meatloaf slices in rolls with cheese and sauce (a favourite from way back) and decided to make individual mini meatloaves hoping to win over the crowd.  I have recently read many sites/recipes for the individual portions so it was a no-brainer really.

Flavoured with bbq sauce, a hint of sweet chilli and mustard plus jammed packed with hidden grated vegetables these were an easy dinner to prepare and could also be great for lunches and picnics.  Plus they are freezable not that we had any left.


BBQ Glazed Beef and Pork Mini Meatloaves
 
Serves: 6 (2 meatloaves each)
ProPoints per serve: 10
 
1 medium zucchini, grated
500 grams pork mince
500 grams extra lean beef mince
1 small brown onion, finely chopped
2 garlic cloves, crushed
1 medium carrot, peeled, grated
1 1/4 cups fresh breadcrumbs
1/2 cup bbq sauce 
3 tablespoons sweet chilli sauce
3 tablespoons American mustard
salt
freshly ground black pepper

Preheat oven to 180 degrees Celsius.

Grease an 12 hole, 1/2 cup-capacity mini loaf pan or texas muffin pan.

Squeeze excess liquid from zucchini. Combine zucchini, mince, onion, garlic, carrot, breadcrumbs, half the bbq sasuce, sweet chilli sauce and mustard in a bowl. Season with salt and pepper. Press mixture into prepared pan holes.

Place meatloaves in oven and bake for 20 to 25 minutes or until meatloaves are just cooked through. Remove meatloaves from oven.

Carefully transfer meatloaves to a greased baking tray. Using a pastry brush, brush with remaining steak sauce. Bake for 10 minutes or until browned and cooked through.


(Click here for a printable version of this recipe)

Monday, September 3, 2012

Ginger and Teriyaki Beef Stir Fry

 I found myself fancying vegetables tonight so thought a stir fry would hit the right spot. 

This was a very quick and easy dish to prepare, cook and eat.  Love the freshness of the crisp vegetables and I have to admit that teriyaki would also be one of my favourtie sauces to use.  I has a sweetness yet saltiness that I enjoy and it can be used with all meats.

Everyone enjoyed dinner, there was some left over which has beccome lunch for tomorrow so that was a good sign too.


Ginger and Teriyaki Beef Stir Fry
(recipe adapted from WW Eat & Enjoy cookbook)
 
Serve: 4
ProPoints per serve: 10
 
500 grams lean beef strips
1 tablespoon finely grated fresh ginger
3/4 cup teriyaki sauce
200 gram Mr Changs Egg Noodles
cooking spray
1 onion, sliced
2 carrots, cut into matchsticks
2 tablespoons water
1 red capsicum, thinly sliced
1 bunch broccolini, cut into 4 cm lengths
200 grams baby corn, halved
200 grams snow peas, trimmed
3 green shallots, thinly sliced for garnish

Place beef, ginger and 1/4 cup of teriyaki sauce in a bowl.  Turn to coat and allow to stand for 30 minutes.

Cook noodles as per packet instructions, drain and set aside.

Heat wok over high heat, spray with cooking spray.  Stir fry beef in batches for 1 - 2 minutes or until browned.  Transfer to a plate.

Reheat wok over high heat and respray with cooking spray.  Add onion, carrots and water and stir fry for 1 - 2 minutes or until softened.  Add the capsicum and corn and stir fry for a further 2 minutes.  Add broccolini and snow peas.  Stir fry for a further 2 to 3 minutes until vegetables are tender.

Return beef to wok with remaining teriyaki sauce and white parts of shallots.  Stir fry for 2 minutes or until heated through. 

Place noodles on serving tray, top with beef stir fry.  Sprinkle with remaining shallots and serve.


(click here for a printable version of this recipe)

My other good news is that I am now the proud owner of Heston's DVD - How To Cook Like Heston.  I actually won this from a competion which was run by Lorraine over at Not Quite Nigella.


Thank you Lorraine... as usual your blog posts are amazing and for anyone that hasn't been to the Not Quite Nigella website please do - your taste buds will thank you.

Tuesday, August 28, 2012

Dixie Chicken

Yes I have been travelling with work and busy again.... apologies as normal but all is back to normal in the House of Murray for a few weeks at least.  Junior football is nearly finished for the year also so we will have some more free time on the weekends shortly.

This dish is perfect for a mid week wonder as it was very easy to make and for a recipe with very few ingredients the flavour was amazing.  The sauce, even though made from soup, was creamy and enveloped the flavours of the vegetables and the thyme while the chicken remained tender and juicy.


Dixie Chicken
(recipe adapted from Taste.com)
 
Serves: 4
ProPoints per serve: 11
 
750 grams (8) chicken thigh cutlets, skin removed
salt
freshly ground black pepper
1 red capsicum, diced
1 green capsicum, diced
cooking spray
250 gram button mushrooms, sliced
125 grams Weight Watchers bacon, roughly chopped
420 gram can cream of mushroom soup
1/3 cup light thickened cream
2 tablespoons fresh thyme leaves, roughly chopped

Preheat oven to 200 degrees Celsius.

Place chicken into an 8-cup capacity oven proof dish in a single layer. Season with salt and pepper.  Place capsicum on chicken.

Cover a large frying pan with cooking spray and heat over medium heat until sizzling. Add mushrooms and bacon. Cook, stirring, for 3 to 4 minutes or until tender. Add soup and cream. Stir until well combined. Bring to the boil. Remove from heat. Stir in thyme. Pour over chicken.

Bake, uncovered, for 30 minutes or until cooked through.


(Click here for a printable version of this recipe)

Tuesday, August 14, 2012

Chilli Beef and Bean Pasta Bake

WOW we certainly have been busy - so busy I cannot believe that it's been so long between recipes.  We have been cooking but mainly quick and easy recipes that have been blogged before.  I am humbly sorry to our readers and will endeavour to get back to dong something that I enjoy also - sharing recipes with friends.

Tonight's dinner was prepared by Noel so I cannot take credit for it except for putting the dish on the menu planner.  However I can say that if was delicious and very mourish.

We all love Mexican flavours so this dish did not disappoint.  It was interesting to make a Mexican style pasta bake but it the tastes and the textures all worked well together.


Chilli Beef and Bean Pasta Bake
(recipe sourced from Weight Watchers Food You'll Love Cookbook)
 
 
Serve: 6
ProPoints pers Serve: 9

200 grams spiral pasta
1 tablespoon olive oil
1 brown onion, finely chopped
1 red capsicum, chopped
400 grams lean beef mince
2 garlic cloves, crushed
30 gram packet taco spice mix
400 gram can diced tomatoes
2 zucchini, chopped
1/2 cup water
400 grams can red kidney beans, rinsed, drained
310 gram can corn kernels, rinsed, drained
1/2 cup reduced fat grated tasty cheese

Preheat oven to 180 degrees celsius.  Lightly spray a 2 litre capacity ovenproof dish with oil.  Cook pasta in a large saucepan of boiling salted water, following packet instructions, or until just tender. Drain.

Meanwhile, heat oil in a large non-stick frying pan over medium heat.  Add onion and capsicum, cook stirring, for 5 minutes or until softened.  Add mince and cook, breaking up any lumps, for 5 minutes or until browned.  Add garlic and cook, stirring, for 1 minute or until fragrant.

Stir in taco spice mix and cook, stirring, for 1 minute.  Add tomatoes, zucchini and water and bring to the boil.  Reduce heat and simmer, uncovered, for 5 minutes or until zucchini is just tender and mixture has thickened.  Add pasta, beans and corn and mix to combine.

Spoon mixture into prepared dish.  Sprinkle with cheese and bake for 20 minuste or until cheese is golden.  Serve.

Monday, July 23, 2012

Chicken and Prawn Pad Thai

Once again it seems like forever since I have blogged.  Firstly with recent Victorian school holidays (the first 2 weeks of July) we had Mam down to help with the children and she was responsible for some evening meals.  Looking back I didn't cook a great deal during the school holidays.  Mam took the kids away for the weekend to visit my uncle and aunt so Noel and I took advantage of the freedom relaxing on the Friday with a pizza and then going out for dinner on the Saturday evening.

Then last week I travelled with work so needless to say no cooking there either.

So with things getting back to normal at home and me back from my travels it's good to get back into the kitchen.  Tonight we had Chicken and Prawn Pad Thai - a favourite of mine but I have never cooked it at home.  I adapted a simple yet tasty Weight Watchers recipe and it was exotic. 

All loved the flavours of the lime and spice while enjoying the textures of the soft noodles and crisply cooked vegetables.


Chicken and Prawn Pad Thai
(recipe adapted from Weight Watchers Australia)

Serves: 6
ProPoints per serve: 11
250 grams dry rice noodles
500 grams lean chicken breast, cut into 2 cm cubes
1/4 cup fish sauce
1 bunch broccolini, cut into 3cms pieces
2 medium carrots, peeled and finely sliced
1/4 cup fresh lime juice
3 tablespoons water
3 tablespoons soft brown sugar
1 1/2 teaspoon fresh ginger, finely chopped
1 tablespoon peanut oil
250 grams raw king prawns, peeled and tails intact
1 clove fresh garlic, crushed
1 1/2 cups bean sprouts
1/2 cups roasted unsalted peanuts, choppped roughly
1/2 cup fresh coriander, roughly chopped
1/2 cup fresh mint leaves, roughly chopped
2 tablespoons crushed chilli flakes (optional)

Soak noodles in cold water for 1 hour.

Place chicken in a small bowl and cover with 1 tbsp of fish sauce. Set aside.

Steam broccolini and carrot for approximately 5 minutes, or until tender crisp. Immediately immerse in cold water. Drain and set aside.

Meanwhile, in another small bowl, combine remaining 3 tablespoons of fish sauce, 3 tablespoons lime juice, water, sugar and ginger. Mix well to combine then set aside.

Heat 2 teaspoons oil in a wok over high heat. Add chicken and cook, stirring for 5 minutes, or until chicken is cooked through. Remove chicken from wok and set aside. To the same pan quickly cook prawns until pink and remove from heat.

Drain noodles thoroughly.

Heat 2 teaspoons oil in wok over high heat. Add garlic and cook for 30 seconds. Add noodles and fish sauce. Cook stirring for 3 minutes, or until sauce is mostly absorbed. Stir in chicken and half the peanuts and remove from heat. Add remaining lime juice, bean sprouts and half of the coriander and the mint. Toss through broccoli and carrot just before serving.

Place on serving platter and sprinkle with remaining coriander, mint, peanuts and crushed chilled flakes if desired.


(Click here for a printable version of this recipe)

Thursday, July 5, 2012

Spicy Prawns and Vegetables

I wasn't sure what to cook but knew it had to be spicy and yummy definitely using prawns as the main ingredient.  My mam also loves prawns - I would put money on saying that her favourite dish is garlic prawns.

Another favourite family dish is Nice Chicken and having not cooked this either in a while I decided it would be great to have a little play around recreating a prawn dish based on the same flavourings.

This dish has a delightful spicy yet sweet sauce - spicy from the cayenne pepper, salty from the soy and sweetness from the hoisin sauce.  A beautiful combination with the tender prawns.


Spicy Prawns with Vegetables

Serves: 4
ProPoints per serve: 11

1 egg
30 grams cornflour
500 grams peeled and deveined large raw prawns, rinsed
1/4 cup oil for deepfrying
200 grams mushrooms, sliced
1 red capsicum, thinly sliced
4 spring onions, sliced
1 x 225 gram can sliced water chestnuts, drained and rinsed
1 cup hoisin sauce
1/3 cup soy sauce
1 teaspoon cayenne pepper (or to taste)

In a bowl mix egg and cornflour together into a smoot batter. Add prawn to the bowl and mix to combine.

Heat oil in a large wok or frying pan. Cook prawns in batches until almost golden but not fully cooked. Drain on a plate lined with paper towel. Discard oil

Spray wok or frying pan with cooking spray. Add mushrooms and capsicum to the wok and stirfry for 2 minutes. Add water chestnuts and spring onions, stir fry for another 1 - 2 minutes. Return prawns to pan and cook for a further 2 minutes.

Combine the hoisin sauce, soy sauce and cayenne pepper. Add combined sauce to wok and toss for another 2 minutes or until chicken is well coated with sauce.

Serve immediately.


(click here for a printable version of this recipe)

Sunday, July 1, 2012

Smoked Paprika Chicken

A bit of a spice theme happening here lately.. maybe it's what my tastebuds are fancying or maybe it's just by chance.. whichever I know that we are all enjoying the meals.

The house smells good that's for sure.  The aroma of a smokey tomato broth with the obvious hints of fresh garlic were delish.

One of the ingredients is saffron threads. I am very lucky as I was recently given a small plastic container of saffron threads from my in laws who recently travelled overseas.  To me it was a present worth millions I am sure others wouldn't agree.  But to know that I was thought of in a special way while they were overseas in the Spice Market makes me feel very treasured.

This dish was very easy to prepare and bring it all together in the one casserole dish.  The original recipe called for shop brought chargrilled capsicum (not in oil) but I grilled my own.


Smoked Paprika Chicken
(recipe adapted from WW Food You'll Love Cookbook)

Serves: 6
ProPoints per serve: 8

2 teaspoons olive oil
6 chicken chops, skin removed, fat trimmed
6 drum sticks, skin removed, fat trimmed
1/4 teaspoon saffron threads
2 tablespoons hot water
1 red onion, thinly sliced
3 cloves garlic, thinly sliced
2 teaspoons smoked paprika
1/4 cup dry sherry
400 gram can diced tomatoes
1 cup chicken stock
100 grams green Sicilian olives
2 red capsicums
cooking spray
2 teaspoons cornflour
2 tablespoons water
1 tablespoon honey

Preheat oven to 180 degrees Celsius.

Heat half the oil in a large non stick frying pan over high heat.  Cook chicken, in batches, turning for 5 minutes or until browned.  Transfer chicken to a large ovenproof casserole dish.

Place saffron in a small bowl.  Add 2 tablespoons hot water and set aside to soak for 5 minutes.

Meanwhile heat remaining oil in the same pan over medium heat.  Add onion and cook, stirring, for 5 minutes or until softened.  Add garlic and paprika and cook, stirring, for a further 1 minute.  Add saffron liquid and sherry and cook for 2 minutes.  Add tomatoes, stock and olives and bring to the boil.

Pour onion mixture over chicken in the casserole dish,  Bake, covered, in the oven for 1 hour.

Meanwhile cut capsicum into thick strips and place on a foil lined oven tray.  Spray with cooking spray and place under a high grill for 5 minutes until black and blistered.  Remove and place into a sealable plastic bag to sweat for 10 minutes.  Remove outer layer of skin and slice into 2 cm strips.

Blend cornflour with water in a small bowl.  Stir cornflour mixture into casserole with the honey.  Add the capsicum strips.  Bake, uncovered, for 15 minutes or until sauce is slightly thickened.  Stir sauce around chicken.  Serve immediately.

(click here for a printable version of this recipe)