Showing posts with label party food. Show all posts

Wednesday, May 15, 2019

Baked Spicy Chicken Tacos

I have really been wanting Mexican for some time now but didn't want the usual boring beef tacos that are normally a mid week quick fix for dinner.  Then, as normal, I enlisted the help of my friend Google and came up with some fantastic ideas as always.

After deciding I would try baked tacos - the next decision was all about what filling I wanted.  There are so many different flavour combinations out there.  Something that everyone would eat is always the main criteria so chicken was a must.  And of course, being me, I had to add those vegetables in.  In this version I just used onion, corn, capsicum and black beans - I guess any vegetable would work though depending on your preferences.

This meal was so easy and perfect for a mid week dinner.  To make it even easier you could always used a cooked chicken from the supermarket rather than poaching the chicken yourself.  If you can save time cooking dinner during the week - go for it!

Flavours were magic - fixed my Mexican craving that's for sure.  A little spicy as I used my Homemade Taco Seasoning rather than shop brought.  However the additional cumin and garlic gave the flavours a little more depth and the lime juice added a beautiful zing.

I was pleasantly surprised at the crunchiness of the taco shells as I did expect them to sog a little and set the table with knives and forks at the ready.  No need.  This dinner was definitely finger food worthy and I am pleased to say completely all eaten... with lots of compliments from the family.


Baked Spicy Chicken Tacos

Serves: 6 - 8

4 chicken breast fillets
1 teaspoon salt
1 teaspoon ground black pepper
2 onions, diced
1 cup corn kernels
1 x 400 gram can Black Beans, rinsed and drained
1 red capsicum, finely diced
2 limes, juiced
2 teaspoons taco seasoning (or as desired)
1 teaspoon ground cumin
1/2 teaspoon garlic powder
20 Stand and Stuff (flat bottomed) taco shells
2 cups grated  cheddar cheese
1½ cups shredded iceberg lettuce
2 tomatoes, diced
2 tablespoons chopped coriander
taco sauce or preferred sauce, for garnish

Trim fat off the chicken fillets and cut into 3 pieces.

Bring a medium saucepan of water to boil and add the chicken, salt and pepper.  Stir to ensure that the fillets do not stick together.  

Bring the water to the boil again and reduce heat to medium-low.  Allow chicken to simmer for 20 minutes. After 10 minutes add the onions.  Drain and set aside allowing to the chicken to cool.

In a large bowl mix together the corn, black beans, capsicum, lime juice, taco seasoning, cumin and garlic powder.

When chicken has cooled, shred using 2 forks or your preferred method.

Add chicken and onions to the bowl of vegetables.  Stir to combine well.

Preheat the oven to 200 degrees Celsius. 

Arrange the taco shells inside 2 large baking dishes (not too loosely or they will fall over).

Sprinkle a little cheese into the bottom of each taco shell.

Divide the chicken mixture among the taco shells and top with the remaining cheese.

Bake for 10 - 15 minutes or until tacos are warmed through and cheese is golden and melted.

Serve accompanied with lettuce, tomato and coriander.  Top with taco sauce if desired.


(Click here for a printable version of this recipe)


Monday, May 1, 2017

Sticky Asian Chicken Wings

Well it's definitely been a long time between posts for me and to be honest I have so many recipes backed up it's kind of embarrassing.  We at the House of Murray have been ridiculously busy with life in it's entirety.... work, school, junior and senior football, etc., that by the time we sit down we fall asleep.  Oh well, I guess a busy life is still so much better than no life, correct?

I have been eyeing off carious recipes for sometime as we have been experimenting quite a bit with Chicken Wings over the last few months with one of our favourite recipes being Heston's Barbecue Chicken Wings and of course, the recipe that started our wing obsession off Buffalo Wings with Blue Cheese Dressing.

This recipe not only lives up to it's name with the stickiness of the sauce but the wings are also mega crunchy.   Baked in the oven makes them a win win in the fat stakes also but they could easily be deep fried if preferred.  I liked the fact that the wings are quickly tossed in the sauce just before serving and that the wings were not cooked in the sauce as then they would not have that crispy crunch.  The sprinkle of crushed peanuts and spring onions over the top added to the texture and the flavour which only made the dish even yummier.

We were lucky enough to buy nice sized wingettes (no wing tip or drumstick) but you could use the full chicken wing if you prefer - that's totally up to you and wouldn't change this recipe at all.


Sticky Asian Chicken Wings

Serves: 6
SmartPoints per serve: ?

2 kilograms chicken wingettes
1/4 cup plain flour
1 teaspoon salt
1 teaspoon ground pepper
cooking spray
2 teaspoons crushed garlic
2 teaspoons crushed ginger
1 tablespoon chilli sauce (such as Maggi)
2 tablespoons tomato sauce
4 tablespoons honey
3 tablespoons soy sauce
2 teaspoons chopped roasted peanut
2 spring onions, sliced

Preheat oven to 180 degrees Celsius.

Rinse and pat dry chicken wings with paper towel.

In a large snap lock bag combine flour, salt and pepper.  Add chicken, seal and toss until chicken is covered with the flour mixture.

Line an oven tray with non-stick baking paper.  Spray with cooking spray.  Line the chicken wings on the tray in a single layer and spray with cooking spray.  Cook in oven for 20 minutes, turn over and increase oven heat to 220 degrees Celsius.  Continue to cook for a further 20 minutes or until crispy.

In a small sauce pan, combine the garlic, ginger, chilli sauce, tomato sauce, honey, and soy sauce together. Simmer on lower heat until thickened and slightly sticky.

Toss the chicken wings and coat well with the sauce.

Transfer the chicken wings onto a serving platter, top with peanut and spring onions.

Serve immediately.


(Click here for a printable version of this recipe)

Tuesday, September 2, 2014

Sweet and Sour Jalapeno Poppers

I know I have mentioned this before but I, we, both of us LOVE Poppers.

This recipe from Taste of Home not only intrigued me but definitely intrigued my tastebuds from the first mouthful.  Sweetness of the brown sugar, saltiness of the proscuitto and the tingle from the chilli combined make for a delicious mouthful.

The best things about Poppers is that they are not only easy to make, they are quick and perfect for entertaining or even just a quick snack. 


Sweet and Sour Jalapeno Poppers
(Recipe adapted from Taste of Home)

Makes : 16
ProPoints per Popper: 1

8 Jalapeno peppers
125 grams Philadelphia Extra Light Cream Cheese
60 grams grated tasty cheese
1 teaspoon dried thyme
freshly grated black pepper
8 thin slices (100 grams) prosciutto or parma ham, cut in half lengthways
¼ cup firmly packed brown sugar
½ teaspoon chilli powder

Preheat oven to 180 degrees Celsius.

Line a baking tray with baking paper.

Cut jalapenos in half lengthwise and remove seeds, set aside.

In a small bowl beat cheeses, thyme and pepper until well blended. Spoon into pepper halves. Wrap a half strip of prosciutto around each pepper half.

Combine brown sugar and chilli; coat peppers with sugar mixture.

Place on prepared baking tray. Bake for 18-20 minutes, or until cheese is melted and prosciutto crispy.

Serve immediately.


Friday, August 28, 2009

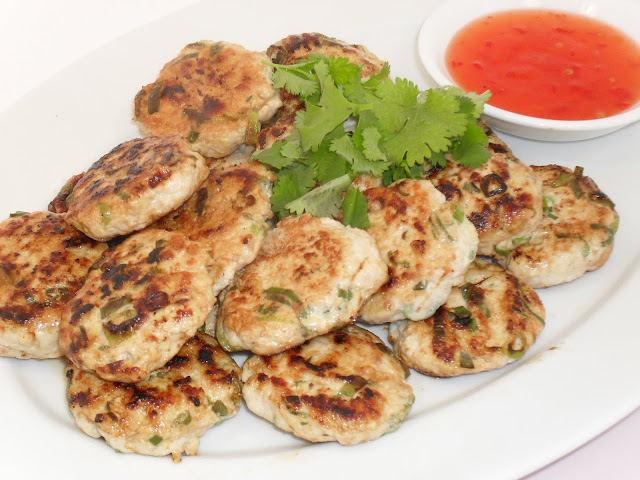
Chicken and Ginger Patties

Tonight the kids had asked for "party food" (some dim sims, nuggets, etc) as they wanted to watch a movie, after all it was a Friday night....
.
However I wasn't excited about the thought of dinner being frozen from boxes and as I had some chicken mince that needed using but for some reason all I could think of was "fish cakes" - go figure? Anyway so basing my thoughts on the idea of fish cakes I replaced the fish with the chicken mince and went from there. These patties turned out to be very quick and easy to prepare.
>
I love the flavour combination of chicken, ginger and spring onion. It is quite a refreshing and unique taste. You could even add some chillies to this if you like.

They must have been okay as there was none left... I think I managed to get 2 or 3 of them.


Chicken and Ginger Patties

Serves: 20
Points per serve: 1/2

500 grams chicken mince
4 spring onions finely sliced
1 tablespoon grated ginger
salt
freshly ground black pepper
1 teaspoon sugar
1 tablespoon soy sauce

In a large bowl mix chicken, onions, ginger, salt, pepper, sugar and soy sauce together until well combined.

With wet hands shape spoonfuls of mixture into small patties. Place on an oven tray that has been sprayed with cooking spray. Once all patties have been made spray with cooking spray again. Refrigerate for 30 minutes.

Heat a large non stick fry pan over a medium-high heat and coat with cooking spray. Working in batches cook the patties for 2 - 3 minutes each side or until browned and cooked through. Drain on paper towel and keep warm. Repeat until all patties are cooked.

Tip: Freeze patties prior to cooking.

(click here for a printable version of this recipe)

Wednesday, August 5, 2009

Honey Dipped Crunchy Chicken Nuggets

I have to say my kids LOVE these nuggets.... they are so much better than shop bought nuggets for sure.

For the extra crunchiness this recipe calls for using Cornflake crumbs, which can be bought in the supermarket or you can crush some Cornflakes using your blender. Normally breadcrumbs can be used but they are not as crunchy.

Quite easy to prepare, which is always a good thing, knowing that they are homemade and full of good ingredients makes the little effort required well worth it.

Honey Dipped Crunchy Chicken Nuggets
(recipe adapted from WW Secrets of Success)

Serves: 10
Points per serve: 3

cooking spray
1 tablespoon honey
1 eggwhite, lightly beaten
1 kg chicken fillets
1 cup Cornflake crumbs

Preheat oven to 200 deg C.

Line a baking tray with foil and spray lightly with cooking spray.

In a large bowl mix together the egg white and honey. Add chicken pieces and toss in the mixture. Place in a colander over a sink or bowl and allow excess to drain.

Place cornflake crumbs in a bowl. Roll chicken pieces in crumbs, one at a time ensuring they are fully coated and place on baking tray.

Lightly spray with oil and bake in the oven for 8 - 10 minutes or until cooked.

Serve with Honey Mustard Mayonnaise.

(click here for a printable version of this recipe)

Tuesday, July 28, 2009

Noels Homemade Sausage Rolls

Another dish we don't cook a lot of due to the fact that they are very morish, unresistable and overall just too yummy is homemade sausage rolls. Shop bought sausage rolls have nothing on these little gems - especially as Noel did all the hard work not me!!

The best thing about making sausage rolls from scratch is that you get to invent the flavour.... and with any invention the potential is endless.

Perfect for either a party or a snack - they never fail to please.


Noel's Homemade Sausage Rolls


Makes approx 64 rolls
Points per serve - danger beware

500g pork mince
500g sausage mince
1 onion, finely chopped
1 zucchini, grated
1 1/2 cups finely grated parmensan cheese
1 tablespoons minced garlic
2 tablespoons mango chutney
6 tablespoons tomato paste
4 tablespoons barbecue sauce
salt
freshly ground black pepper
1 tablespoon dried sage
1 tablespoon dried thyme
2 tablespoons dried parsley
1 tablespoon dried basil
2 1/2 cups breadcrumbs
2 eggs, beaten
8 sheets premade puff pastry, frozen 24cm x 24cm square


Preheat oven to 180 deg C.

In a large bowl mix all the ingredients besides the egg and pastry, ensuring it is thoroughly mixed together.

Defrost pastry sheets and cut in half.

Roll mince mixture into a sausage formed roll long enough to fit the pastry. Wet hands to stop mince mixture from sticking during this process. Place mince mixture on the pastry, brush with egg and roll to enclose. Cut into 4 pieces (or more if desired). Repeat with remainder of mixture.

Place on a lined oven tray and brush with remainding egg. Cook for 40 - 50 minutes or until cooked through.

Monday, July 27, 2009

Corn Dogs

Whilst I know that I should not have even contemplated cooking these, let alone actually proceeding to cook them, I have to confess the idea of doing so has been in my mind for several months. Ever since I saw them premade and frozen in a shop not far from home. In between then and now I also noticed that another foodie blogger, Carmen at Chubba Girl, posted her take on Corny Dogs which also gave me the nudge to make them!!

To be honest these are something that I have treated myself to if I am at the Melbourne Show, Luna Park or market. Just as I thought they were quite easy to assemble and cook but although nice not the same as buying or eating them in a carnival atmosphere!

Although, like me, the kids liked them these are not a regular item on our menu I have to mention and nor will they be, especially considering we are trying to lose weight.... hahaha


Corn Dogs

Serves: 8

1 cup milk
2 medium eggs 1/4 cup oil
2 tablespoons sugar
1 teaspoon salt
2 teaspoons baking powder
1 1/3 cups polenta or corn meal
2/3 cup plain flour
8 skinless hot dogs
flour for dusting
oil for frying
8 wooden skewers
In a large bowl combine the milk, eggs, oil, sugar and salt. Mix it very well. Sprinkle in the baking powder, corn meal and flour. Stir it all up to make a slightly thick batter.

Dust the hot dogs with flour, coating them completely. Thread the hot dogs on the skewers as straight as possible.

Meanwhile heat oil until very hot (a bread cube should sizzle when added).

Coat hot dogs by swirling them in the bowl of batter until they are coated, hold for 30 seconds or so over the batter allowing for any excess batter to drip off. Carefully place into the hot oil. Turn the corn dogs when the bottom side is well browned. Using tongs carefully remove the cooked corn dogs from the oil and allow them to drain on paper towels. Repeat the process, coating and frying a few at a time, until all of the corn dogs are cooked.

(click here for a printable version of this recipe)