Showing posts with label ww 12 propoints. Show all posts

Monday, June 1, 2015

Baked Chicken Chimichangas

Don't panic we have been cooking and eating... in fact eating too much - especially quick, easy, tried and proven recipes due to the hectic lifestyle we are currently living. It's footy season again in Australia, and this is our last year involved with Junior Football, Both kids are playing their last junior year. Oliver is in Under 17's and will be a senior next year and Alexandria, well as she's 14, after this year she can no longer play football with the boys. If she wishes to continue her football career she will need to join the girls league.

But YAY I have finally sat down and managed a blog.... I am in my element - doing something I love about something I love!!  FOOD!!

This meal is tasty but yet so easy to make. Realistically it will be on your table within 30 minutes. Using precooked barbecue chicken and only a couple of other ingredients including one of my favourite things, cream cheese laced with our homemade Taco Seasoning these Chimichangas brought a welcome change to the usual common Mexican dishes we have at home.  Of course you can use shop purchased Taco Seasoning but why when it's so easy to make and has a lot more flavour?  Just saying....

Anyway I think your family will love you for it. Ours did.


Baked Chicken Chimichangas
(Recipe adapted from Weight Watchers Quick 6 Ingredients Cookbook)

Serves: 4
ProPoints per Serve: 12

1/2 cup (120 grams) light cream cheese
3 teaspoons Taco Seasoning
400 grams shredded skinless barbecue chicken breast
3 green shallots, thinly sliced
1 red capsicum, finely chopped
8 x 40 gram Mission Lite (98% Reduced Fat)tortillas
cooking spray
2/3 cup chunky tomato salsa


Preheat oven to 200 degrees Celsius.

Line a baking tray with baking paper.

Combine cream cheese and seasoning in a large bowl. Add chicken, capsicum and shallots and stir to combine.

Spoon chicken mixture into centre of each tortilla. Fold in opposite sides and roll to enclose filling.

Place seam side down, on prepared tray. Lightly spray with cooking spray and bake for 10 minutes or until gold and crisp.

Serve Chimichangas with salsa, coleslaw (add 1 ProPoint per serve), warm refried beans (add 2 ProPoints per 100 grams) and low fat sour cream (add 1 ProPoint per tablespoon).


Thursday, April 2, 2015

Perfect Roast Chicken with Lemon, Fresh Herbs and Veg


What a really easy delicious Roast Chicken Dinner this was.  And a mid week treat that's for sure. 
 
Normally our Roast Chicken is very traditional - being a Classic Roast Chicken with Sage and Onion Stuffing but today I thought I needed something also full of flavour but easy to prepare - you know minimal fuss.  Now my good friend, Mr Jamie Oliver, provides a bevvy of these kind of meals so I went straight to his website and never doubting him, he came up with the goods and this recipe was on the screen for all the world to see... oh well me as I was the only one looking at the screen.
 
Perfect Roast Chicken with Lemon, Fresh Herbs and Veg - it was decided!!!  That's how are chicken would be sacrificed tonight - well a few tweaks here and there - but it was sorted.
 
No stuffing this time - no need.  Filling the cavity with fresh herbs and whole lemon gave the chicken the same if not better flavours and aromas of a full herby breadcrumb stuffing plus with a lot less fuss.  The vegetables were perfect - taking on the flavours of the chicken and one dish later - it was all done.  Except for the saucepan to make the gravy of course.
 
The chook we served up tonight was perfectly cooked - juicy, tender with a yummy crispy skin.....


Perfect Roast Chicken with Lemon, Fresh Herbs and Veg
(recipe adapted from jamieoliver.com)
 
Serves: 6
ProPoints per Serve: 12
 
1.6 kg whole chicken
6 medium potatoes, halved
2 medium onions, quartered
4 carrots, large slices
2 bulbs garlic, halved
2 tablespoon olive oil
1 cup water
sea salt
freshly ground black pepper
1 lemon
1 small bunch fresh thyme, rosemary, bay or sage, or a mixture
2 tablespoons Chicken Gravy powder
2 tablespoons cold water

Take your chicken out of the fridge 1 hour before it goes into the oven.   Remove packaging, rinse and drain.  Pat dry with paper towel. 

Preheat your oven to 240 degrees Celsius.

Pile all the vegetables and garlic into the middle of a large roasting dish and drizzle with half of the olive oil.  Pour in 1 cup of water.

Drizzle the chicken with remaining olive oil and season well with salt and pepper, rubbing it all over the bird. Carefully prick the lemon all over, using the tip of a sharp knife or a skewer. Put the lemon inside the chicken's cavity, with the bunch of herbs.

Place the chicken on top of the vegetables in the roasting dish and put it into the preheated oven. Turn the heat down immediately to 200 degrees Celsius.  Cook the chicken for 1 hour and 20 minutes.

Baste the chicken halfway through cooking and if the veg look dry, add some more water to the roasting tray to stop them burning.

Check to ensure chicken is cooked by poking with a skewer through the thickest point - it's cooked if the juices run clear.  take the dish out of the oven and transfer the chicken to a board to rest for 15 minutes or so. Cover it with a layer of tinfoil and a tea towel and put aside.

Transfer pan juices to a small saucepan leaving vegetables in the roasting dish.   Return vegetables to the oven to keep warm and crisp up. 
 
Mix gravy powder with water and stir through pan juices in the saucepan.  Place saucepan over medium heat, bring to the boil and cook until slightly thickened, stirring continuously.  Place in jug or gravy boat.
 
Cut chicken into pieces. Remove vegetables from the oven and place chicken pieces on top of the vegetables.  Serve with the gravy and extra ProPoint free vegetables, if desired.
 

Saturday, February 21, 2015

General Tso's Chicken

Keeping on the Chinese theme, here is another new dish that I had to try.  It's a very popular dish in Chinese restaurants in America, which of course made me very curious.
 
Doing some research (once again thank goodness for Google) this simple chicken dish became more intriguing as it seems that this dish named in honour of a Qing dynasty general from Hunan, General Tso Tsung-tang, or Zuo Zongtang, has no known connection to him.  The food has been associated with his name  even though] the dish is found neither in Changsha, the capital of Hunan, nor in Xiangyin, the home of General Tso.  And even more interestingly - apparently descendants of General Tso who still live in Xiangyin, when interviewed, say that they have never heard of such a dish. 
 
Further reading there are many versions of where this dish originated but I am guessing it was in the early '70s in New York rather than in the 1800s when General Tso lived.  Obviously linking this dish with a famous man adds to the intrigue when ordering meals outside of ones culture!!

This dish itself, was very much like one of our all time favourites, Nice Chicken, although I didn't find it as spicy.  Using the dried chillies added a different texture, and a direct heat upon eating but I would keep the seeds in next time to increase the heat.
 
Anyhow this is our take on the dish that I found on Rasa Malaysia, fast becoming one of my favourite food sites.


General Tso's Chicken
(recipe adapted from Rasa Malaysia)
 
Serves: 6
ProPoints per Serve: 12
 
600 grams skinless chicken breast fillets, cut into bite-sized pieces
2 tablespoon rice wine
1/2 teaspoon salt
6 tablespoons Chinese rice vinegar
5 tablespoons soy sauce
1 tablespoon dark soy sauce
2 teaspoon Hoisin sauce
1/2 cup water
5 tablespoons sugar
3/4 cup cornflour
3/4 cup canola oil
3 tablespoons ginger, finely crushed
2 cloves garlic, finely crushed
8 - 10 dried red chillies, rinsed and deseeded
4 spring onions, cut into 2 cms lengths

In a bowl marinate the chicken with 1 tablespoon of rice wine and salt for 15 minutes.
 
In a jug place rice vinegar, soy sauces, hoisin sauce, water, sugar and 2 tablespoons of cornflour.  Mix well and set aside.

Coat the chicken generously with the remaining cornflour. Add oil, reserving 1 tablespoon, to a wok or frying pan. When oil is hot cook the chicken, in batches, until they turn light brown. Remove from oil and drain on a plate lined with paper towels.

Heat up a wok with 1 1/2 tablespoons oil. Add the minced ginger, garlic, and dried chilies into the wok, stir-fry until the chilies are fragrant. Pour the sauce into the wok. When the sauce boils and thickens, add the chicken, stirring to ensure all is well combined. Add the spring onion and stir 1 - 2 minutes. 
 
Place on a serving platter or dish and serve immediately.
 

Wednesday, January 7, 2015

Jo's Made Up Butter Chicken


After trawlling through many recipes for low fat butter chicken recipes to satisfy a craving I was having and was surprised actually how many there are.  Sadly a lot of them claim to be low fat or healthy but just didn't fit the bill after reading the ingredients list.
 
I eventually settled on making up my own while using all the knowledge I had gathered.  So here is my very non authentic recipe.
 
Most butter chickens call for the chicken to be marinated in the yoghurt and spices before hand but I didn't have time to do this as it was for dinner tonight.

To my surprise a nice flavour - well balanced with a mellow hint of sweetness and a tingle of heat.  I personally would have it a bit hotter by adding more chilli but for a first go I was impressed.  The family thought it was pretty good too.


Butter Chicken
 
Serves: 6
ProPoints per Serve: 12

2 large onions, diced
2 tablespoon Weight Watchers Canola Spread
1 teaspoon turmeric ground
1 teaspoon cardamom ground
1 teaspoon garam masala ground
1 teaspoon coriander ground
1/4 teaspoon cloves ground
1/4 teaspoon cinnamon
1 teaspoon crushed chilli
2 teaspoon crushed ginger
3 teaspoons crushed garlic
1/4 cup cooking cream light
1 cup natural low fat yoghurt
140 gram can tomato paste
2 cans diced tomatoes
1 tablespoon brown sugar
1 teaspoon salt
1 cup water
800 grams chicken thigh fillets, fat trimmed and diced
1 cup raw rice
fresh coriander, to garnish 

In a large saucepon over a low heat melt butter and oil together.  Add onions, cook stirring for 5 - 10 minutes until softened and are translucent. 

Place turmeric, cardamom, garam masala, coriander, cloves and cinnamon in a small bowl and mix. Set aside.

Add the chilli, ginger, and garlic to the onion mixture and stir 1 minute.

Add tomato paste to the onion mixture and cook, stirring, for 5 minutes.
 
Add the combined spices to the onion mixture and cook, stirring, for 1 - 2  minutes or until fragrant.
 
Add the canned tomato, sugar, salt and water, bring to the boil and then reduce to a simmer.  Cook for 10 minutes, stirring occasionally.
 
Ensure the saucepan is over a low heat and add the cream and yoghurt, stirring, ensuring that it's all mixed through.

Add the chicken into the simmering sauce and cook, stirring occasionally, for 20 minutes or until chicken is cooked through.

Mealwhile cook the rice as per packet instructions.
 
Serve with rice and garnished with coriander leaves.
 

Tuesday, December 2, 2014

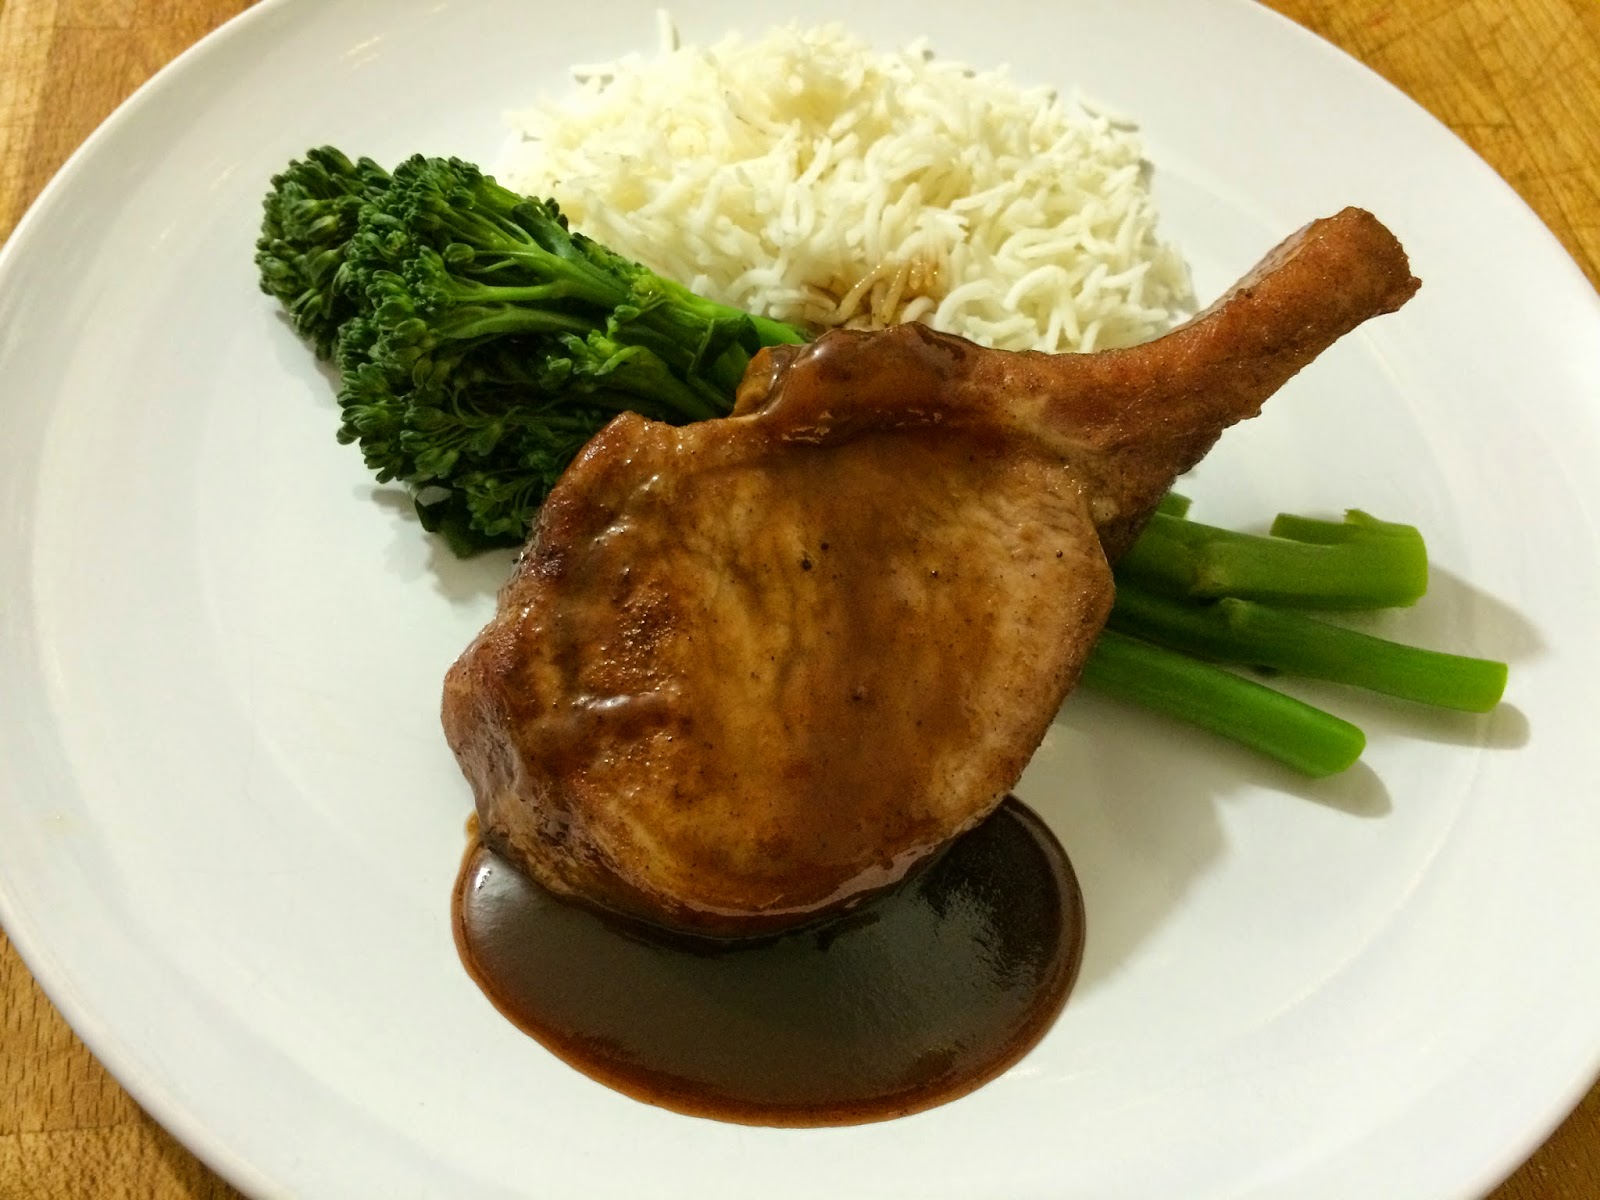
Asian Pork Cutlets

This meal had to be one of the easiest that I have prepared EVER!!  And the outcome was a really tender pork cutlet flavoured with all the spices of the orient.

I have to be perfectly honest that I am not a fan of cooking small pieces of meat in the oven (baking) in fact I don't even cook large peices of meat in the oven as we cook all of our roasts in the Weber.  So this itself was an interesting exercise for me and thankfully with success.

The flavour was full considering the marinating time was very minimal making these Asian Pork Cutlets a perfect midweek wonder.  The kids loved the flavour - somewhat sweet but with the underlying tones of cinnamon, star annise and soy added character to the plum sauce base.

Overall a terrific dish which I am sure will be on the menu again very soon.

 
Asian Pork Cutlets
(Recipe adapted from Weight Watchers 5 Ingredients Cookbook)
 
Serves: 4
ProPoints per serve: 12
 
1/2 cup plum sauce
1/4 cup soy sauce
1 teapsoon chinese five spice powder
4 x 200 gram pork cutlets, fat trimmed
1 bunch broccolini, ends trimmed
1 cup white rice
 
 
Combine the plum sauce, soy sauce and five spice in a shallow glass or ceramic bowl.  Add pork, turning to coat.  Set aside for 30 minutes to marinate.
 
Preheat oven to 180 degrees Celsius.  Line a baking dish with baking paper.  Place cutlets on the baking tray, reserving any marinade.  Bake cutlets for 25 minutes, basting with marinade every 10 minutes.  Cook until pork is cooked through and golden or to your liking.
 
Meanwhile cook rice as per packet instructions. 
 
Place remaining marinade in a small saucepan, bring to the boil and reduce heat, simmering until sauce slightly thickens. 
 
Steam broccolini for 2 minutes or until bright in colour.
 
Place cutlets on serving plates with rice and broccolini.  Drizzle with sauce and serve.


Monday, December 1, 2014

Chicken Leek and Corn Crepes

This dish definitely is at the top of the Comfort Food list - it's creamy, flavoursome and a definitely "can I please have some more?" meal.    In fact this dish has 'Comfort' written all over it. There was not much left of this dish at all (and I had planned to freeze some as I had doubled the recipe). 

While this sounds like a recipe that involves a lot of elements - it would if you cooked them all yourself but making this mid week is easy when you can by already made crepes.  Here in Melbourne you can find them in the freezer section at supermarkets near the pastry).  Defrost them before use and away you go.

The creamy chicken, leek and corn filling is easy to make and with all the ingredients prepared before hand is completed in 20 minutes allowing a little extra time for it to cool. 

Overall, a perfect dish...


Chicken Leek and Corn Crepes
 
Serves: 4
ProPoints per Serve: 12

cooking spray
1 leek, finely sliced
1 teaspoon crushed garlic
400 grams lean chicken breast fillet, fat trimmed, cut into 1 cm pieces
2 tablespoons water
salt
freshly ground black pepper
2 tablespoons Weight Watchers Canola Spread
2 tablespoons plain flour
1/2 cup skim milk
1/2 cup chicken stock
pinch ground nutmeg
2 tablespoons fresh flat leaf parsley, chopped
1 cup frozen corn kernals, thawed
8 French-style frozen crepes, just thawed
1/3 cup finely grated parmesan cheese
 
Preheat oven to 200 degrees Celsius or 180 degrees Celsius fan-forced.  Spray a 28cm x 20cm x 3cm ovenproof dish with cooking spray.
 
Lightly spray a large non-stick frying pan with cooking spray and heat over medium-high heat.  Add leek and garlic and cook, stirring, for 5 minutes or until softened.  Add chicken and cook, stirring, for 5 minutes or until browned.
 
Heat spread in a saucepan over medium heat.  Add flour and cook, stirring, for 1 minute. Combine milk, stock and nutmeg in a jug.  Gradually add milk mixture to the flour mixture and stir until  smooth.  Bring to the boil.  Reduce heat to low and simmer, uncovered, for 2 - 3 minutes or until sauce has thickened.  Stir in chicken mixture, corn and parsley.
 
Reserve 1/2 cup of the chicken mixture.  Lay crepes on a flat work surface.  Divide remaining chicken mixture among crepes and spread evenly along 1 edge.  Roll crepes to enclose filling and place, seam side down, in prepared dish.  Spoon reserved filling along centre of crepes.  Sprinkle with parmesan cheese and bake for 10 minutes or until cheese is melted.
 
Served sprinkled with a 0ppt garden salad if desired. 
 
 
(Click here for a printable version of this recipe)


Thursday, September 25, 2014

Pepper Crusted Lamb Rack with Cream Cheese Mash

 
Today we celebrated 21 years of wedded bliss.... what more of a gift could I give my husband than a beautiful rack of lamb dinner.... the more part that I gave him was that he cooked most of it!!!!  LOL I have to say it was a joint effort cooking tonight.  Cooking together is something that we have always enjoyed doing which is a bonus.
 
Both of us enjoy lamb especially the fillet, rack or cutlets and even more so a lamb roast.  This lamb rack was cooked to perfection and it wasn't very difficult at all.  A quick pan fry and then finished off in the oven for 15 minutes it was not over cooked - just right.  The crust had a flavour sensation that was not over powered by the pepper it was beautifully balanced with thte rosemary and salt. 
 
The mash - what can I say?  I was mash to die for.  Very rustic with a leek and thyme infusion which did nothing but complimented the lamb rack.
 
It was a toss up as to whether the lamb was better than the mash or that the mash was better than the lamb - that's how nice this dish was.
 
Overall this dinner, which would be a magnificient entertainer's meal, was avvery easy to prepare, cook and serve weeknight wonder. 


Pepper Crusted Lamb Rack with Cream Cheese
(Recipe adapted from WW Dinner With Friends Cookbook)
 
Serves: 4
ProPoints per serve: 12
 
650 grams peeled potatoes, chopped
3 teaspoons cracked black pepper
1 tablespoon finely chopped fresh rosemary
1 teaspoon sea salt
4 x 200 gram (4 cutlets in each) french trimmed lamb racks
1 tablespoon oil
2 small leeks, thinly sliced
2 garlic cloves, crushed
2 teaspoons fresh thyme leaves, plus extra sprigs to garnish
60 grams extra light cream cheese
2 tablespoons milk

Preheat oven to 180 degrees Celsius.
 
Boil, steam or microwave potatoes until tender.  Drain, cover and keep warm.
 
Meanwhile combine pepper, rosemary and salt in a small bowl.  Press pepper mixture over lamb racks.  Heat half the oil in a large non stick frying pan over medium-high heat.  Cook the lamb for 2 minutes each side or until browned.  Transfer to a baking tray.  Bake for 15 - 18 minutes for medium or until cooked to your liking.  Remove from oven, cover with foil and set aside to rest for 5 minutes before serving.
 
Heat remaining oil in the same pan over medium heat.  Add the garlic, leek and thyme leaves, stirring, for 5 - 7 minutes or until leek has softened.   Mash potatoe in a bowl with cream cheese and milk until smooth.  Stir in the leek mixture.  Season with salt and pepper.
 
Serve mash with lamb and 0 ProPoint steamed vegetables.


Monday, September 1, 2014

Chicken Parma Meatballs with Pasta

I love it when anyone in my family tag me on food that they have seen posted on Facebook.  I know why they do it as it's like waving a red flag to a bull... it's like "CHALLENGE ACCEPTED".
 
Alex tagged me in a post by 4 Ingredients from one of their non-4 Ingredients books ""4 Play" in the recipe Chicken Parma Meatballs and I am glad she did.  This was such a novel concept - not unlike the meatballs that you get on a Sub at Subway but obviously made with chicken mince.
 
The original recipe is for bite sized balls perfect for entertaining but I wanted to make this into a meal we could have for dinner so what better to go with Parma meatballs than to serve it with pasta.
 
The meatballs were very tender, in fact melt in your mouth tender.  The slight flavour of cheese in each mouthful of meatball was delicate but enticing especially being smothered in a thick tomato sauce and molten cheese.
 
Winner winner chicken dinner I say..............


Chicken Parma Balls
(Recipe adapted from 4 Ingredients - 4 Play Cookbook)
 
Serves: 6
ProPoints per serve: 12

1 kilogram lean chicken mince
4 slices wholegrain bread made into breadcrumbs
1/2 red onion finely chopped
2 tablespoons chopped fresh flat leaf parsley
1 cup grated Parmesan cheese
salt
freshly ground black pepper
700 gram bottle Passata
250 grams spiral pasta or pasta of your choice

Preheat oven to 180°C.

In a large bowl mix the mince, breadcrumbs, onion, parsley and half the cheese. Season with sea salt and cracked pepper. Using your hands shape into 30 balls and place on a lightly greased ceramic baking dish.  Brush each ball with Passata.

Bake in oven uncovered for 10 to 12 minutes.

Meanwhile cook pasta in a large saucepan of boiling water according to packet directions.  Drain and keep warm.

Remove dish from oven and brush meatballs with more sauce and pour remaining Passata around the baking dish.  Scatter with remaining cheese and bake for another 15 minutes or until cheese is melted and golden.

Serve with pasta and 0ppt steamed vegetables.


(Click here for a printable version of this recipe)

Tuesday, February 11, 2014

Slow Cooked Beef with Pasta

Nothing more homely than a rich beef casserole anytime of the year - yes you heard me correctly I don't keep cooking casseroles just for a cold winter's night.  Just like roasts we have them anytime of the year.

This recipe is not only hearty but it's very easy to cook.  The beef was so tender, melt in your mouth in fact, and surrounded by a sauce that reminded me of a Hungarian Goulash.  Deep and rich from the paprika yet not overpowering nor spicy. 

Served on warm Tagliatelle put this recipe towards the top of my comfort food list. (Yes I do have a comfort food list which does not inclued Elvis Presley's Deep Fried Peanut Butter and Banana Sandwiches!)


Slow Cooked Beef with Pasta
(Recipe adapted from WW Cheap and Cheerful Cookbook)

500 grams lean beef chuck steak, cut into 3cm cubes
2 onions, cut into wedges
2 garlic cloves, crushed
2 cups beef stock
1 tablespoon sweet paprika
2 teaspoon plain flour
1 tablespoon brown sugar
2 carrots, peeled and sliced
1 red capsicum, large dice
1 green capsicum, large dice
salt
freshly ground black pepper
250 grams dried tagliatelle

Preheat oven to 180 degrees Celsius.

Heat a large non stick frying pan over medium heat.  Spray beef with oil and cook in batches until browned.  Place in a casserole dish.

Spray onions with oil.  Add to pan and cook over low heat for 3 minutes of until softened.  Add garlic, 1 tablespoon stock, paprika and flour.  Cook, stirring for 1 minute.  Stir in remainng stock and sugar. Bring to the boil, stirring continuously.  Pour over beef.  Cover and bake for 1 1/2 hours.  Add carrots and capsicums.  Season with salt and freshly ground black pepper.  Cook for another 30 minutes.

When beef has nearly finished cooking, cook tagliatelle in a large pan of salted boiling water following packet instructions or until tender.  Drain and place in serving bowls.  Top with beef and serve.


(click here for a printable version of this recipe)

Monday, February 10, 2014

Lemongrass Pork Patties with Noodle Salad

Another Monday night and something quick needed to prepared for dinner.  Story of our lives at the moment - it's only February and we are all starting to get busy.  Doesn't hold much hope for any relaxation for the rest of 2014.

We are coming across many recipes that are surprising us not only for their flavours but for how easy and quick they are to prepare and cook.  This recipe comes from a cookbook Weight Watchers have published called as Easy as 1, 2, 3.   Each recipe has 3 steps that are simple and easy to prepare allowing dinner to be on the table with minimal fuss and quickly which makes these recipes the kind that busy working families look forward to cooking.
 
So this meal, a Vietnamese style dish, packed a powerful punch of flavours in both elements.  The Lemongrass Pork Patties full of lemongrass and ginger were delicate.  The noodle salad, different than one that I had made before, used soft noodles, laced with sweet chilli sauce and lime complimented the patties. 
 
We actually doubled this recipe as it was decided prior to cooking that a few of us would like it for lunch the next day - cannot complain about asking for healthy food for lunch.
 
Another dish that would be ordered at an Asian restaurant that anyone could easily create and enjoy at home.


Lemongrass Pork Patties with Noodle Salad
(recipe adapted from WW Easy as 1, 2, 3 Cookbook)
 
Serves: 4
ProPoints per Serve: 12
 
200 grams dried rice stick noodles
1/3 cup sweet chilli sauce
2 tablespoons lime juice
500 grams pork mince
1 lemongrass stick, pale section only, finely chopped
2 teaspoons finely grated fresh ginger
2 carrots, finely grated
1/2 baby wombok (Chinese cabbage) finely shredded
2 spring onions, finely sliced
1 cup fresh coriander leaves
lime wedges

Prepare noodles following packet instructions or until just tender.  Drain.  Rinse under cold water. Drain.  Transfer to a large bowl.  Combine chilli sauce and juice in a small jug.  Set dressing aside.

Meanwhile combine mince, lemongrass and ginger in a large bowl.  Using clean hands, roll mixture into 12 balls.  Flatten into 8cm patties.  Lightly spray a large non-stick frying pan with oil and heat over high heat.  Cook patties for 3 minutes each side or until browned and cooked through.

Add carrot, wombok, spring onions, coriander and half the dressing on the noodles.  Toss to combine.  Drizzle patties with remaining dressing and serve with salad and lime wedges.


(click here for a printable version of this recipe)

Tuesday, February 4, 2014

Rigatoni Milano

Pasta, pasta, pasta..... it's a favourite in our house especially with Alexandria.  She does get excited if it's on the menu - even more so if it's served with a creamy sauce.    The conversation last night went like this:
 
Alex: What's for dinner tonight mam?
Me: Pasta
Alex: (excited) With a creamy sauce?
Me: No - tomato with cream added
Alex: Cool - do you want help?
Me: That would be nice.
 
This pasta dish was very easy and fit perfectly in with the fact that I was once again busy at work meaning I walked in the front door later than preferred.
 
A very basic recipe the use of sausages as the meat was very nifty and considering we have a mulititude of flavoured sausages here in Australia I can only imagine that this meal would have a very different flavour depending on the sausage that is used.  Saying this we used a reduced fat pork sausage.
 
The sauce was delicate and full flavoured even though cream is mixed through at the end of the cooking process.  The use of passata, a tomato cooking sauce, meant there was more liquid that when I have used tinned diced tomatoes.  No herbs were needed and I feel this was from using the sausages.
 
Overall a yummy dish that was enjoyed by all - I can tell as there wasn't that much left over. 


Rigatoni Milano
(recipe adapted from WW Easy as 123 Cookbook)
 
Serves: 4
ProPoints per Serve: 12
 
250 grams rigotoni pasta
280 grams extra-lean pork sausages
1 tablespoon olive oil
1 brown onion, thinly sliced
2 garlic cloves, crushed
2 cups passata
2 tablespoons light thickened cream
1/3 cup finely grated parmesan cheese

Cook pasta in a large saucepan of boiling salted water, following packet instructions, or until just tender.  Drain and return pasta to the saucepan.

Meanwhile, remove and discard sausage casings.  Heat oil in a large non stick frying pan over medium-high heat.  Cook sausage mince, onion and garlic, stirring to break up lumps, for 7 minutes or until browned.  Add passata and bring to the boil.  Reduce heat and simmer, uncovered, for 5 minutes or until sauce has thickened.

Add passata mixture and cream to pasta.  Toss gently to combine.  Serve sprinkled with parmesan.

(Click here for a printable version of this recipe)

Tuesday, July 2, 2013

Asian Pork Cutlets

A quick and easy mid week dinner was needed as we are so busy at the moment and to top it off it's also school holidays here in Victoria.

I love pork especially when cooked with Asian flavours so this meal was really nice.  The marinade consisted of 3 ingredients so that made for easy preparation but did not lead to any shortcuts in the flavour.  I love Chinese Five Spice by the way..... and the use of Chinese Five Spice did not over power the sweetness of the plum sauce.  To be honest it was the typical asian flavour that we all relate to when we think of an asian meal.

This dish was cooked in the oven, elimating frying or barbecuing.  One baking dish, some steamed rice and some vegetables and voila - done.


Asian Pork Cultlets
(recipe adapted from WW The Extremely Contented Tummy 2007)
 
Serves: 4
ProPoints per serve: 12
 
1/4 cup plum sauce
2 tablespoons soy sauce
1/2 teaspoon Chinese Five spice
4 x 125 gram lean pork cutlets
1 cup white rice
1 bunch baby bok choy, trimmed
3 carrots, peeled and cut into batons

Combine the plum sauce, soy sauce and five spice in a shallow ceramic dish.  Add pork, turning to coat. Set aside for 30 minutes to marinade.

Preheat oven to 180 degrees Celsius.

Line a baking dish with baking paper.  Bake cutlets for 25 minutes, basting with marindae every 10 minutes, until cooked trhough and golden.

Meanwhile, cook rice according to packet directions.

Steam carrots for 5 minutes, add bok choy and steam for a further 2 minutes or until bright green.

Place cutlets on serving plates with rice and bok choy.  Drizzle with sauce and serve.

(click here for a printable version of this recipe)

Wednesday, March 6, 2013

Chicken and Mushroom Baked Crepes

Tonight's dinner surprised me on two levels - firstly I didn't think my kids would eat savoury crepes and secondly I didn't think my husband would appreciate "pancakes" for dinner!  I was wrong on both counts and stand corrected.

In fact tonight is the first time ever I have cooked savoury crepes and the first time I have ever served pancakes as a main course.  This recipe was very tasty. 
 
The soft crepe enveloping the creamy chicken and mushroom filling was absolutely delightful and delicate.  Although the filling ingredients sound "plain" as such in fact the delicate thick creamy sauce was perfect - you could taste every element right down to the pinch of nutmeg. 

Needless to say nothing left......


Chicken and Mushrooms Baked Crepes
(Recipe sourced from WW Cook Hearty Cookbook)

Serves: 4
ProPoints per Serve: 12

cooking spray
1/2 brown onion, finely chopped
400 grams lean chicken breast fillet, fat trimmed, cut into 1 cm pieces
400 grams button mushrooms, sliced
2 tablespoons water
salt
freshly ground black pepper
2 tablespoons Weight Watchers Canola Spread
2 tablespoons plain flour
1/2 cup skim milk
1/2 cup chicken stock
pinch ground nutmeg
2 tablespoons fresh flat leaf parsley, chopped
8 French-style frozen crepes, just thawed
1/3 cup finely grated parmesan cheese
2 tablespoons finely chopped fresh chives

Preheat oven to 200 degrees Celsius or 180 degrees Celsius fan-forced.  Spray a 28cm x 20cm x 3cm ovenproof dish with cooking spray.
 
Lightly spray a large non-stick frying pan with cooking spray and heat over medium-high heat.  Add onion and cook, stirring, for 5 minutes or until softened.  Add chicken and cook, stirring, for 5 minutes or until browned.  Add mushrooms and 2 tablespoons water and cook, stirring, for 2 minutes or until mushrooms have softened.
 
Heat spread in a saucepan over medium heat.  Add flour and cook, stirring, for 1 minute. Combine milk, stock and nutmeg in a jug.  Gradually add milk mixture to the folour mixture and stir until  smooth.  Bring to the boil.  Reduce heat to low and simmer, uncovered, for 2 - 3 minutes or until sauce has thickened.  Stir in chicken mixture and parsley.
 
Reserve 1/2 cup of the chicken mixture.  Lay crepes on a flat work surface.  Divide remaining chicken mixture among crepes and spread evenly along 1 edge.  Roll crepes to enclose filling and place, seam side down, in prepared dish.  Spoon reserved filling along centre of crepes.  Sprinkle with parmesan cheese and bake for 10 minutes or until cheese is melted.
 
Served sprinkled with chives. 
 

Wednesday, December 12, 2012

Pulled Pork and Bean Burritos & an ORGOPOT giveaway

Another spell between posts but I am still busy as a bee, my work changed dramatically the other week with a department reshuffle - not the best outcome but something I have to deal with!!

Despite the sweltering heat of Melbourne today I needed to post tonight.  So with having decided that I must blog and with it being such a warm day I knew dinner would need to be easy and flavoursome.  Mexican on a warm day was my first thought strangely.  Easy to cook easy to eat was my theory behind the choice!! 

These Pulled Pork and Bean Burritos by all means fit the bill... the pork was slow cooked in an Orgopot for a few hours on a low heat so there was no over the stove top sweats with the preparation.  Shredded and mixed with kidney beans and the sauce it was cooked in gave the meat texture and also a nice delicate yet a little spicy flavour.  A quick colourful salad all combined in a tortilla wrap ensured this was the perfect meal.


Pulled Pork and Bean Burritos
(recipe sourced from WW Takeaway At Home Cookbook)
Serves: 4
ProPoints per Serve: 12
1 tablespoon olive oil
400 gram peice of lean pork neck (scotch fillet) fat trimmed
1 brown onion, chopped
2 cloves garlic, crushed
1 teaspoon ground cumin
1/2 teaspoon ground chilli
2 tablespoons tomato paste
3/4 cup chicken stock
400 gram can kidney beans, rinsed and drained
2 cups (150 grams) finely shredded red cabbage
1 carrot, cut into matchsticks
1 red capsicum, thinly sliced
100 grams snow pea sprouts
1 tablespoon lime juice
8 x 20cm flour tortillas

Preheat oven to 160 degress Celsius or 140 degrees Celsius fan forced.

Heat half the oil in a medium stove/oven proof pan over high heat.  Cook pork, turning for 5 minutes or until browned. Set aside.

Heat remaining oil in the same pan over medium heat.  Add onion and cook, stirring, for 5 minutes or until softened.  Add garlic, cumin and chilli and cook, stirring, for 30 seconds or until fragrant.  Stir in tomato paste and stock.

Place pork on top of onion mixture.  Cover with foil and bake for 2 hours or until very tender.  Uncover and cool slightly.  Using 2 forks, shred pork.  Add beans and stir to combine.

Combine cabbage, carrot, capsicum, sprouts and juice in a medium bowl.

Heat tortillas following packed instructions.

Divide pork mixture among tortillas.  Top with cabbage salad and roll to enclose filling.  Serve.


(click here for a printable version of this recipe)

Tonight's post also brings a special giveaway. 

I recently brought two Orgopots for my own use through a work colleague's recommendation who had purchased one herself.  Bottom line all I can say is that they are wonderful to use.  Both for use on the stove top and in the oven these pots make cooking a dream and I have also noticed that due to the pan surface I have actually reduced the use of oil while cooking.  The pots are lightweight, dishwasher safe, metal utensial safe and very easy to clean.  Measuring 28cm in diameter, 9.5 cm deep and hold 4.5 litres.  A glass lid also allows you to see what you are cooking at a glance.


Now for the giveaway - I have one of these Orgopots (valued at $69 each) to giveaway.  To be in with a chance of winning please tell me what is your family favourite "one pot wonder" recipe that you love to cook.  Leave a comment on this post - if I like the sound of your dish I may even cheekily request the recipe.  Should you leave an anonymous comment please ensure you leave your name and email address on the comment or email me me confirmation of your comment including contact details to houseofmurray@optusnet.com.au so I can contact you.

To ensure that the winner will recieve this brilliant prize in time for Christmas (I must say what a wonderful Christmas present) the competition will close Sunday 16th December 8pm EST and unfortunately for my overseas friends this competion is only available to Australian residents.

However should you wish to own your own Orgopot it's easy to purchase one. You can own one for $69 each plus delivery of $9.95. Total being: $78.95.
You can order your Orgopot by clicking here.  I have been told by the supplier, Orgolife, that if you order before Christmas you will not be charge Postage and Handling - so you will save $9.95!!

Here is a video of OrgoPot in action, the Youtube link is: http://youtu.be/xltzljs1Ix4.

Good luck to all that enter and I will be contacting one of you Sunday night via email.

Wednesday, June 27, 2012

Tex Mex Chilli Bowls

Anything Mexican inspired excites me - I think it is because I love the simplicity of the cuisine (even though at times it is a hard cuisine to cook).  The vibrant colours always inviting your taste buds to experience the combination of flavours.

These Tex Mex Chilli Bowls definitely caught my eye is a recent Weight Watchers Magazine.  A full meal served individually in it's own little edible bowl.

To be totally honest, eating this meal was so comforting and unlike any "diet" mexican dish I have ever eaten before.


Tex Mex Chilli Bowls
(recipe sourced from Weight Watchers Magazine June 2012)

Serves: 4
ProPoints per serve: 12
 
 
 cooking spray
1 medium brown onion, finely chopped
2 garlic cloves, finely chopped
500 grams extra lean beef mince
1 teaspoon Mexican chilli powder blend
2 x 400 gram cans diced tomatoesf
salt
freshly ground black pepper
1 x 400 gram can red kidney beans, drained
4 x 48 gram reduced fat tortilla
3 large tomatoes, chopped
1/2 bunch fresh coriander leaves, chopped
6 iceberg lettuce leaves shredded
1/2 medium avocado, coarsely mashed
60 grams grated extra light tasty cheese
1/3 cup reduced fat sour cream

Lightly spray a large non stick frying pan with cooking spray and heat over medium heat.  Add onion and garlic and cook, stirring, for 3 minutes or until softened.  Add mince and cook, stirring to break up lumps, for 5 minutes or unmtil browned.  Add chilli powder and cook, stirring, for 1 minute.

Stir in canned tomatoes, season with salt and freshly ground black pepper and bring to the boil.  Reduce heat to low and simmer for 30 minutes or until liquid has almost evaporated.  Stir through the beans.

Meanwhile, preheat oven to 200 degrees Celsius. 

To make tortilla bowls, line 4 bowls (with a base measurement of approximately 8cms and a top measurement of approimately 15cms) with tortillas.  Bake for 12 minutes or until lightly golden.  Set aside to cool and then remove from bowls.

Combine fresh tomatoes and coriander in a medium bowl and season with salt and freshly black pepper.

Divide mince mixture amongst tortilla bowls.  Top with lettuce, avocado, grated cheese, sour cream and fresh tomato mixture.


(Click here for a printable version of this recipe)

Thursday, March 1, 2012

Slow Cooked Italian Beef with Pasta

~*~ HAPPY ST. DAVID'S DAY ~*~
~*~ HAPUS DYDD GWYL DEWI ~*~

No traditional Welsh food for this little Welsh Lass this year as I knew it was going to be another long day at work as I was spending the day in Kilmore - a good 2 hour drive each way from home so I decided to let our beloved slow cooker work it's magic.  And once again it did.

This recipe had such a lovely flavour starting with a herbed tomato base with a hint of spice.  Jam packed with vegetables and served simply with pasta there was definitely no complaints in the Murray house.


Slow Cooked Italian Beef with Pasta

Serves: 8
ProPoints per serve: 12

1 kilogram lean beef, cut into 3cm cubes
4 medium carrots, peeled and thickly sliced
2 medium green capsicum, large dice 
2 medium red capsicum, large dice
2 medium onion, large dice
1/4 cup dried oregano leaves
2 220 gram tins diced tomatoes 
1 tablespoon beef stock powder
2 cups hot water
1/4 cup(s) tomato paste
2 clove(s) fresh garlic, crushed
2 Tbsp ground sweet paprika
1 Tbsp brown sugar
salt
freshly ground black pepper
500 g pasta, tagliatelle
2 Tbsp arrowroot flour
1/4 cup water, extra

Place beef, carrots, capsicum and onions in slow cooker vessel.  Sprinkle with oregano leaves.  Pour diced tomatoes over meat and vegetables.

In a large jug or bowl combine together stock powder and water.  Mix well.  Add tomato paste, garlic, paprika and sugar.  Combine well.  Pour mixture over meat and vegetables in slow cooker vessel.  Season with salt and freshly ground black pepper.  Mix to combine.

Cook on low for 8 hours.

During the last hour of cooking mix together arrowroot and extra water to form a smooth paste.  Gently stir through casserole.

Cook pasta as per packet instructions, drain and keep warm.

Place pasta in serving bowls and serve with Slow Cooked Italian Beef.

Note: You could easily cook this in a large casserole dish in an oven.  Heat oven to 180 degrees and cook covered for 1½ hrs. Add arrowroot mixture and continue to cook for a further 30 minutes. Cook pasta as per packet directions and serve in individual bowls with the beef.

(Click here for a printable version of this recipe)

Thursday, December 29, 2011

Steak with Prawns in Bryon Bay Fiery Coconut Chilli Sauce

I was really fancying a Surf and Turf but the creamy garlic sauces are not a favourite with Noel so I decided to create a "prawn sauce" to top our steak that Noel would enjoy and would also satisfy my craving at the same time.

Recently we have really been enjoying the Byron Bay Chilli Co Fiery Coconut Chilli Sauce.  It has an amazing flavour and while it's rate medium hot it sure does have a kick that's for sure.  Hog's Breath Cafe serve it on their menu and Noel always orders it when we eat there.

I have to say the sauce I made was actually delicious.  Still full flavoured even though I did combine it with cream it definitely made an interesting change to the normal "Surf and Turf".


Steak with with Prawns in Bryon Bay Fiery Coconut Chilli Sauce

Serves: 2
ProPoints per serve: 12

2 scotch fillet steaks 200 grams each, barbecued to your liking
cooking spray
250 grams large green king prawns, peeled and rinsed
2 spring onions, sliced
1 clove garlic, crushed
2 tablespoons Byron Bay Chilli Co. Fiery Coconut Chilli Sauce
2 tablespoons water
1 teaspoon chicken stock powder
2 tablespoons reduced fat cream

Cook steaks your preferred way and to your liking, keep warm.

Spray a large frying pan with cooking spray and cook prawns for  1 - 2 minutes each size until colour starts to change (but do not overcook).  Remove to a plate.

Respray the same pan with cooking spray and add spring onions and garlic over a medium heat.  Saute for 2 minutes or until spring onions have softened.  Add chilli sauce and water, mixing well to combine.

Stir through cream until combined.

Return prawns to the pan and cover with sauce.  Continue to stir until heated through and sauce has returned to a slight boil (do not boil).

Serve prawns and sauce drizzled over steak.

(Click here for a printable version of this recipe)

Sunday, October 30, 2011

Moroccan Lamb Shanks

These went down a treat last night.  We loved the decadence of the moroccan flavours - the cumin, coriander, paprika to name a few combined with the sweet tomato and sultana sauce.  The aroma was tantalising and the lamb just melted in your mouth.

Once a little prep work is done and the dish is in the oven it's just a matter of waiting a few hours before sitting down to this wonderfully morish dish that we served with couscous but would accompany mashed potato just as well.


Moroccan Lamb Shanks

Serves: 8
ProPoints per serve: 12

2 tablespoons plain flour
salt
freshly ground black pepper
2 tablespoons olive oil
8 french style lamb shanks, 180 grams each, fat trimmed
3 red onions, thickly sliced
2 cups beef stock
2 cups water
2 tins 440g diced tomatoes
1 tablespoon ground coriander
1 tablespoon ground cumin
3 teaspoons paprika
2 teaspoons tumeric
1 tablespoon fennel seeds
2 garlic cloves, crushed
1 teaspoon salt
1 teaspoon freshly ground black pepper
4 carrots, peeled, cut into batons
1 green capsicum, largely diced
1/2 cup sultanas
1/2 cup freshly coriander leaves, roughly chopped

Preheat oven to 175 degrees Celsius.

Place flour in a large snap lock bag, season with salt and pepper.  Place shanks in the bag, seal and shake to coat in seasoned flour.  Remove from bag shaking off any excess flour.

Heat 1 tablespoon oil in a large heavy based frying pan and cook 4 shanks until browned all over.  Remove to a large lidded casserole dish.  Repeat with remaining oil and shanks.  Add onions to shanks in casserole dish.

In a large jug combine beef stock, water, tomatoes, coriander, cumin, paprika, tumeric, fennel seeds, garlic, salt and pepper.  Mix well and pour over lamb shanks.

Place lid on casserole and cook in oven for 2 - 3 hours, turning shanks occasionally or until tender.

Add carrots, capsicum and sultanas.  Stir gently to combine in sauce and cook for a further 30 minutes or until carrots are tender.

Sprinkle with fresh coriander leaves and serve.


(click here for a printable version of this recipe)

Monday, October 10, 2011

Beef and Spinach Cannelloni

This was very easy to make, very tasty and a family pleaser of course not only because it was full of flavour but because it was pasta of course!!  Pasta has always been an instant success at our place.

No fiddly cannelloni tubes to use with this recipe as it calls for fresh lasagne sheets making the process a lot quicker. 

You could really taste the fresh basil in the rich tomato based beef sauce, this accompanied by the creamy cheese sauce topping made this dish a very comforting meal.


Beef and Spinach Cannelloni
(recipe sourced from WW magazine September 2011)

Serves: 4
ProPoints per serve: 12

cooking spray
1 small brown onion, finely chopped
1 small carrot, finely chopped
500 grams extra lean beef mince
2 garlic cloves, crushed
400 gram can diced tomatoes
2 tablespoons tomato paste
1/2 cup beef stock
100 grams baby spinach leaves
1/4 cup finely chopped fresh basil leaves
1 tablespoon reduced fat butter
1 tablespoon plain flour
1 cup skim milk
1/2 cup extra light (50% fat) tasty grated cheese
salt
pepper
4 fresh lasagne sheets
3/4 cup tomato pasta sauce
1/4 cup grated parmesan cheese

Preheat oven to 180 degrees Celsius.

Lightly spray a 2 litre (8 cup) capacity oven dish with cooking spray.

Lightly spray a large non stick frying pan with oil and heat over high heat.  Add the onion and carrot, cook stirring, for 5 minutes or until softened.  Add mince and garlic and cook, breaking up lumps, for 3 - 5 minutes or until mince is browned.

Add tomatoes, paste and stock.  Bring to the boil.  reduce heat to low and cook, stirring occasionally, for 10 - 15 minutes or until mix tickens.  Stir in spinach and basil and cook for 2 minutes.  Cool.

Meanwhile melt butter in a small saucepan over medium heat.  Add flour and cook, stirring, for 1 minutes.  Gradually add milk, stirring until smooth after each addition.  Bring to the boil, stirring.  Reduce heat to low and simmer for 1 minute or until sauce thickens slightly. Remove from heat. Stir in half the grated cheese, season with salt and pepper and set aside.

Spread pasta sauce over base of prepared dish.  Cut pasta sheets in half.  Divide mix into 8 portions, spoon down the centre of each pasta piece, then roll pasta to enclose filling.  Place cannelloni, seam side down, in one layer.  Pour over cheese sauce, sprinkle with parmesan and remaining grated cheese.  Bake for 30 - 35 minutes or until golden.


(click here for a printable version of this recipe)