Showing posts with label thyme. Show all posts

Tuesday, August 28, 2018

French Pork Cutlets with Creamy Herb and Wine Sauce

I don't know about you but I really enjoy experimenting with pork especially what flavours compliment this tender meat.  Needless to say it's not always roasted and served with apple sauce at the House of Murray.

Pork is rarely eaten in our house as a whole family due to the fact that Ms 17 does not like pork unless it's Sweet and Sour Pork and Chinese Roast Pork served in pancakes.  Talk about being fussy and a tad demanding.  Despite her dislike of pork (unless it's on her terms) I decided that it would be on our menu this week as there are 4 others in the house happy to eat it.  Thanks team.

As mentioned I enjoy experimenting with flavours and if you look through our list of pork recipes you will see that so many other recipes have been tried.  Some got the tick of approval others not so.  What is your favourite way of serving up pork?  Or even what's your favourite cut of pork?  I really enjoy cutlets, medallions or fillet.  I find these very tender and easy to cook.

Now did I explain that Ms 17 is fussy right?  To add to her disapproval of pork being on the menu if I even consider making a sauce or marinade that has mustard, lemon, rosemary or occasionally other herbs such as tarragon or thyme it is on for young and old.... needless to say Ms 17 didn't eat dinner tonight.

When all cooked this smelled absolutely delicious.  The combination of the wine and herbs all enveloped into a thick creamy sauce complimented the thyme crusted pork cutlets.  Not to mention it was quick and easy with a total cooking time under 30 minutes.  An absolutely tasty dish that while accompanied by a creamy sauce is still full of flavour without the guilt factor.


French Pork Cutlets with Creamy Herb and Wine Sauce

Serves: 4
SP per Serve: 8

4 pork cutlets, fat trimmed
salt
freshly ground black pepper
2 tablespoons chopped fresh thyme
2 teaspoons vegetable oil
1/2 cup white wine or champagne
1 cup chicken stock
1 tablespoon chopped fresh tarragon
1 tablespoon french mustard
1 cup extra light thickened cream
1 tablespoon cornflour
2 tablespoons water

Preheat oven to 180 degrees Celsius.

Season the pork chops with salt and pepper. Rub both sides of each chop with 1 tablespoon fresh thyme.


Heat the vegetable oil in a skillet over medium-high heat until shimmering. Add the seasoned pork to the pan and cook for 2-3 minutes per side until browned. Remove the pork from the pan and place on a lined oven tray. Place in oven and cook for a further 10 minutes or to your liking.

Pour the wine into the pan and continue to cook for 3 minutes to reduce the liquid. Add the chicken stock, remaining thyme, tarragon, mustard and cream and cook another 3-5 minutes. Stir through combined cornflour and water and continue to stir until sauce has thicken. Remove from heat.

Remove cutlets from the oven and place on a serving tray. Drizzle with sauce if desired or place in a serving jug. Serve with crispy potatoes and steamed vegetables.


(Click here for a printable version of this recipe)

Sunday, May 20, 2018

"Royal Engagement" Roast Chicken aka The Perfect Roast Chicken

Well everyone in the world knows what took place yesterday ... the Royal Wedding!   The wedding of Prince Harry and Meghan Markle was held in St George's Chapel at Windsor Castle in the United Kingdom.  

It was a beautiful event fully televised and I thoroughly enjoyed spending most of my Saturday infront of the tv.  Growing up, like most girls, there is always the dream that I would grow up and meet my Prince Charming, be swept off my feet and live life like a princess! So while I pottered around doing my usual "Princessy" things such as putting the groceries away, cleaning, cooking and menu prepping I watched on in awe (and I guess a little jealousy) an event that will change history.  

Sunday, as most of you know, is family roast dinner day at the House of Murry (now seriously how regal does that sound?) and when possible I ensure that we do sit down for a roast dinner.  Giving the Royal Celebrations this week I thought we would have the "Engagement Chicken" that Meghan Markle cooked for Prince Harry the night that he proposed.  

In an interview from People November 2017 it was revealed that Prince Harry got down on one knee to propose while the couple was at home making roast chicken, the origin of the dish was from famous celebrity chef  and host of the Barefoot Contessa, Ina Garten — and it’s one of Meghan’s go-to recipes.  Ina Garten couldn’t be more pleased that her recipe is now part of the royal couple’s love story.

This recipe has been around for quite sometime despite it's new found fame.  The original recipe which I followed was published on Food Network in 1999 however since gaining celebrity status it has been revamped and can be found here.

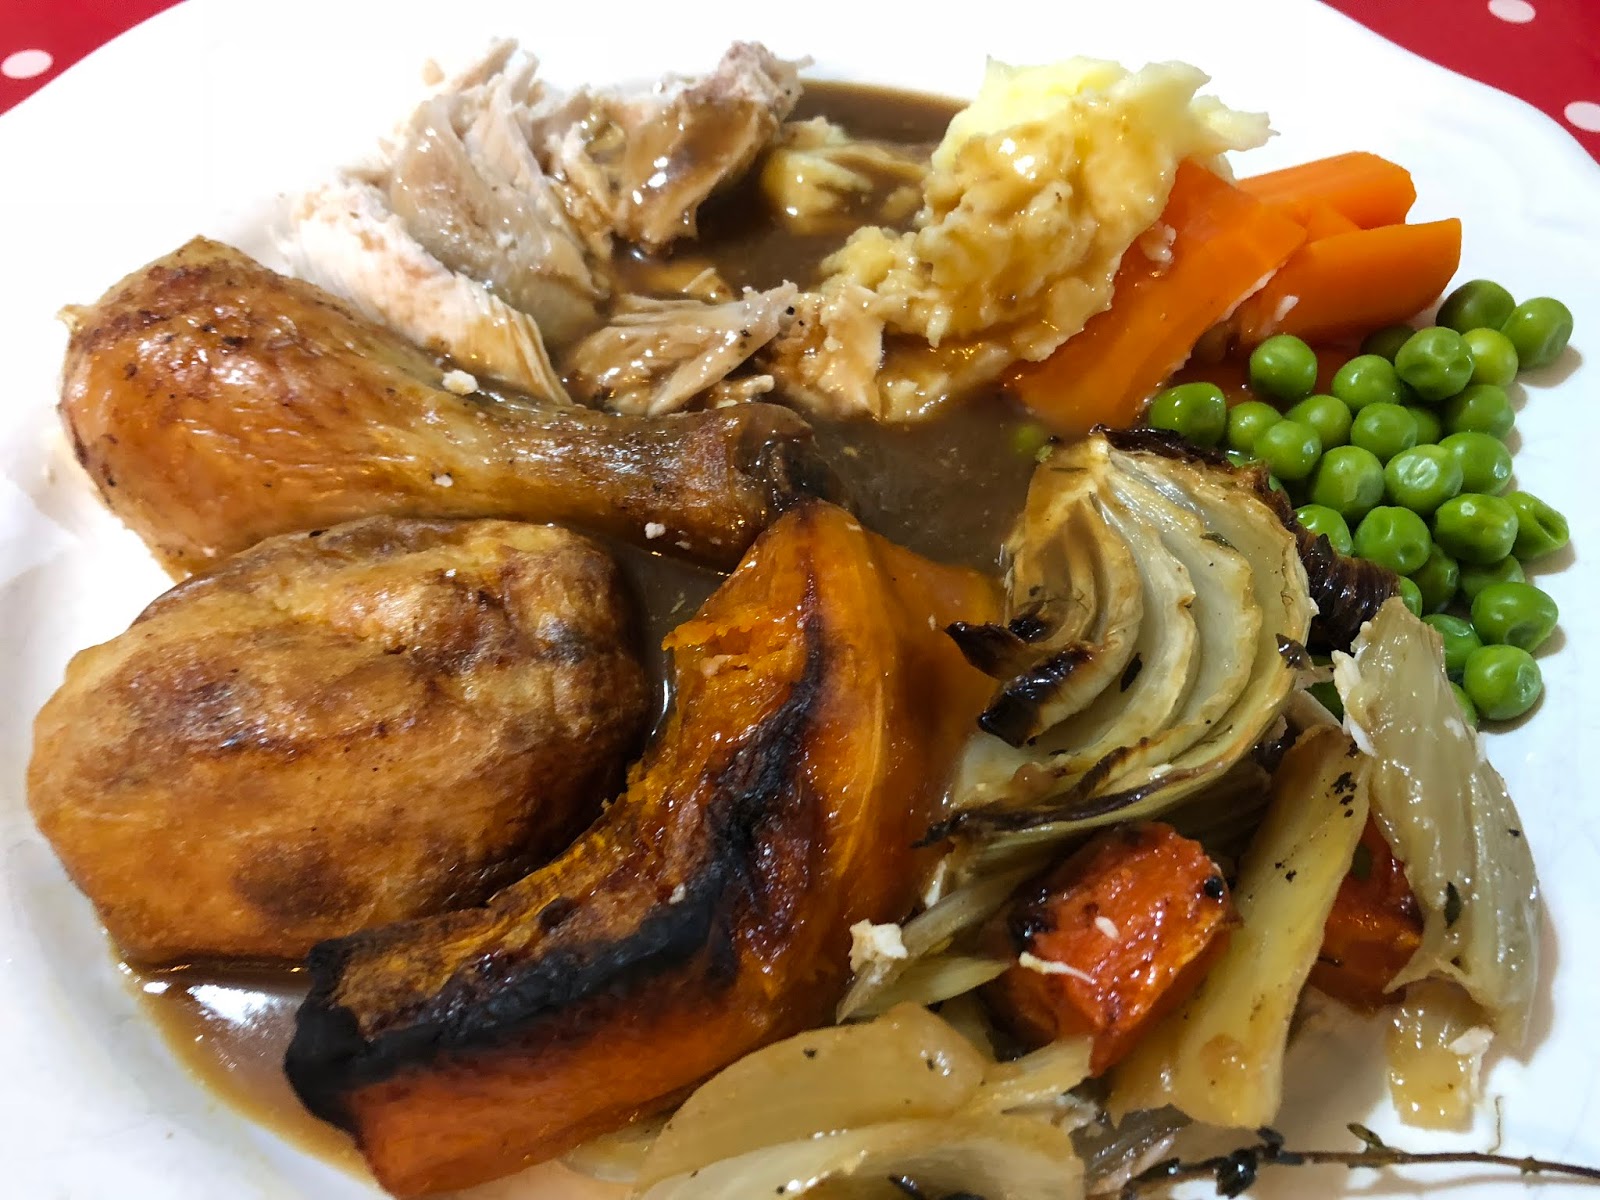
The roast chicken itself is quite a plain dish when you read the recipe.  It's quite simple and easy to prepare.  However the decadent flavours from the thyme, lemon and garlic lacing the tender juicy meat which are cooked on a bed of roasted fennel, onions and carrots that are enveloped in the stunning chicken flavours contradict the simplicity of what you read.

Needless to say if it was good enough for Meghan's Prince would be good enough for mine and our loyal subjects?

Yes it was definitely was......


"Royal Engagement" Roast Chicken aka Perfect Roast Chicken
(Recipe sourced Ina Garten: Food Network)

Serves: 6 - 8

2 kilogram roasting chicken
salt
freshly ground black pepper
1/2 large bunch fresh thyme, plus additional 20 sprigs
1 lemon, halved
1 head garlic, cut in half crosswise
2 tablespoons butter, melted
1 large yellow onion, thickly sliced
4 carrots cut into 2-inch chunks
1 bulb of fennel, tops removed, and cut into wedges
Olive oil

Preheat the oven to 220 degrees Celsius.

Remove the chicken giblets. Rinse the chicken inside and out. Remove any excess fat and leftover pin feathers and pat the outside dry. Liberally salt and pepper the inside of the chicken. Stuff the cavity with the bunch of thyme, both halves of lemon, and all the garlic.


Brush the outside of the chicken with the butter and sprinkle again with salt and pepper. Tie the legs together with kitchen string and tuck the wing tips under the body of the chicken.


Place the onions, carrots, and fennel in a roasting pan. Toss with salt, pepper, 20 sprigs of thyme, and olive oil.


Spread around the bottom of the roasting pan and place the chicken on top.


Roast the chicken for 1 1/2 hours, or until the juices run clear when you cut between a leg and thigh. Remove the chicken and vegetables to a platter and cover with aluminum foil for about 20 minutes.


Slice the chicken onto a platter and serve it with the vegetables (or get one of your royal followers to do it for you LOL).  Accompany with other vegetables as desired.


Monday, March 19, 2018

Marry Me Chicken aka Sicilian Chicken

So are you as intrigued with the name of this dish as I was?  As soon as I came across a recipe called "Marry Me Chicken" I guessed that it was obviously good and did some more investigation.

Tradition, as it is told, is that there are two dishes that are guaranteed to lead you to the alter!  Far fetched I know but the first dish, "Engagement Chicken", is a roast chicken  and the second is "Marry Me Chicken", which is a creamy casserole.  And before you ask, yes there are so many different recipes for both dishes.  I was reading and reading for a long time before I settled on the recipe I was going to cook.

A quick history lesson regarding the both dishes.  Starting with Engagement Chicken - this was  developed by a fashion editor at Glamour Magazine, following a trip to Italy. Afterwards the recipe was given to co-worker to prepare for her boyfriend and soon afterwards, the couple was engaged. The recipe made the rounds in the office and three other women in the office were offered marriage proposals soon after making the dish for their boyfriends.  The recipe featured in Glamour Magazine later on after it was dubbed "Engagement Chicken". Soon afterwards the magazine began receiving letters from women claiming that their boyfriends proposed shortly after being served the dish. The magazine claims 70 couples have married after the women served their boyfriends the dish.

Now for the story of Marry Me Chicken is not to different. Instead of using a whole chicken this recipe calls for skin on chicken thighs or pieces which are fried until crispy. According to the article I was reading Delish editors started devouring these crispy chicken thighs soaked in a savory sun-dried tomato-thyme cream sauce, people started blurting out "I'd marry you for that chicken" and "OH MY GOD THAT'S MARRIAGE MATERIAL."

So what I can make of my own google investigation?  It is obvious that people have heard of Ina's Engagement Roast Chicken and Marry Me Chicken - I clearly did not have a clue!  Secondly they are both obviously renounced for their flavours and the after effects of serving either dishes to partners according to the romantics among us.

The romantic in me decided to try cooking the Marry Me Chicken even though I did not expect this dish to cause anything incredible to occur (this year hubby and I will celebrate our 25th wedding anniversary).

I didn't have a whole chook nor did I have any skin on chicken thighs so I substituted chicken breast fillets cut into 4 large pieces other than that I followed the recipe.  The smell during the cooking process was magnificent and I have to admit that I was actually looking forward to eating this dish myself.

As mentioned before, these chicken pieces enveloped in a creamy sun dried tomatoes and thyme sauce were magic.  Actually like nothing I have tasted before.  The chicken was tender and juicy.  The sauce thick and creamy.  It was everything in just one dish. 

I wanted to marry myself LOL!!  


Marry Me Chicken or Sicilian Chicken
(Recipe adapted from Delish.com)

Serves: 4

cooking spray
4 chicken breast fillet, quartered
2 cloves garlic, minced
1 tablespoon fresh thyme leaves
1 teaspoons crushed red pepper flakes
3/4 cup chicken stock
1/2 cup light thickened cream
1/2 cup chopped sun-dried tomatoes
1/4 cup grated Parmesan
salt
freshly ground black pepper


Preheat oven to 180 degrees Celsius.

Heat a large frying pan over medium-high heat and spray with cooking spray. Add chicken and season with salt and pepper. Sear until golden, 3 - 5 minutes per side. Transfer chicken to a plate.

To the same frying pan, add garlic, thyme, and crushed red pepper flakes and let cook until fragrant, approximately 1 minute. Add chicken stock, cream, sun-dried tomatoes, and Parmesan and season with salt and pepper. 

Bring to a simmer, then return chicken to skillet and bake for 15 minutes, until chicken is fully cooked through.


Thursday, January 1, 2015

Turkey Ham and Vegetable Pot Pies

Merry Christmas to you all
and best wishes for the New Year.
 

Thank you all for your support and patience with me and my blogging in 2014.  As I have mentioned many times it has been a hard year in the Murray house - one of many changes, one that found me time pour and one where I was just lost and finding things very difficult.  I am now at the end of the year and looking forward to a better 2015 and wishing you a prosperous and creative New Year.

My first post of the year is brought to us by the dreaded Christmas leftovers.... everyone has them.  Some us of us end up with lots of them - in our case it was only some turkey slices but a whole leg of ham on the bone.

I love turkey but once it's cooked and served the first time it tends to get dry really quickly.  Ham on the other hand doesn't change when stored correctly but you must keep an eye on the used by date.  My favourite use of left over ham, especially ham on the bone, is Pea and Ham Soup which I normally make a long time after Christmas when the cooler months start to make their way in.  Tonight something different was called for and to be honest everyone in our house loves Pot Pies so it was a no-brainer.

These flavours work so well together - the turkey, the ham, the creamy thyme flavoured sauce and of course being packed so full of vegetables made for a perfect one dish wonder that everyone loved.  All individually portioned up so no there was no arguments over "he got more pastry than I did" - oh the dramas!!


Turkey, Ham and Vegetable Pot Pies
(recipe adapted from Taste.com)

Serves: 8
ProPoints per serve: 10

cooking spray
150 grams button mushrooms, sliced thinly
2 carrots, peeled and thinly diced
2 spring onions, finely chopped
1 cup frozen corn kernels
1 cup frozen peas
2 tablespoons fresh thyme leaves
60 grams Weight Watchers Canola Spread
1/2 cup plain flour
3 cups chicken stock
1/2 cup dry white wine
1 cup light (reduced fat) thickened cream
320 grams chopped cooked turkey
90 grams chopped leg ham
salt
freshly ground black pepper
2 sheets Reduced Fat Puff Pastry
 
Preheat the oven to 180°C. Line a baking tray with baking paper.

Spray a large frying pan with cooking spray, add mushrooms, carrots, spring onion, corn, peas and thyme. Cook for 5 minutes or until carrots have softenend. Remove from heat and set aside.

Melt the butter in a saucepan over low heat. Add the flour and cook, stirring constantly, for 1 minute or until mixture bubbles. Add chicken stock and wine, then cook for a further 2-3 minutes, whisking to remove any lumps. Add the thickened cream and cook for a further minute or until the mixture boils and thickens. Season to taste, then stir in the turkey, ham and mushroom mixture. Remove from the heat and allow to cool completely.

Meanwhile, defrost pastry sheets. Cut into quarters.
 
Divide mixture evenly amongst 8 x 1 cup capacity ramekins.  Spray ramekin dish rims with cooking spray and place 1 piece of pastry on each dish.  Trim if required and use remaining pastry as decoration.  Place on baking tray and spray pastry top with cooking spray.

Bake the pie for 25-30 minutes until puffed and golden.


Tuesday, March 5, 2013

Beef and Bacon Casserole with Cheese Dumplings

The one great thing about comfort food is that there is no season when you must eat it... comfort food is definitely a year round happening.  This dish is certainly in the comfort food category.

Beef and Bacon Casserole, a  thick tomato gravy laced with tender beef chunks, bacon pieces and vegetables is nice by itself but topped with a couple of fluffy cheese dumplings it was perfect.  The hint of thyme perfectly complimented the mix.

Best of all this recipe was easy to prepare which made it easy to fit into the mid week rush especially as I cheated by putting the casserole in the slow cooker (although the recipe cooks in the oven) and was ready not long after getting home from football training with only the dumplings to prepare.


Beef and Bacon Casserole with Cheese Dumplings
(Recipe sourced from WW Food You'll Love Cookbook)
Serves: 4
ProPoints per serve: 11
cooking spray
125 grams Weight Watchers Bacon, chopped
1 brown onion, finely chopped
2 garlic cloves, crushed
600 grams lean blade steak, fat trimmed cut into 3cm pieces
2 tablespoons plain flour
1/3 cup dry red wine
1 1/2 cups beef stock
400 gram can diced tomatoes
2 carrots, chopped
1 celery stick, chopped
1 tablespoon fresh thyme leaves
200 grams button mushrooms, halved
salt
freshly ground black pepper
1 cup self raising flour
1 tablespoon Weight Watchers Canola Spread
1/4 cup finely grated Parmesan cheese
1/3 cup reduced fat milk

Preheat oven to 160 degrees Celsius or 140 degrees Celsius fan forced. 

Lightly spray a large 1.5 litre (6 cup) flameproof casserole dish with cooking spray and heat over medium-high heat.  Add bacon and onion and cook, stirring, for 5 minutes or until onion has softened.  Add garlic and cook for 1 minute.  Transfer to a bowl.

Lightly spray the same dish with cooking spray and heat over high heat.  Cook beef, in batches, turning, for 5 minutes or until browned.  Return beef and bacon mixture to the pan.  Add plain flour and cook, stirring, for 1 minute.  Gradually stir in the wine and bring to the boil.  Add stock, tomatoes, carrot, celery and thyme. Cover and bring to the boil.  Transfer dish to oven and bake for 1 hour.  Add mushrooms and bake for 30 minutes.  Season with salt and freshly ground black pepper.

Meanwhile, place self raising flour and spread in a large bowl.  Using fingertips, rub spread into flour until mixture resembles breadcrumbs.  Stir in Parmesan.  Make a well in centre of flour mixture and stir in enough milk to create a soft, sticky dough.

Remove dish from oven.  Increase oven to 200 degrees Celsius or 180 degrees Celsius fan forced.  Using floured hands, roll dough into 8 dumplings about the size of a walnut. Arrange dumplings, about 3 cm apart, on top of beef mixture and lightly spray with oil.  Bake, uncovered, for 15 minutes or until dumplings are lightly browned and cooked through.


Note:  I mentioned that I cooked the casserole component in the slow cooker (I love my slow cooker).  Cooked on low for 8 hours after the second step.  Transfer to an oven proof dish when ready to cook dumplings in the oven.

(click here for a printable version of this recipe)

Friday, June 1, 2012

Chicken with Wine, Garlic and Herb Sauce

Sorry for the delay in posting Monday night's feast but Tuesday saw me off to Brisbane with work of course, only to return very late Thursday night.  Never mind I had a good time this trip during my absence but have been waiting to blog again on the new fresh version of A Dash Of Flavour.  I hope you are liking the few changes that we have made to our blog.

This dish, I have to say myself, was magnificent.  In fact I think we all wanted second helpings once we had cleared out plates.  The chicken moist and tender, the sauce creamy and powerful - a brilliant combination of garlic, fresh herbs and wine.  And another easy weeknight dinner that could easily be served for a special dinner.

I love the delicateness of a cream sauce and there was no resisting this while eating.


Chicken with Wine, Garlic and Herb Sauce

Serves: 4
ProPoints per serve: 7

2 red onions, thinly sliced
4 x 200 gram chicken fillets, all visible fat removed
4 cloves garlic, thinly sliced
1/2 cup fresh oregano leaves
1/2 cup fresh thyme leaves
salt
freshly ground black pepper
1/4 cup dry white wine
1 cup chicken stock
1/2 cup thick light cream

Preheat oven to 180 degrees Celsius.

Coat a small frying pan with cooking spray and heat over medium heat.  Add onions and cook until softened.  Remove from heat and allow to cool slightly.

Place chicken fillets in a shallow oven proof dish.  Sprinkle with onions, galic, oregano and thyme.  Season with salt and fresh ground pepper.  Mix together wine and chicken stock, pour around chicken fillets.  Cover dish with lid or foil and cook in oven for 25 - 35 minutes or until chicken is cooked.

Remove chicken from casserole dish, covering with foil to keep warm.  Mix cream into wine mixture until well combined, return chicken to sauce to coat.

Serve chicken drizzled with sauce accompanied by point free vegetables.


(click here for a printable version of this recipe)

Tuesday, January 17, 2012

Shredded Chicken Leek and Thyme Tart

This meal has been on my menu planner for the last few weeks but somehow keeps getting brushed aside for no particular reason - either something else gets requested or our plans change.  What ever the reason we had some left over barbecue chicken again this weekend so I was determined to have this no matter what.

The thought of having pastry while dieting is a novelty in itself  for as we all know as a rule pastry is a NO-NO.  This recipe called for reduced fat shortcrust pastry therefore reducing the fat content. 

Although the pastry component was a little fiddly, the rest of the recipe was easy.  The dish was quite inviting to look at and not to mention it was definitely full of flavour.  The feta cheese made a nice change to normaly cheddar and the flavour was delicious combined with the sundried tomatoes and the thyme.  The serving sizes were quite large so this recipe could easily serve 6 - 8 for a light meal.

Overall this recipe sured pleased my crowd, with it being devoured last night.


Shredded Chicken Leek and Thyme Tart
(recipe sourced from WW Magazine January 2012)

Serves: 4
ProPoints per serve: 14

2 sheets reduced fat shortcrust pastry, just thawed
1 tablespoon olive oil
2 small leeks, halved, thinly sliced, washed and drained
3 teaspoons fresh thyme leaves
3 eggs
1/2 cup skim milk
salt
freshly ground black pepper
1 cup shredded left over skinless cooked chicken
1/3 cup fat free semi dried tomatoes, chopped
70 grams reduced fat feta cheese, crumbled

Line base and sides of a 2.5cm deep 11.5cm x 34cm loose bottom flan tin with pastry, trimming of the excess.  Place flan tin in the freezer for 20 minutes.

Meanwhile, preheat oven to 200 degrees Celsius.

Place flan tin on a baking tray.  Line pastry case with baking paper and fill with ceramic pie weights or uncooked rice.  Bake for 10 - 12 minutes or until the edges are crisp and light golden.  Remove weights or rice and baking paper and bake for a further 6 - 8 minutes or until base is light golden.  Set aside and allow to cool slightly.

Reduce oven to 180 degrees Celsius.

Meanwhile, heat oil in a medium non stick frying pan.  Add leeks and half the thyme leaves and cook, stirring occasionally, for 10 minutes or until softened.

Spread leek mixture over pastry case.

Whisk eggs and milk in a medium jug and season with salt and freshly ground black pepper

Top leeks with shredded chicken, tomatoes and crumbled feta, then pour over egg mixture.  Sprinkle with remaining thyme.

Bake for 20 - 25 minutes or until just set. 

Serve Chicken Leek and Thyme Tart warm or cold.


(click here for a printable version of this recipe)

Wednesday, April 20, 2011

Creamy Chicken, Mushroom and Corn Parcels

As a lover of pastry I have been craving pastry for a few weeks now. So to satisfy my pastry craving I decided to make some filo parcels for dinner last night.

The filling was creamy and tasty with a somewhat homestyle country taste and smell about it - nothing fancy infact quite plain Jane but it was delish. A mixture of chicken, mushrooms and corn bound togther with a creamy sauce laced with a hint of mustard and thyme.... typing this I could eat another one right now!


Creamy Chicken, Mushroom and Corn Parcels

Serves: 4
ProPoints per serve: 9

cooking spray
500 grams chicken breast fillets, diced
1 brown onion, diced
200 grams button mushrooms quartered
2 cloves garlic, crushed
1/2 bunch fresh thyme
1 tablespoon wholegrain mustard
1 cup chicken stock (made with stock powder)
1/2 cup skim milk
2 tablespoons cornflour
2 tablespoons water
1/2 cup canned corn kernels, drained
salt
freshly ground black pepper
12 sheets filo pastry
1 tablespoon sesame seeds (optional)


Coat a large frying pan with cooking spray and cook chicken, onion, mushrooms and garlic until chicken is browned and just cooked.

Add thyme, mustard and chicken stock. Bring to the boil stirring and reduce heat to simmer for 5 minutes.

In a small jug combine milk with cornflour, mixing well. Add to chicken mixture and stir until thickened slightly. Stir through corn and season to taste with salt and pepper. Remove from heat and allow to cool.

Preheat oven to 180 degrees Celsius.

Working with one sheet of pastry at a time place first sheet on your workspace longways away from yourself. Spray with cooking spray and place another sheet on top. Repeat this with the third sheet of pastry.

Place a quarter of the chicken mixture at one end of the pastry, fold over ends and roll to enclosed. Place on a prepared oven tray. Repeat to make four parcels.

Spray parcels with cooking spray and sprinkle with sesame seeds.

Cook in oven for 15 - 20 minutes or until heated through and the pastry is golden.


(click here for a printable version of this recipe)

Tuesday, April 5, 2011

Beef Ribs with Stout and Caramelised Onion

We are really enjoying Beef Ribs at the moment especially as they are quite cheap in the butchers. They have so much meat on them and are full of flavour. I buy the ribs as individual peices not as racks as they seem to be more tender when they are cooked.

I tried an old style recipe with this batch - slow cooking cooking them with stout. Although the ingredients weren't overly fancy the aroma that filled the house was such a homely smell, reminding me of when I was a child coming home to the aromas of my parents cooking for which I would excitedly and patiently waited (sometimes impatiently) to be put on the table at dinner time.

The stout wasn't overpowering but noticable and this combine with the sweetness of the caramelised onion made for a delicate sweet and sour experience followed with a hit of fresh thyme, a powerful yet delightful herb to add to meat dishes.


Beef Ribs with Stout and Caramelised Onion
(recipe adapted from The Australian Women's Weekly Slow Cooker Cookbook)

Serves: 8
ProPoints per serve: 12

2 kgs beef ribs with bone, visible fat trimmed
2 teaspoons olive oil
2 large brown onions, thinly sliced
1 tablespoon brown sugar
1 tablespoon balsamic vinegar
1/4 cup water 4 medium carrots, sliced thickly
1 x 400 gram can diced tomatoes
5 sprigs of fresh thyme
1 tablespoon dijon mustard
1 cup beef stock (made with stock powder)
1 cup stout

Place ribs in a large saucepan and cover with water. Bring to the boil, reduce heat and simmer for 10 minutes. Drain and place in slow cooker basin.

Heat oil in a large frying pan and add onion. Cook onion, stirring until soft. Add sugar, vinegar and the water, cook, stirring, for 10 minutes or until onion caramelises. Transfer onion mixture to the slow cooker basin.

Add the carrot, undrained tomatoes, thyme, mustard, stock and stout to the ribs and stir through. Cook covered on low for 8 hours. Sprinkle with additional thyme leaves when serving.

Thursday, April 22, 2010

Pork Apple and Thyme Meatballs

There is something irresitable about meatballs especially when served with a rich tomato sauce over some warm pasta or mashed potato. This dish was no execption.

Easy to make, easy to eat that's for sure. A nice pork meatball sweetened by apple and laced with thyme which were devoured last night by the four of us.

Meatballs, like rissoles or hamburgers, I guess are adaptable to suit any tastes or flavours. They are no longer just rolled up mince meat served with canned sauce - they have taken on their own with everyone adding flavourings and other ingredients to make them tasteful.

When I first saw this recipe I was intrigued by the list of ingredients, and when I am intrigued it normally means I will be cooking it...


Pork Apple and Thyme Meatballs
(recipe adapted from Donna Hay Magazine - Autumn 2010)

Serves: 4
Points per serve: 5.5

1 slice of white bread, made into coarse breadcrumbs
1/4 cup skim milk
500 gram lean pork mince
1 small apple, peeled and grated
1 small red onion, peeled and grated
1 tablespoon fresh thyme leaves
1/2 cup finely grated parmesan
1 tablespoon honey
1 egg, lightly beaten
1 clove garlic, crushed
salt
freshly ground black pepper
cooking spray
1 clove garlic, crushed (extra)
2 x 400 gram can chopped tomatores
6 sprigs thyme, extra
1 tablespoon caster sugar

Place the breadcrumbs and the milk in a large bowl and allow to stand for 2 minutes or until milk is absorbed.

Add the pork, apple, onion, thyme, parmesan, honey, egg, garlic and season with salt and black pepper. Mix well to combine. Using 2 tablespoons of the mixture at a time shape into 16 balls. Place on a tray and refrigerate for 30 minutes if time permits.

Spray a large frying pan with cooking spray and heat over a medium heat. Cook the meatballs for 5 - 7 minutes or until browned. Remove from pan and keep warm.

Add the extra garlic, tomato, thyme and sugar to the pan and cook for 5 minutes. Return the meatballs to the pan and cook for a further 2 - 3 minutes until cooked through.

(click here for a printable version of this recipe)

Thursday, September 3, 2009

Roast Chicken with Lemon and Rosemary Potatoes

I have to admit we do quite a few roast dinners but rarely a roast chicken. I cannot explain why that is - we just don't. Being home from work today I decided that we would have a roast chicken dinner tonight.
.
Of course, I just couldn't pop it in the oven and cook it... I had to experiment. After reading a few (well lots) of recipes I came finally across a Jamie Oliver recipe that took my fancy. Not only did the picture look nice the use of fresh herbs really captured my attention... as everyone knows I love fresh herbs.


Roast Chicken with Lemon and Rosemary Roast Potatoes
(recipe adapted from Jamie Oliver)
.
Serves: 8
Points per serve: 7.5
.
1 x 2 kilogram whole chicken
sea salt
freshly ground black pepper
2 kilograms, peeled
1 large lemon
1 whole bulb of garlic, broken into cloves
a handful of fresh thyme
olive oil
sprinkle sweet paprika
a handful of fresh rosemary sprigs, leaves picked
.
Rinse and dry the chicken. Rub the chicken inside and out with a generous amount of salt and freshly ground black pepper. Cover the chicken and leave in the fridge until you're ready to start cooking it for lunch or dinner.
.
About 30 minutes before you plan to cook the chicken remove it from the bench and allow it to come to room temperature.
.
Preheat your oven to 190 degrees Celcius.
.
Bring a large pan of salted water to the boil. Cut the potatoes into pieces, put them into the water with the whole lemon and the garlic cloves, and cook for 12 minutes. Drain and allow to steam dry for 1 minute, then remove the lemon and garlic. Toss the potatoes in the pan while still hot so their outsides get chuffed up and fluffy.

While the lemon is still hot, carefully stab it about 10 times. Pat the chicken with kitchen paper and rub it all over with olive oil and sprinkle over the sweet paprika. Push the garlic cloves, the whole lemon and the thyme into the cavity, then put the chicken into a roasting tray and cook in the preheated oven for around 45 minutes. Remove the chicken to a plate. Drain most of the fat from the roasting tray, leaving around a tablespoon.
.
Toss the potatoes into this with the rosemary leaves. Shake the tray around, then make a gap in the centre of the potatoes and put the chicken back in. Cook for a further 45 minutes, or until the chicken is cooked and the potatoes are nice and golden. Ensure juices run clear.....


(click here for a printable version of this recipe)

Saturday, August 8, 2009

Herb Crusted Rack of Lamb

I have had quite a busy week and Noel decided that he would cook on both Saturday and Sunday this weekend just to give me a break, isn't he sweet? And boy did he step up to the plate.

Noel, like me, enjoys the challenge of trying something new and when he puts his mind its sure to be a winner. What can I say - these were delicious and he can definately cook them for us any time he likes.

The lamb was delicately cooked, still nice and tender and was complimented by the crunchiness of the herbed breadcrumbs. I am positive that this would make an impressive main at your next dinner party.


Herb Crusted Rack of Lamb
(recipe courtesy of Noel)


Serves: 2
Points per serve: 7

200 grams fresh rich white bread
2 tablespoons fresh flat leaf parsley, chopped
1 teaspoon fresh thyme leaves, chopped
1 teaspoon fresh rosemary leaves, chopped
1 large garlic clove, finely chopped
4 tablespoons vegetable oil
100g unsalted butter
sea salt
freshly ground black pepper
2 lamb racks
2 tablespoons dijon mustard
500 ml lamb or beef stock
1 large sprig of rosemary

Preheat oven to 220 degrees C.
Remove all visible fat from lamb racks.

Blend bread until fine, add herbs and garlic and blend for a further 30 seconds.

Heat oil and butter in a large frying pan until foaming. Season the lamb racks with salt and pepper. Add racks to pan, placing meat side down first, cook for 3 - 4 minutes on each side. Remove from pan and rest for 5 minutes.

Brush mustard onto the meat side of the racks ensuring you generously cover. Press herbed breadcrumbs onto the meat side, pressing firmly to form a crust. At this point, you can cover the bones with foil to reduce burning.

Place on a rack on a foiled lined baking tray. Cook for 10 - 15 minutes or until cooked to your liking. Remove foil prior to serving.

While lamb is cooking, place stock and rosemary in a small saucepan and bring to the boil. Reduce heat and simmer until reduced by half. Strain before serving.

(click here for a printable version of this recipe)

Tuesday, July 7, 2009

Springtime Veal Stew

I know that you all already know that I love using my slow cooker not matter what time of year it is but as the year goes on I do get bored with using tomatoes and or red wine as the sauce base.

I must admit that when I saw this recipe I had to try it as the concept of adding cream in the last 10 minutes of cooking intrigued me. The fact that this recipe was simple also helped and any vegetables can be used. And I must say that I was glad I tried, it was really nice to have a meat dish with a creamy sauce, it made such a pleasant change. Best of all though, everyone ate it and said they enjoyed it!

Now that I have cooked this once I will look for ways to make it more weight-friendly, I already have adjusted the recipe a little but there is still room for improvement. I am sure that this dish would also work well with lamb, replacing the thyme with rosemary.


Springtime Veal Stew
(recipe adapted from Essentials of Slow Cooking)

Serves: 6

1 kilogram veal, diced
salt
freshly ground black pepper
cooking spray
1 onion, finely diced
80g ham, diced finely
1/2 cup white wine
1 cup water
1 teaspoon chicken stock powder
1 tablespoon dried thyme
4 carrots, peeled and diced
1 bunch asparagus, trimmed and cut in 2 cm pieces
1 red capsicum, diced into 2 cm cubes
1 cup frozen baby peas
1 cup lite thickened cream

Season veal cubes with salt and pepper. Spray a frying pan with cooking spray and cook veal in batches until browned and sealed completely. Set aside.

To the same pan add the onions and ham and saute over medium heat for 2 minutes. Pour in the wine and deglaze the pan, scraping up the browned bits with a wooden spoon. Stir in the combined water and chicken stock and bring to the boil.

SLOW COOKER: Transfer the veal and the juices to a slow cooker. Sprinkle with thyme. Add the stock mixture. Cover and cook until the veal is very tender, 2 1/2 hours on high setting or 5 1/2 hours on low. Add the carrots and capsicum, cover and cook for a further 30 - 40 minutes until they are almost tender. Add the asparagus and peas and continue to cook, covered, until the vegetables are tender, about 15 - 20 minutes. Stir in the cream and cook until the sauce is heated through, about 5 minutes. Season with salt and pepper to taste.

STOVE TOP: Transfer the veal and the juices to a large dutch oven. Sprinkle with thyme. Add the stock mixture. Cover and cook over a very low heat for 1 1/2 hours. Add the carrots and capsicum, cover and cook for a further 30 - 40 minutes until they are almost tender. Add the asparagus and peas and continue to cook, covered, until the vegetables are tender, about 15 - 20 minutes. Stir in the cream and cook until the sauce is heated through, about 5 minutes. Season with salt and pepper to taste.

~~~~~~~~~~~~~~~~~~~~~~~~~~~~~~~~~~~

GIVEAWAY RESULT


Before I forget I have to announce my Giveaway winner.... thanks to all those that stopped by and left a comment sharing your favourite "local" food or dish. I have to say it was a hard decision to make as two of the "local" dishes were really tempting my tastebuds.

The winner of the 5 Womans Weekly Mini Cookbooks is......

~~~ Donna-FFW ~~~

Congratulations!!! The dish you described, Blueberry and Peach Summer Torte, using local produce sounds delish and also, to me, a typically American dessert! (ant that's a good compliment by the way!).
Donna can you please email me your postal address? PS Can I have the recipe too?? Pretty please?

LellyJ - I have to say as tempting as muttonbird sounds (NOT!!!) I loved your comment!! I definitely had a giggle!! And Katy the wine would be very tempting.

Thanks again to everyone who took the time to leave a comment....

~~~~~~~~~~~~~~~~~~~~~~~~~~~~~~~~~~~

Tuesday, June 30, 2009

Braised Pickled Pork

Up until coming across this recipe on an episode of Better Homes and Gardens I cannot even remember ever having eaten pickled pork let alone attempting to cook it myself. Both Noel and I loved the idea of cooking something.

It seemed very easy to prepare and was another slow cooker recipe so it was definately up our alley. Needless to say it wasn't long before we tried it and I must say it has been a regular meal in our house ever since.

Although we enjoy this meal I have to admit the first time we cooked this recipe we found it very salty due to the pickling/curing process used by the butcher. Now we actually soak the peice of pork in a saucepan full of cold water (ensure meat is fully covered) overnight and drain well prior to cooking. This reduces the content of salt in the meal considerably.


Braised Pickled Pork
(recipe source: Better Homes and Gardens)

Serves: 6
Points per serve: 4.5

1 kilogram pickled pork
1 tablespoon olive oil
4 carrots, peeled and chopped into 2.5cm pieces
1 stick celery, finely sliced
1 red onion, diced
6 cloved of garlic, skin removed
1/2 bunch fresh thyme
2 bay leaves
10 black peppercorns
1 tablespoon tomato paste
1 cup red wine
3 cups chicken stock

Heat olive oil in a large heavy based pan. Add the pickled pork and brown well on all sides. Remove and set aside.

To the same pan add the carrots, celery, red onion, garlic, thyme, bay leaves and peppercorns and cook for 2 - 3 minutes, scraping the bottom of the pan to capture the pan juices. Add tomato paste and red wine, stirring to combine for 1 minute.

Slow cooker: Place the pork in the slow cooker dish, top with wine mixture and add chicken stock. Cook on high for 4 - 5 hours or on high for 7 - 8 hours.

Stove Top: Return the pork to the pot with 3 cups of chicken stock. Simmer for 2 hours.

Served sliced with the vegetables from the pot.

Thursday, June 11, 2009

Braised Garlic Chicken

I have come across this recipe a few times on several blogs and upon reading the ingredients knew that I would be cooking this dish especially due to my love of garlic and this recipe uses a lot. Four whole heads of garlic might sound excessive, but as it cooks the garlic mellows and thickens, adding depth of flavour to the pan juices that are served over the chicken.

While I can say that I didn't dislike this dish I wasn't overly impressed with both it's looks and the flavour. Needless to say it was edible but I believe I choose to cook from a slow cooker recipe was the incorrect move. Most of the other versions of this recipe have been down either on the stove top or in an oven. Oh well this just leaves room for improvement, right?

Speaking of other versions, the first time I even read a recipe for this dish, and that recipe was Chicken with 40 Cloves of Garlic, I must say it definitely caught my attention, was written almost immediately on my "to cook list" and this version will be the recipe that I will be attempting next time. It's on a magnificent blog, For The Love of Cooking. Please take the time to pop over and visit Pam, the blog's host. Not only is the recipe and the post much nicer, but Pam's photographs actually do the dish some justice unlike mine below....


Braised Garlic Chicken
(recipe adapted from Essentials of Slow Cooking)
Serves: 8

8 chicken chops (bone in thigh fillets) trimmed of excess skin and fat
salt
freshly ground black pepper
2 tablespoons canola oil
4 heads of garlic
1/4 cup dry white wine
1 tablespoon chopped fresh thyme

Season the chicken all over with salt and pepper. In a large frying pan over medium high heat warm the oil. Working in batches if necessary, add the chicken and cook, turning frequently, until well browned, 7 - 10 minutes. Remove from the pan and set aside.

Pour off all but 2 tablespoon of the fat in the pan. Add the garlic cloves and saute over medium high heat until lightly browned, about 3 minutes. Pour in the wine and deglaze the pan, stirring and scraping up the browned bits on the bottom of the pan with a wooden spoon.

Transfer the chicken to a slow cooker. Sprinkle with the thyme and add the galic mixture. Cover and cook until the chicken is tender and opaque throughout, approx 3 hours on the low setting.

Transfer the chicken to a platter and cover loosely with foil to keep warm. Set a fine mesh sieve over a saucepan and strain the pan juices. Reserve a few whole cloves for presentation. Press on the garlic cloves to extract as much liquid and pulp as possible. Bring to a simmer over a medium high heat and season to taste with salt and pepper. Transfer the chicken to a warmed platter and top with the sauce. Serve at once.

Tuesday, April 7, 2009

Honey, Mustard and Whiskey Glazed Pork Cutlets

I set about trying something different with Pork Cutlets as I have really over done the Sticky Pork Cutlets recipe and needed to cooked something different for fear of the family revolting at the dinner table.
3
So several cookbooks later and using my new found friend, Google, I came across a recipe which took my eye. After reading and reading, a few ingredient swaps here and there, I came up with Honey, Mustard and Whiskey Glazed Pork Cutlets.
3
3
Honey, Mustard and Whiskey Glazed Pork Cutlets
3
Serves: 6
Points per serve: 5
3
6 trim pork loin cutlets
4 tablespoons Jack Daniels or other Tennessee whiskey
2 tablespoons extra virgin olive oil
2 tablespoons wholegrain mustard
2 tablespoons honey
1 tablespoon finely chopped fresh thyme
2 teapsoons finely grated orange rind
1/2 cup fresh orange juice
Salt & freshly ground black pepper
3
Place pork in a shallow glass or ceramic dish. Combine whiskey, oil, mustard, honey, thyme, orange rind and orange juice in a bowl. Pour over pork. Cover and refrigerate for 1 hour to allow flavours to develop or longer if time permits.
3
3
Remove pork from the marinade but reserve marinade. Transfer to a plate lined with paper towel. Place reserved marinade in a small saucepan over high heat. Bring to the boil. Reduce heat to medium and simmer for 2-3 minutes or until sauce thickens slightly. Remove from heat. Taste and season with salt and pepper.
33
Preheat a barbecue or chargrill on high. Add the pork and cook for 3-4 minutes each side for medium or until cooked to your liking. Transfer to a plate and cover with foil. Set aside for 5 minutes to rest.
3
Divide the pork among serving plates. Drizzle with sauce and serve.

Monday, March 9, 2009

Baked Brie with Sundried Tomatoes

Okay I have to admit this... my world DOES actually revolve around food and being a foodie, believe it or not.
3
In fact since I started up this food blog I have come across so many others out there just like me, blogging their culinary delights and kitchen masterpieces. Some are even game enough to blog about their disasters!! There are so many foodie blogs that I read and have linked all of these to my blog, a few I have chatted with via comments and emails while there are others I just read, but I am always adding some of their dishes to my never ending list of foods to make in the future.
3
One person's blog that I read daily is Kevin's. Kevin's blog is called Closet Cooking and he is based in Toronto, Canada.I must say that some of his dishes are amazing, not to mention the quality of his photo's just make you want to lick the computer screen. So when I read this Baked Brie with Sundried Tomatoes I immediately knew we had to try it. Like Kevin I have to admit for not being a huge fan of Brie but in this recipe it had such an interesting flavour when coupled with the sun-dried tomatoes and the herbs.
3
3
Baked Brie with Sundried Tomatoes
3

Serves 2
3
250 grams brie, rind removed and cut into cubes
60 grams sundried tomatoes packed in oil, chopped
1 clove garlic, chopped
1 teaspoon thyme, chopped
pepper to taste
3
Preheat oven to 175C.
3
Mix everything together in a small bowl.
3
Transfer to a small baking dish. The mixture should fill the baking dish to the brim as it will shrink when baked. I used just one small ramekin between the two of us... you could divide into individual serves if you wish.
3
Bake in oven until the brie is melted and starts to bubble, about 20-30 minutes.
3
Serve dip hot with crackers or dippers of your choice.

Tuesday, December 2, 2008

Creamy Lamb & Tomato Fettuccine


This is an incredible tasting dish, not very hard to cook either and I can pretty much guarantee that there will not be much left over! Well there never is in our house.


Creamy Lamb & Tomato Fettucine
adapted from Weight Watchers 123 Recipe Collection
.
Serves: 4 large
Serves: 6 average
Points per serve: 7.5 large
Points per serve: 5.0 average

250g fettucine or pasta of your choice
1/2 cup sundried tomatoes (not packed in oil)
500g lean lamb fillets sliced or lamb strips
4 shallots sliced diagonally (reserve some for garnish)
1 tbs dijon mustard
1 tbs fresh or dried thyme
1 can 375ml Evaporated Low Fat milk
2 tsp cornflour, blended with 1tbs water
2 tbs grated parmesan cheese

Cook pasta to manufacturer's instructions until al dente. Drain and set aside.

Soak sun-dried tomatoes in hot water until plump. Drain and slice.

Heat a non-stick frying pan coated with cooking spray and cook lamb for 3 to 4 minutes until browned and sealed - do not overcook. Remove from pan. (You may need to do this in 2 batches to avoid boiling the lamb.)

To the same pan add the shallots, sun-dried tomatoes, mustard and thyme. Cook, stirring, for 1 to 2 minutes. Add evaporated milk, bring to the boil and remove from heat. Add blended cornflour and parmesan cheese. Stir until sauce thickens.

Return to the heat, add lamb and fettucine. Toss well so all pasta is coated in the sauce and heated through.

Serve with additional Parmesan Cheese shavings and shallot slices.