Showing posts with label ww 6.0 points. Show all posts

Thursday, October 28, 2010

Chicken and Spring Vegetable Pasta

There was no real recipe behind last night's pasta, just using things up in the fridge and to my delight everyone loved it. The kids wanted pasta, I fancied vegetables and Noel wasn't really fussed as he had a late lunch and wasn't hungry.

I was impressed by the flavour plain but slightly cheesy and you could definitely taste the vegetables which reminded me of spring vegetable soup. This pasta dish would even be nice without the chicken or you could substitute for a different meat.


Chicken and Spring Vegetable Pasta

Serve: 6
Points per serve: 6

250 grams penne or pasta of your choice
cooking spray
1 onion, diced
1 tablespoon garlic, crushed
1 red capsicum, small diced
1/2 cup frozen peas
1/2 cup frozen corn kernels
150 grams broccoli, cut into florets
100 grams chicken breast supreme (deli sliced chicken), chopped roughly
1 teaspoon chicken stock powder
1 tablespoon dried parsley flakes
salt
freshly ground black pepper
200 ml lite thickened cream
100 grams reduced fat grated tasty cheese

Cook pasta according to packet directions. Drain and set aside.

Coat a large frying pan with cooking spray and over medium heat cook onion and garlic until softened. Add capsicum, peas, corn and broccoli and cook until no longer frozen and broccoli cooked through.

Add the chicken and cook for a further 2 minutes.

Mix together the chicken stock powder, parsley and cream. Season with salt and pepper. Add to the vegetable mixture along with the cheese, mix well.

Add the pasta and toss to combine. Heat through ensuring cheese has melted and serve.

(click here for a printable version of this recipe)

Monday, October 11, 2010

Pesto Linguine with Chicken and Zucchini

Tonight is a busy night for the house... Dennis and Pam arrive to visit tomorrow so with having weigh in as well as a mountain of cleaning to do we needed a very quick and easy dinner to prepare.

I know dinner at the Murray household is good when everyone is quiet for a few minutes as they take in the flavours. This dish was very fresh tasting and to be totally honest very enjoyable. Even Miss 9 who apparantly hates pesto had 2 bowls full.

As far as preparation and cooking is concerned, this pasta dish is on the table in under 25 minutes which as you all know fits my week night requirement of something quick and tasty. Considering the fact that there is the minimum of ingredients with this recipe you will, like we were, actually be surprised with the flavour.


Pesto Linguine with Chicken and Zucchini
(recipe adapted from Good Taste Magazine January 2009)

Serves: 6
Points per serve: 6

350g dried linguine pasta
Olive oil spray
1 (about 300g) single chicken breast fillet, thinly sliced
2 zucchini, trimmed, thinly sliced diagonally
2 garlic cloves, crushed
80g (1/3 cup) bought basil pesto
1/2 cup fresh basil leaves, coarsely torn
1/2 cup reduced fat light thickened cream
20g (1/4 cup) coarsely grated parmesan


Cook the pasta in a large saucepan of salted boiling water following packet directions or until al dente. Drain and return to the pan.

Meanwhile, heat a large non-stick frying pan over medium-high heat. Spray with olive oil spray to grease. Add the chicken and cook for 2 minutes each side or until cooked through. Transfer to a plate. Increase heat to high. Add the zucchini and garlic, and cook, stirring occasionally, for 2 minutes or until the zucchini is tender.

Add the chicken, zucchini mixture, pesto, basil and cream to the pasta and toss to combine. Divide among serving bowls and top with the parmesan to serve.

(click here for a printable version of this recipe)

Wednesday, September 22, 2010

Springtime Lamb Casserole

I cannot take credit for being the first in my family to cook this as it's actually a recipe that my mam used to make when I was younger. I do however take credit for borrowing the cookbook containing the recipe and for some reason never giving it back!! As a child that has had a long battle with my weight my mam was very supportive when it came to helping me to lose weight. She purchased the Australia Women's Weekly Best Ever Slimmers Recipes Cookbook, along with others, in a bid to help me on my journey and I must say it's one of those cookbooks that we have actually cooked many meals from.

This casserole is very simple to make but has a full bodied flavour. It makes a wonderful mid week dinner no matter what season it is.


Springtime Lamb Casserole
(Recipe adapted from Australia Women's Weekly Best Ever Slimmers Recipes Cookbook)

Serves: 6
Points per serve: 6

900 grams lean lamb, cut into large dice
1 1/2 tablespoons paprika
900 grams potatoes, peeled and quartered
4 large carrots, peeled and thickly sliced
1 large red capsicum, large dice
1 large green capsicum, large dice
1 x 35g packet Spring Vegetable Soup (I used Continental)
1 cup dry white wine
3 cups water
2 cloves garlic, crushed
2 tablespoons chopped fresh parsley
pinch salt
freshly ground black pepper
2 tablespoons cornflour
1/4 cup water, extra
Preheat oven to 180 degrees Celsius.

Place diced lamb and paprika in a bag, seal and shake until all meat is coated in the paprika.

In a large casserole dish place lamb, potatoes, carrots and capsicum.

Combine dry soup with wine, water, garlic and parsley. Pour over lamb and vegetables.

Cover and cook for about 1 hour or until lamb and vegetables are tender.

Blend cornflour with extra water, add to lamb mixture ensuring well mixed through. Return to the oven for 15 - 20 minutes or until mixture boils and thickens.


(click here for a printable version of this recipe)

Thursday, September 16, 2010

Pork Canneloni

Normally you either have a beef canneloni or a spinach and ricotta one, but deciding on our weekly menu last week I remembered a recipe that I use to make years ago that I actually adapted and used pork mince as it's main ingredient.

I find using pork mince makes it a lighter style canneloni compared to using beef. It was very simple in taste yet full of flavour. And of course like most pasta dishes, this was not only filling but was also very mourish with both kids eating another half serve each.


Pork Canneloni
(Recipe adapted from Weight Watchers Quick Start Cookbook)

Serves: 6
Points per serve: 6

cooking spray
500 grams lean minced pork
1 tablespoon garlic, crushed
1 onion, finely diced
2 slices multigrain/wholemeal bread, made into crumbs
850 mililitres unsweetened tomato juice
1/4 cup chopped fresh parsley
2 teaspoons prepared horseradish
freshly ground black pepper
pinch of salt, to taste
200 grams instant cannelloni tubes
1 teaspoon dried oregano
1 teaspoon dried basil
60 grams grated reduced fat tasty cheese
60 grams grated reduced fat mozzarella cheese

Preheat oven to 180 degrees Celsius.

Spray a nonstick frying pan with cooking spray and cook pork, garlice and half the onion until browned all over and cooked through. Remove from heat and allow to cool slightly. Add breadcrumbs, 1 cup of tomato juice, parsley, horseradish, pepper and salt. Mix well.

Fill a wide nozzle piping bag with pork mixture and fill each canneloni tube. Coat a large casserole dish with cooking spray and arrange stuffed tubes in a flat line.

Using the frying pan or a saucepan sprayed with cooking spray, gently cook remaining onion until translucent. Add remaining tomato juice, oregano, basil and season to taste with salt and pepper. Cook, stirring constantly, until mixture comes to the boil. Pour juice mixture over the stuffed canneloni tubes.

Combine both tasty and mozzarella cheeses in a small bowl and sprinkle evenly over the top of the stuffed canneloni tubes.

Bake in oven for 30 minutes or until cooked through and the cheese is golden and bubbling.


Tuesday, August 3, 2010

Devilled Sausages

Sometimes the simple meals are always the best and I have to say when I am stuck for something to make quickly that I know we will all enjoy there is no going past Devilled Sausages.

Although the name of this dish somewhat suggests chilli or heat there is neither. In fact the sauce has a tang that is slightly sweet but very enjoyable. For those wanting a little heat/spice you can add chilli sauce to the mixture.

I also have to say that this easy recipe is so much nicer than any packet mix available. Once you have this you will not use the packet mix again.

Served with mashed potatoes and steamed vegetables this makes a wonderful winter warmer and a quick weeknight dinner.


Devilled Sausages

Serves: 6
Points per serve: 6

600 grams pork chippolatas or sausages
cooking spray
1 clove garlic, crushed
2 onions, thinly sliced
1 large apple, peeled and thinly sliced
1 x 400 gram can diced tomatoes
1/4 cup tomato ketchup or sauce
1/4 cup barbecue sauce
2 tablespoons brown sugar
2 tablespoons malt vinegar


Preheat oven to 180 degrees Celsius.

Coat a frying pan with cooking spray and fry sausages until browned and just cooked. Remove from pan and place in a casserole dish. (If using sausages cut each sausage into pieces).

Respray the same frying pan with cooking spray and add garlic, onions and apples. Fry for 3 to 5 minutes on medium heat or until onions have softened. Add to the sausages in the casserole dish.
Mix together the remaining ingredients and pour over the sausage and onion mixture.

Cover and cook for 25 to 30 minutes.


(click here for a printable version of this recipe)

Tuesday, July 13, 2010

Mexican Chicken in Tortilla Baskets

I am actually embarrassed by how busy I have been of late and how long it's been since I posted any our meals.. trust me we have been cooking but admittedly our meals have been recipes that have either been posted before or frozen meals (normally left overs). Also I have been really busy with work and have been travelling quite a bit... crossing fingers I can get the balance right between work and blogging so I can keep sharing with you all.

Saying this, tonight I have a committee meeting with the Junior Football Club (so yes I am still a little busy) and needed to cook something no only tasty but quick and easy as I wanted to eat dinner sitting down as a family before attending the meeting. This recipe certainly met all that criteria - tasty, quick and easy.

With the family having a soft spot for Mexican dishes I knew we would all enjoy this meal and serving it in a tortilla basket made it seem more authentic and was definitely different. It wasn't overly spicy and more chilli can be used for the chilli lovers.

Making the tortilla basket was very easy. Choose an ovenproof bowl dependent on how you want your baskets to look - there is no real rule here. I used Mission reduced fat tortillas but I know there are several on the market.


Mexican Chicken in Tortilla Baskets
(recipe adapted from Symply To Good To Be True # 3)

Serves: 4
Points per serve: 6

4 reduced fat tortillas
cooking spray
500 grams chicken breast, all visible fat removed
1 teaspoon crushed garlic
1 brown onion, diced
1 red capsicum, largely diced
1 green capsicum, largely diced
2 teaspoons ground cumin
2 teaspoons paprika
2 teaspoons oregano
1/4 teaspoon chilli powder
2 teaspoons chicken stock powder
1 x 410 gram can diced tomatoes
1 x 450 gram can refried beans
fresh coriander leaves or finely sliced spring onion, for garnish


Preheat oven to 180 degrees Celsius.

Coat a ovenproof bowl with cooking spray and press the tortilla into the bowl. Coat the tortilla basket with cooking spray and bake in the oven for 10 minutes. Remove from oven and leave in bowl to cool.

Dice the chicken.

Coat a large frying pan with cooking spray and cook the chicken and garlic for 4 minutes, add onion and capsicum and cook for 2 minutes. Add the cumin, paprika, oregano, chilli powder and stock powder. Cook for 1 - 2 minutes or until fragrant. Add the tomatoes and refried beans and mix well. Bring to the boil, reduce heat and allow to simmer for 3 - 5 minutes ensuring that the chicken is cooked through. If mixture starts to thicken add a little water to thin, if desired.

Serve in the tortilla baskets and garnish with coriander or spring onions.

Note: If you do not wish to serve with the tortilla basket the points for the chicken dish would be 4 points per serve.

(click here for a printable version of this recipe)

Monday, June 7, 2010

Old Fashioned Chicken and Corn Pot Pies

Nothing beats an old fashioned pot pie and when the filling is creamy chicken and corn I think it brings out the kid in us all...... especially on Sunday night when we had spent the day freezing cold at the football, dodging rain showers and trying to get warm from the few rays of sun peeking through the clouds.

I remember my mam always making pot pies (and family sized ones). She would make really yummy and interesting fillings, topping them off with homemade pastry and serving them with pride. Oh I wish I was a kid again.......

As you have probably guessed due to my erratic posting of late we are still flat out being over social flutterbies that I am trying to catch up on posting some recipes as I don't want you to think I have given up on sharing recipes with you all - needless to say I cheated and used frozen pastry sheets!! But the result was delish... ask the others!!

Old Fashioned Chicken and Corn Pot Pies
(recipe adapted from WW Heavenly d'Lites Cookbook)

Serves: 6
Points per serve: 6


4 small chicken breast fillets, skin and visible fat removed
500 ml water
1/2 cup dry white wine
2 teaspoons chicken stock powder
1 teaspoon garlic
freshly ground black pepper
cooking spray
2 medium carrots, diced
1 cup frozen peas
1 teaspoon olive oil
1 brown onion, diced
200 grams button mushrooms, sliced
3 tablespoons plain flour
1 cup skim milk
440 gram can corn kernels, drained
2 teaspoons dried sage
1 1/2 sheets Pampas Reduced Fat Puff Pastry
1 tablespoon sesame seeds, if desired

Place chicken fillets, water, wine, stock powder, garlic and freshly ground black pepper in a medium saucepan. Bring to the boil, reduce heat and cook gently uncovered fot 15 minutes. Remove chicken from the saucepan to allow to cool, reserve the liquid stock. When chicken is cool, chop roughly.

Preheat oven to 180 degrees Celsius.

Coat 6 1 cup ramekins with cooking spray.

Microwave the carrots and peas for 2 - 3 minutes or until slightly tender. Drain.

Heat the oil in a large frying pan over a medium heat. Add the onions and cook for 3 - 4 minutes or until soft. Stir in the flour, cook over a gentle heat for 2 minutes. Remove pan from heat and stir in the milk and the reserved stock. Return to the heat and cook stirring until the mixture boils and starts to thicken. Add the carrots, peas, mushrooms, sage, chicken and corn. Mix well and simmer for a further 5 minutes.

Pour equal amounts of the filling in each ramekin. Cut pastry sheets into 6 squares and place over the pie, pressing edges firmly to seal. Lightly coat with cooking spray and sprinkle with sesame seeds if desired.

Bake for 15 - 20 minutes until pastry is crisp and golden.

(Click here for a printable version of this recipe)

Thursday, May 27, 2010

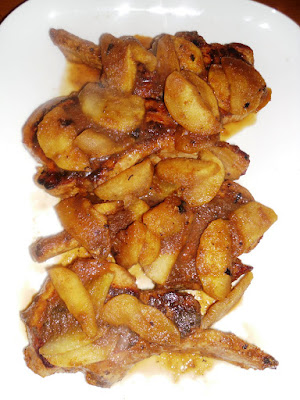
Pork Cutlets with Apple Glaze

This looked like a very easy recipe to make, and I wasn't wrong in my thinking. So simple and a wonderful mid week dinner that had a wonderful sweet but not sickly glaze on the pork which didn't require any additional condiments.

A winner in our house, devoured by the kids and on the table in 30 minutes - who's complaining... not me!


Pork Cutlets with Apple Glaze
(Recipe adapted from Symply To Good To Be True Book #4)

Serves: 4
Points per serve: 6

4 Pork Cutlets (200g each) all visible fat removed
2 green apples
cooking spray
1/3 cup brown sugar
1/4 cup brandy
1/2 cup apple sauce (in jar)
1 teaspoon cornflour
1 tablespoon water

Peel and core apples, cut in half and slice.

Coat a large non-stick frying pan with cooking spray, add sugar and apple. Allow apple to brown with sugar, cooking on both sides. Once cooked removed from pan to a small bowl, cover with foil and set aside.

Recoat the same frying pan with cooking spray and over a high heat cook pork cutlets for 3 to 5 minutes each side turning once during cooking. Remove to a large plate and cover with foil.

Pour brandy into frying pan and cook for 30 seconds, scrapping the pan base. Add apple sauce and stir well. Combine cornflour with water and add to pan, stirring continuously. Bring to the boil, reduce heat and simmer for 2 minutes. Return pork cutlets to the pan and heat through.

Serve pork cutlets with apples and drizzled with sauce.

(click here for a printable version of this recipe)

Wednesday, May 19, 2010

Braised Chicken with Tomato and Rosemary

As winter is settling and the nights are definitely becoming cooler (if not freezing) rustic, home cooking, comfort food is starting to creep onto my menu planner. Tonight's meal was no exception and went down a treat.

Best of all, very easy to put together and on the table in 30 minutes. Just what's needed for a week night. Everyone enjoyed the robust Italian flavours, what's not to like about tomatoes and rosemary? The capers added their own little distinctive flavour with each mouthful also. We served this with plain cooked pasta spirals and some additional steamed vegetables but I imagine it would be deliscious served with anything especially fresh crusty bread to mop up the juice.


Braised Chicken with Tomato and Rosemary

Serves: 4
Points per serve: 6

2 teaspoons olive oil
8 chicken thigh fillets, all visible fat removed
1 rosemary sprig, leaves finely chopped
1 red onion, finely sliced
3 garlic cloves, finely sliced
400gram can chopped tomatoes
1 tablespoon capers, rinsed and drained
1/3 cup dry red wine
salt
freshly ground black pepper
extra rosemary sprigs to garnish

Heat the oil in a large frying pan over a medium heat and cook the chicken for 3 - 4 minutes each side or until browned all over. Add half the choped rosemary and stir to combine. Transfer chicken to a plate.

To the same pan cook onion for 3 - 4 minutes until soft. Add the garlic and remaining rosemary. Cook for 2 - 3 minutes or until fragrant. Add tomatoes, capers and wine. Bring to the boil and return chicken to the pan. Reduce heat to low, cover and simmer for 15 - 20 minutes or until cooked through. Season with salt and pepper. Scatter over extra rosemary.

(click here for a printable version of this recipe)

Thursday, April 15, 2010

Chicken with Creamy Garlic Prawns

Ever since we went to Phillip Island a few weeks ago and had lunch at the Isle of Wight Hotel I have been dreaming of recreating the meal I had which was Chicken Schnitzel with Creamy Garlic Shrimp.

Of course my version had to be healthier than the crumbed deep fried schnitzel and more than likely (it tasted like) full cream sauce. I actually found this quite easy to adapt, infact easier than I thought so I was happy with that and I was even happier with the flavour. I had managed to keep the flavour creamy and vibrant even though I used low fat ingredients.


Chicken with Creamy Garlic Prawns
Serves: 4
Points per serve: 6
cooking spray
4 small chicken fillet breasts, no skin, visible fat removed
500 grams raw prawns, peeled
1 tablespoon crushed garlic
1 tablespoon freshly chopped flat leaf parsley
1/2 cup dry white wine
1/2 cup water
1 teaspoon chicken stock
2 tablespoons reduced fat cream
1 tablespoon cornflour
2 tablespoon water extra

Preheat oven to 180 degrees Celsius.

Coat a large frying with cooking spray, add chicken fillets and cook over a medium to high heat until sealed and golden brown on both sides. Remove from pan and place on an oven tray. Cook in oven for a further 15 minutes or until cooked through.

Meanwhile respray frying pan with cooking spray and add prawns, garlic and parsley cooking until prawns start to turn pink. Transfer to a plate.

Add wine, combine water and stock powder to the pan, stirring to pick up any garlic stuck to the pan base until boiling. Reduce heat, stir in the cream and combined water and cornflour. Stir until slightly thickened. Return prawns to the sauce and still until heated through.

Remove chicken from oven and place on plates. Top with creamy garlic prawn sauce and serve.

(click here for a printable version of this recipe)

Tuesday, March 30, 2010

Pork Cutlet with Mushroom, Vodka and Chilli Sauce

I had actually planned using Char Sui Sauce as a marinade for the pork cutlets tonight but my plans changed when I got home to find we didn't have any Char Sui sauce.... so I guess Char Sui Pork Cutlet with Sesame Noodle Salad will have to wait for another day.

Needless to say I had to come up with something else using the pork cutlets which I did have. So in an imaginative mood I decided on tonight's meal, Pork Cutlet with Mushroom, Vodka and Chilli Sauce. I was fancying a creamy sauce also which was good as it calmed the chilli taste.


Pork Cutlet with Mushroom, Vodka and Chilli Sauce

Serves: 4
Points per serve: 6


4 pork cutlets, 200 grams each, fat trimmed
salt
freshly ground black pepper
cooking spray
100 grams mushrooms, sliced
3 tablespoons Vodka
1 teapsoon chilli paste , or to taste
1/2 cup low fat cream


Season pork cutlets on both sides with salt and pepper.

Coat a large frying pan with cooking spray and cook pork over a high heat for 3 - 5 minutes on each side depending on your preference. Remove from heat. Place on a plate and cover with foil.

In the same pan add the mushrooms and cook for 2 - 3 minutes or until softened. Deglaze the pan with the vodka, swirl around covering all the pan. Add chilli paste, mix through. Add the cream and mix well.

Serve pork cutlets and serve with the sauce.

(click here for a printable version of this recipe)

Friday, February 5, 2010

Satay Chicken Pizza

We love homemade pizza nights as it gives us a chance to experiment with toppings. We all make our own pizza using Lebanese Bread (Pita) as the base so it's low in fat and not as filling as using dough.

Recently I had come accross a recipe for Satay Chicken Pizza and I just knew that was what I was making. Another easy Weight Watcher friendly recipe that was quick and tasted fantastic.

Satay Chicken Pizza
(recipe adapted from Weight Watchers Cook Easy)

Serves: 4
Points per serve: 6


500 grams chicken breast fillet, thinly sliced
1 tablespoon soy sauce
1/4 cup satay sauce
2 lebanese bread rounds
2 tablespoons tomato paste
1 small red onion, thinly sliced
1 red capsicum, thickly sliced
50 grams baby spinach leaves
50 grams low fat mozeralla cheese

Preheat oven to 200 degrees celsius.

Lightly spray a large non stick frying pan with cooking spray and heat over a medium high heat. Cooked the chicken for 3 - 4 minutes or until cooked through. Add soy and satay sauce and simmer, uncovered, for 2 minutes.

Place bread on baking trays and spread with tomato paste. Top with onion, capsicum and chicken mixture. Sprinkle with spinach leaves and mozeralla cheese. Bake for 10 - 12 minutes or until pizza bases are crisp.

(click here for a printable version of this recipe)

Saturday, November 28, 2009

Dum Ka Murgh (Chicken in Yoghurt)

Called dum ka murgh in India, this dish was thought to have been introduced into Indian cooking by the Mughal dynasty. Dum is the name of the traditional style of casserole dish used, which is a tightly sealed pan and slowly steams the dish's ingredients so no flavour escapes and very little oil is required.

This dish was full of flavour and one that we all enjoyed.


Dum Ka Murgh (Chicken in Yoghurt)
(recipe adapted for Woman's Weekly New Curries)

Serves: 8
Points per serve: 6

2 teaspoons ground cumin
2 teaspoons ground cardamom
1 teaspoon ground cinnamon
1/2 teaspoon ground clove
1/2 teaspoon ground tumeric
1/2 cup (80 grams) blanched almonds
2 cm piece fresh ginger (10g) chopped coarsely
2 cloves garlic, quartered
500g non fat greek style yoghurt
1.5 kilograms chicken thigh cutlets, skin and visible fat removed
2 tablespoons vegetable oil
2 medium brown onions, thinly sliced
1/3 cup lemon juice
1/4 cup fresh coriander, chopped

Dry fry spices and nuts in small heated frying pan, stirring until nuts are browned lightly.

Blend or process nut mixture, ginger and garlic unitl mixture forms a paste. Combine mixture with yoghurt in a large bowl. Add chicken and mix well. Cover and regfrigerate for 3 hours or overnight if time permits.

Heat oil in a large saucepan and cook onion, continually stirring until soft. Add chicken mixture, simmer covered for about 45 minutes or until chicken is cooked through. Stir in the lemon juice and serve sprinkled with coriander.

Wednesday, November 4, 2009

Sweet and Spicy Lamb

When I first read the ingredients for this dish I wasn't sure what we would think of it. It had spices that we use in a lot of our cooking but it also had apple and sultanas so I think I was unsure how "sweet" it actually would be.

Another quick and easy dish to cook, this recipe is from The Symply To Good To Be True collection and I have to say it pleased everyone in the house, as well as surprised Noel and myself. It was pleasantly sweet but not overly spicy either. I thought it could have been a little more spicier and will probably add a little chilli powder the next time I cook it. The kids gave it the thumbs up which is always a good sign.

I served this with Vegetarian Fried Rice but would be perfect with steamed rice or even couscous.


Sweet and Spicy Lamb
(recipe source: Symply To Good To Be True # 3)


Serves: 6
Points per serve: 4

600g lean lamb steaks (or strips)
1/3 cup almond slivers
cooking spray
1 teaspoon crushed ginger
1 teaspoon crushed garlic
1 cup onion, sliced
1 cup peeled apple, diced
1/2 cup sultanas
1 teaspoon cardamon
1 teaspoon cumin
1 teaspoon dried coriander
1 teaspoon turmeric
2 teaspoons chicken stock powder
1 tablespoon tomato paste
1 tablespoon cornflour
1 x 375ml can evaporated light milk
1 teaspoon imitation coconut essence

Cut lamb into strips (if required).

Toast almonds on a sheet of foil placed under a grill until browned, set aside.

In a non stick frypan or wok that has been coated with cooking spray saute lamb, ginger and garlic until meat is nearly cooked. Remove from wok. Add onion, apple and sultanas and cook for 2 minutes. Put cardamom, cumin, coriander, turmeric, stock powder and tomato paste into pan. Mix cornflour into the milk add the essence. Add to frypan stirring continuously until boiled. Return lamb to the pan and heat through.

Sprinkle almonds over top.

NOTE: for a thinner sauce reduce the amount of cornflour to 2 teaspoons.

(click here for a printable version of this recipe)
Monday, October 19, 2009

Pastitsio

Pasta is always a huge hit in our house as was this dish. Pronounced Pa'sti-tsi-o it's a greek baked pasta dish, layered like Lasagna. Starting with a bottom layer of pasta (normally a tube pasta) mixed with egg and cheese, the second layer is a tomato meat sauce, a third layer of another pasta and then topped with a custard like sauce instead of a bechamel. Grated cheese and at times breadcrumbs are sprinkled on top to form a crust.

Of course I have adapted this recipe to reduce it's fat content and point count. I did use the basic bechamel sauce but added egg to it to give it the custardy consistency. I only used one layer of pasta also. But it was still full of flavour, filling and as usual devoured by one and all.


Pastitsio

Serves: 8
Points per serve: 6

cooking spray
1 onion, diced
2 teaspoons crushed garlic
500 grams lean lamb mince
2 tablespoons tomato paste
1/2 cup red wine
1/2 cup water
1 teaspoon beef stock powder
2 tablespoons oregano
3 bay leaves
1/4 teaspoon nutmeg
1 400gram tin diced tomatoes
2 carrots, peeled and grated
200g button mushrooms, finely sliced
salt
freshly ground black pepper
250 grams penne pasta
2 eggs, lightly beaten
1 tablespoon fat reduced butter
2 tablespoons plain flour
2 cups skim milk
1 egg, lightly beaten
2 egg whites, lightly beaten
60 grams grated tasty cheese
30 grams parmesan cheese, finely grated
2 tablespoons breadcrumbs

Coat a large frying pan with cooking spray. Add onions and garlic, cook over a medium heat for 5 - 10 minutes or until onions are soft and golden. Add mince and cook until browned, breaking up the clumps whilst cooking. Add the tomato paste, mix well to combine and cook for a further 5 minutes.

Add the wine, water, stock powder, oregano, bay leaves, nutmeg, tomatoes, carrots and mushrooms. Stir well and simmer for 15 - 20 minutes until juice has thickened. Season with salt and pepper to taste.

Preheat oven to 180 degrees Celsius.

Spray a large lasagne or baking dish with cooking spray.

Meanwhile bring a large saucepan of salted water to the boil, add pasta and cook as per packet directions. Drain well. Allow to cool for 5 minutes and mix through beaten egg. Place pasta mixture into lasagne dish and press down to ensure base of the dish is completely covered and the pasta layer is even.

Remove bay leaves from the meat sauce. Place meat sauce evenly over the pasta layer.

In a small saucepan over a low heat melt butter and stir through flour. Gradually add milk ensuring a smooth sauce with every addition. Bring to the boil and simmer until slightly thickened. Remove from heat and add remaining egg and egg whites, stirring well. Spread evenly over meat. Sprinkle with combined cheeses and breadcrumbs.

Cook for 30 - 40 minutes or until heated through and top golden.

Allow to stand for 10 - 15 minutes prior to serving.

Wednesday, October 7, 2009

Mexican Beef Parcels

Before I begin, I have just remembered that I didn't tell you about our recent trip to the cinema, Gold Class I might just add, thanks to Magnum Ice Creams and the upgrade coupon. So naturally we bought 4 boxes of ice creams to get the four coupons as we thought it would be great to take the kids as a special treat. Now I think they are addicted to Gold Class as they already asked when they could go there again and that was before the movie started!! Once they had enough of raising and lowering their seats and settled, they were amazed that the drinks that we ordered in the foyer were then delivered by a waitress just as the movie started. So what movie did we see?

Julie and Julia, of course! And I loved it. I must say at times I sensed several pair of eyes glancing at me with the look of "OMG you are so like that at home when you are blogging!!" Funny enough until I came across the world of food bloggers I thought I was the only crazed one obsessed by food! The movie enthralled me, not only about Julie and her blogging (my hobby turned obsession also) but admired Julia Childs for the determination and the steps she took to get her book publish all those years ago, years before computers and email. It's a movie I would recommend

So now for the food blogging part of this post...

I have confessed before that I adore filo pastry as it is so versatile and can be used for both sweet or savoury foods. Filo pastry is also good for the weight watcher and it contains far less fat than that of puff or shortcrust pastry.

These Mexican Beef Parcels are always a hit in our house, in fact any filo parcel always goes down well. I guess you could say they are somewhat a flavoured cheat's meat pie although it's not filled with stewed beef and gravy! And overall much better for you.

The trick to making the perfect parcels is first to ensure that the meat beef isn't tough after it's been cooked in the oven is only to flash fry it in the beginning. Do not over cook it at the frying stage, even if it's not completely browned or it will be unenjoyable in the parcel. Remember while the parcel is cooking so is the meat. Also when assembling each parcel make sure that the filling is cool. If it's even too warm the parcel will be very hard to wrap up.

Mexican Beef Parcels

Serves: 4
Points per serve: 6


cooking spray
500 grams beef strips
1 onion, diced
1 carrot, diced
1/2 red capsicum, diced
1/2 green capsicum, diced
1 packet taco seasoning
1/2 cup water
1 400g tin diced tomatoes
8 sheets filo pastry
sweet paprika to garnish, optional

Spray a frying pan with cooking spray and flash fry beef in batches for 1 -2 minutes. Transfer to a plate.

Recoat the frying pan with cooking spray and cook onions, carrots and garlic for 5 minutes or until softened. Add capsicums and cook for a further 5 minutes. Stir in the taco seasoning and water until fully combined. Add the tomatoes, mix well and simmer for 10 - 15 minutes or until sauce has thickened. Remove from heat and allow to cool.

Once sauce mixture is cooled stir through the beef strips.

Preheat oven to 180 degrees Celsius.

Place one sheet of filo pastry on a board or work bench with the smaller side closest to you and spray with cooking spray. Cover with a second sheet of pastry. Place 1/4 of beef sauce mixture at one end of the pastry rectangle. Fold over both edges, spraying the folded area down the length of each side and then roll up to enclose filling. Repeat until all 4 parcels have been made. Place on a foil lined baking tray and spray with cooking spray. Sprinkle with sweet paprika, if using.

Cook in oven for 15 minutes or until cooked through and pastry is golden.


(click here for a printable version of this recipe)

Tuesday, September 29, 2009

Bacon and Mushroom Risotto

Noel worked late again tonight as he is not a lover of risotto I made use of my opportunity and made myself some for dinner. I say myself as the kids both wanted homemade meat pies which was fine and they had but then they too tried my creation.

I wanted to make a creamy style risotto, which are my favourites, but of course without using any cream and at the same time I was trying to keep the points value down. Add more point free vegetables to bulk it up such as baby spinach, zucchini or even asparagus and of course you could omit the bacon.

Although this dish is quite time consuming and demands all your attention, it was well worth it taste wise.


Bacon and Mushroom Risotto
Serves: 4
Points per serve: 6

1 litre (4 cups) water
1 tablespoon chicken stock powder
1 tablespoon reduced fat spread
1 brown onion, finely chopped
2 rashers middle bacon, rind and visible fat removed
2 garlic cloves, crushed
1 1/2 cups (325 grams) arborio rice
1/2 cup dry white wine, such as chardonnay
200 grams button mushrooms, finely sliced
2 teaspoons fresh flat leaf parsley, finely chopped
25 grams (1/2 cup) fresh parmesan, finely grated
freshly ground black pepper

In a small saucepan mix together the water and stock powder. Heat stock and keep simmering over a low heat.

In a large heavy based saucepan heat reduced fat spread over a medium heat. Add onion, bacon and garlic. Cook, stirring, for 5 minutes or until golden

Add the rice into the onion mixture. Cook, stirring, until completely combined. Add the wine and cook, stirring for 3 minutes or until the liquid has reduced by half.

Using a ladle add the stock, one ladle at a time. Stirring continuously after each addition until all the liquid is absorbed, this should take approximately 20 minutes.

Stir in mushrooms. Cook, stirring, for 3 - 4 minutes or until mushrooms are tender and liquid absorbed.

Remove from heat and stir in the parmesan. Season with freshly ground black pepper.

(click here for a printable version of this recipe)

Thursday, September 17, 2009

Curried Sausages

I have to admit I don't cook sausages very often. It is not that we don't like sausages, all of us love them, prehaps a little too much. The reason that they are not regularly on our menu is mainly due to the fact that normal sausages are so high in fat they are pretty much a no-no when it comes to dieting. Well that was until recently!

The Peppercorn Food Company have released a range of gluten free, extra lean sausages and I have to say I really like them. Not only are they very low in saturated fat and get the tick from the National Heart Foundation, but they actually taste good too. They have several different flavours available and although they are a little on the pricey side for sausages - you only get what you pay for right?

Curried sausages have to be a classic home style meal, one that gives comfort no matter when you eat them, either served with mashed potato or steamed rice. It is one of those meals your grandma used to make and are certainly one of those recipes that you expect to have handed down through the generations. I do not have a handme down recipe, infact I cannot recall my grandma cooking them nor my mam. However I saw this in a recent Weight Watchers magazine so I just had to try it.

In the beginning I was kind of concerned with using a combination of curry powder and dijon mustard as the sauce flavouring but it worked well. The apple gave the dish a hint of sweetness but didn't make it overpoweringly sweet and more importantly it got the thumbs up from all of us.


Curried Sausages
(recipe sourced from: WW Magazine June 2009)

Serves: 4
Points per serve: 6.0

500 grams lean sausages
cooking spray
1 medium brown onion, thinly sliced
1 medium green apple, peeled, cored and grated
2 tablespoons plain flour
2 teaspoons mild curry powder
2 teaspoons dijon mustard
2 cups chicken stock
1 medium green capsicum, seeded and thinly sliced
1 medium red capsicum, seeded and thinly sliced
2 cups cooked white rice, to serve

Place sausages in a saucepan and cover with cold water. Bring to the boil, reduce heat to low and simmer for 10 minutes. Drain.

Spray a non stick frying pan and heat over high heat. Add sausages and cook for 3 - 4 minutes or until browned all over. Transfer to a plate and slice in half or quarters diagonally.

Add onion and apple to the pan, cook for 2 minutes or until the onion has softenend. Add flour, curry powder and mustard. Stir to mix. Gradually add stock and bring to the boil. Add sausages and capsicums. Reduce heat to medium low and simmer uncovered for 15 minutes or until sauce thickens. Serve with 1/2 cup rice each.


Stats for Peppercorn Food Company Extra Lean Beef Sausages
500g = 7 sausages (72g per serve), Each serve: Energy: 448kJ Protein 9.6g Fat, total: 5.8g Fat, saturated: 2.2g Carbohydrate: 4.0g Sugars: 0.9g Sodium: 324mg Iron: 1.1mg

Thursday, September 10, 2009

Satay Beef with Noodles

Tonight's dinner was a request.. Oliver wanted Beef Stir Fry and Alexandria automatically followed up with Satay. So what better way to please both my children than to have Satay Beef with Noodles.

Unlike most Satay Sauces this is quite low in fat. The cream has been replaced by Low Fat Evaporated Milk but still had the creamy texture. In fact, you could just boil all the sauce ingredients and make a stand alone Satay Sauce.

Satay Beef with Noodles

Serves: 6
Points per serve: 6

cooking spray
500 grams lean beef strips
250 grams dried noodles, of your choice
1/2 cup lite crunchy peanut butter
2 tablespoons soy sauce
2 teaspoons ground coriander
1 teaspoon ground cumin
1 teaspoon tumeric
1/4 teaspoon chilli powder, optional
1 x 375 ml Lite & Creamy Evaporated milk
2 teaspoons crushed garlic
1 brown onion, sliced
1 head of broccoli, cut into small florets
2 carrots, thinly slice on diagonal
1/2 red capsicum, sliced
1/2 green capsicum, sliced
1 x 400 gram baby corn spears, drained

Spray a wok or large frying pan with cooking spray and heat over a high heat. Cook beef strips, in batches, until browned and sealed. Remove to a plate.

Bring a large pan of water to the boil and cook noodles according to the packet instructions. Drain from water when just done, rinse with cold water. Do not overcook.

Combine peanut butter, soy sauce, coriander, cumin, turmeric, chilli powder (if using) and evaporated milk in a jug, mixing well.

Respray wok or frying pan with cooking spray and over a high heat cook garlic, onions, broccoli and carrots for 3 - 5 minutes or until vegetables start to soften. Add capsicum and cook for a further 3 - 5 minutes. Add the corn spears.

Add all the sauce mixture and stir to combine. Bring to the boil and return beef to the pan. Cook for 2 - 3 minutes until sauce starts to thicken. Add noodles and toss to combine and noodles are heated through.

(click here for a printable version of this recipe)

Thursday, August 27, 2009

Lamb Tagine

This is a recipe that I wanted try the minute I saw it's picture in the Weight Watchers Magazine (July 2009 issue) and have read many reviews about it on the Weight Watchers Forums since.

The ingredients fascinated me (especially cooking meat with fruit) and my love for exotic flavours drew me to the recipe. The morroccan seasoning and cumin smelt beautifully aromatic when preparing this and best of all once organised it went into my slow cooker for 10 hours whilst I went ahead with my day.

Lamb Tagine
(recipe source WW Magazine July 2009)


Serves: 6 large or 8 average
Points per large serve: 6
Points per average serve: 4.5

cooking spray
1 kilogram lean diced lamb
1 large brown onion, finely diced
2 garlic cloves, crushed
2 teaspoons ground cumin
3 teaspoons Moroccan Seasoning
1/2 cup water
1 large red capsicum, cut into 3 cm pieces
400 grams pumpkin, peeled and cut into 4 cm chunks
1 cup dried apricot halves
2 cups of chicken stock
2 tablespoons cornflour
2 tablespoons water (extra)
3/4 cup fresh coriander leaves, chopped

Spray a large frying pan with cooking spray and heat over high heat. Cook lamb in batches for 3 minutes or until browned all over. Transfer to slow cooker bowl.

To the same pan, add the onions and garlic, cooking 3 minutes or until softened. Add the cumin and Moroccan Seasoning and cook while stirring until fragrant. Add 1/2 cup water and bring to the boil. Place onion mixture in the slow cooker bowl.

Add the capsicum, pumpkin, apricots and stock, stir to combine. Cover and cook on low setting for 8 - 10 hours or on high setting for 4 - 5 hours.

STOVE TOP: Preheat oven to 180 deg Celcius. Cook in a large covered casserole dish in the oven for 2 hours.

Blend the cornflour with 2 tablespoons water. Stir into the tagine and cook on high for 10 minutes or until slightly thickened. Stir in the coriander and serve.
Serve with couscous allowing 2.5 points per 1/2 cup.