Showing posts with label bbq. Show all posts

Wednesday, August 2, 2017

Thai Style Chicken Satay Skewers with Peanut Sauce

I have been cooking the same Satay Sauce since I was a kid... it's the same one my mam cooks.  It comes from a old Women's Weekly Cookbook titled Chinese Cooking Class Cookbook.  Many of you would have seen this cookbook whether it was when it was first published, then republished or more likely on the shelf at an Opportunity Shop.  However saying this I thought it was time to try a different Satay Sauce to accompany some chicken skewers. 
 
Have you ever google a recipe and been amazed by how many different results you get?  Makes me wonder how big Google is or then again how big the world really is! I think I could have read about Satay Sauce for days.  Instead of the Chinese style sauce this time I thought I would be adventurous and try a recipe from another style of cooking, Thai.  While both hubby and I enjoy eating Thai foods we rarely cook it at home for a reason I can not produce.  I guess it's a style that we just haven't really experimented with - yet!

The marinade should taste sweet, spicy, and salty. It doesn't have to be the spiciest but the stronger more vibrant flavours should be sweet and salty. If you need to adjust the taste add more sugar or more fish sauce to adjust the taste. However if you would want it to be spicier you also can add more chilli.

Now for the sauce.  No peanut butter in sight as this authentic recipe for Thai peanut sauce is made with real peanuts! This part of the meal was quick and easy to make.  While this sauce is meant to have be smooth, but if you prefer it with a bit of crunch when processing the nuts leave some smaller pieces to the side. Adding more fish sauce (or soy sauce) if not salty enough, or more cayenne if not spicy enough. If too salty, add a squeeze of fresh lime juice. If you'd prefer it sweeter, add a little more sugar.

Overall this wasn't one of the easiest recipes to make but well worth the effort.

 
Thai Style Chicken Satay Skewers with Satay Sauce
(Recipe adapted from The Spruce)
 
Serves: 6
 
1/4 cup minced lemongrass, fresh or frozen
2 shallots
4 cloves garlic
1 to 2 fresh red chillies, sliced
1 thumb-size piece galangal or ginger, thinly sliced
1/2 teaspoon turmeric
2 tablespoons ground coriander
2 teaspoons cumin
3 tablespoons dark soy sauce (available at Asian food stores)
3 tablespoons fish sauce
6 tablespoons brown sugar (you need all of this)
2 tablespoons vegetable oil
18 chicken tenderloins or 1 kilogram chicken breast fillets, sliced thinly
1 cup fresh-tasting dry roasted peanuts, unsalted
1/3 cup water
2 cloves garlic, minced
1/2 teaspoon dark soy sauce
2 teaspoons sesame oil
1 - 2 tablespoons brown sugar, to taste
2 - 2 1/2 tablespoons fish sauce
2 tablespoons lime juice
1/2 teaspoon cayenne pepper
1/3 cup coconut milk
18 wooden skewers

Make the marinade by placing the lemongrass, shallots, garlic, chiles, galangal or ginger, turmeric, coriander, cumin, soy sauce, fish sauce, brown sugar, and oil in a food processor or chopper. Process well.


Place chicken in a bowl and pour the marinade over. Stir well to combine. Cover and allow to marinating for at least 2 hours but overnight if time permits.


Soak skewers in hot water for 30 minutes.

Meanwhile place remaining ingredients in a blender or food processor. Blend or process until sauce is smooth. If you prefer a runnier peanut sauce, add a little more water or coconut milk.  Place in a bowl.
 
 
Thread chicken onto the skewers leaving a quarter of the skewer empty to act as a handle when grilling or frying.

Grill or fry the satay, basting the first time you turn it with a little of the leftover marinade from the bowl. Depending on how thin your meat is, the satay should be done in 10 to 20 minutes.

 
Place satay sauce in the microwave on high for 1 - 2 minutes or until warmed through.

Serve with Thai jasmine rice and Thai peanut sauce for dipping.
 
Note:  This sauce tends to thicken as it sits so just add a little water or coconut milk to thin it out, as needed. Otherwise, it stores well if kept covered in the refrigerator for up to 2 weeks or you can place in the freezer.

Sunday, February 26, 2017

Barbecued Cheesy Capsicums

Well now I have started I am going to keep going... yes these will be dishes that we have cooked over the last month or so but I need to do this and I am trying to catch up.  It's very interesting the life that we are all dealt.  Mine changes direction every now and then!  Different situations present themselves with different options and it takes ones focus to complete, fix or defeat.  It's just the journey of life.  I've decided, that while my life often seems full, I need to make the most out of every day from here on in.

Blogging is something that I do really enjoy doing.  It's like being a teacher and sharing your knowledge. We enjoy cooking and eating lots of variety in food - while many of you think that what we cook is way over the top we need you to understand it's all about the flavour not the recipe. Don't get me wrong one of our favourite family dishes is Eggs Beans and Chips, trust me there is pure excitement when that's on the weekly menu planner.  However the majority of our recipes are easy - however some have some interesting elements.  Our aim with this blog is just to share ideas, especially low fat healthy recipes (as we are human - not all are), with you all.  If any of you try the recipes and enjoy the food we do - well that's fantastic.  Let us know -  we would love to hear your thoughts.

Anyhow enough said.....

This dish was something out of left field for my kids.... I will be honest I think there were mixed feelings once I put the platter on the table. My husband and I thought they were great, son enjoyed it but daughter didn't enjoy the texture of the capsicum!! LOL she is 15 and at the moment anything we cooked has the potential of having issues!

The capsicums filled with a cheesy egg mix incorporating corn, cheese and bacon were a much lighter dinner than meat and 3 veg but it made such a refreshing change.  Once prepared, cooked on the barbecue, these served with some rocket and sundried tomatoes made a refreshing change.


Barbecued Cheesy Capsicums
(recipe adapted from Weight Watchers Make It Fresh)

Serves; 4
SmartPoints per serve: 10

100 grams short cut bacon, fat trimmed, chopped
4 medium red capsicum (about 200 grams each)
1/2 cup frozen corn kernels, thawed
1/3 cup low fat grated tasty cheese
2 tablespoons finely chopped fresh chives, plus extra to garnish
8 eggs, lightly beaten
1/2 teaspoon ground paprika
80 grams rocket leaves
100 grams sun dried tomatoes not in oil

Preheat a hooded barbecue over medium heat.  (If you don't have a hooded barbecue, you can bake capsicums in an oven preheated to 200 degrees Celsius or 180 degrees Celsius fan forced.)  

Lightly spray a small non-stick frying pan with oil and heat over medium-high heat.  Cook bacon, stirring, for 3-4 minutes or until browned and crisp.  Transfer to a large bowl, cool.

Cut each capsicum in half length ways.  Remove and discard core and seeds.  Place on a tray - cut a small sliver off the base of each capsicum if they don't sit flat.

Add corn, cheese and chives to the bacon and mix well.  Divide bacon mixture among capsicum halves.

Pour egg into capsicum halves.  Sprinkle with paprika.

Turn off burners under barbecue flat plate, leaving grill side on.  Place capsicum halves on flat plate and cook, with hood down, for 25 - 30 minutes or until egg has set. 

Remove from barbecue to a platter.  Sprinkle with extra chives and serve with rocket and sun dried tomatoes.


Tuesday, January 31, 2017

Sticky Chilli Barbecue Chicken Cutlets

It feels like a lifetime since we've chatted about our cooking adventures (well it's been many weeks - actually nearly 2 months) and I have missed sharing our experiences on my blog. So here goes my first blog post for 2017. By the way, Happy New Year. I hope that 2017 is kind to you in every way possible.

2016 ended up being the year of unorganised chaos and frantic lifestyle and 2017 has pretty much started off the same way.  But it is what it is and more importantly through all the experiences in the past two months, both good and bad, it has made memories and learnings for all in the House of Murray.  Whilst we have been busy rest assured that we didn't' stop cooking.

So after finally deciding I needed to get my blogging arse back into gear I hope you enjoy this little number we prepared early (well early this evening!)  I say we but in all honesty I made the coleslaw and chopped the potatoes - Noel is responsible for marinating and cooking the chicken.

Sticky Chilli Barbecue Chicken Cutlets, perfect for a mid summers' evening dinner - in fact it tasted that good it would be perfect anytime of the year.  Sticky with a hint of heat and smokiness enveloped the tender juicy chicken - melt in your mouth perfect.

The Chilli component is completely up to your discretion - you can use what ever chilli sauce you like - mild, medium or hot.  Please bear in mind however that using sweet chilli sauce would only add to the sweetness.  We used Maggi Chilli Sauce but you could use Sirracha Sauce, which contains less sugar than most chilli sauces.  Add less sauce for less heat obviously.

Being a "sticky" dish it's quite high in sugars - therefore it's not a meal that should be eaten a lot if you are trying to lose weight but honestly if you want to treat yourself for one meal - this recipe should definitely be on your "to try" list,.  Obviously I will be attempting to modify the recipe to make it more Weight Watcher friendly in the near future.  But in the moment - I really enjoyed dinner tonight.


Sticky Chilli Barbecue Chicken Cutlets
(recipe adapted from Taste.com)

Serves: 4

4 cups water
2 teaspoons salt
1 teaspoon whole black peppercorns
1/2 lemon, rind coarsely chopped, juiced
5 fresh thyme sprigs
1 tablespoon brown sugar
8 (about 1.4kg) chicken thigh cutlets
1 tablespoon extra virgin olive oil

Barbecue sauce
1 1/2 cups tomato sauce
1/3 cup chilli sauce, to taste
1/2 red onion, coarsely chopped
2 large garlic cloves, peeled
1 tablespoon brown sugar
1 tablespoon molasses or honey
1 tablespoon Worcestershire sauce
5 fresh thyme sprigs, leaves picked
2 teaspoons smoked paprika
1 teaspoon dry mustard powder
1 teaspoon ground cumin

Combine water, salt, peppercorns, lemon juice and rind, thyme and sugar in a glass or ceramic bowl. Add chicken and stir to combine. Cover. Place in fridge for at least 30 minutes or up to 3 hours to brine.

For the barbecue sauce, process all the ingredients until smooth. Bring to a simmer in a saucepan over medium-low heat. Reduce heat to low. Simmer, partially covered, stirring occasionally, for 15-20 minutes or until thickened. Season. Reserve one-third of the sauce.

Heat a barbecue grill on medium. Drain chicken from the brine and pat dry with paper towel. Rub with oil, then season. Cook the chicken, turning, for 10 minutes. Baste with marinade and continue cooking, basting generously with marinade and turning every 3 minutes, for 20 minutes or until the chicken is cooked through.

Serve chicken with reserved sauce and sides of your choice.

Saturday, December 3, 2016

Heston’s Barbecue Chicken Wings

Noel was on a mission recently to cook chicken wings.  This fascination started when we went to the Loch Festival with our gorjus friends Kelee and Dave.  We had the most devine Buffalo Chicken Wings there and the men have been talking about them ever since.

I love the fact that Noel loves to cook and he spends hours googling and reading recipes. However saying this he has been know to create his own marinades - successfully I might add. He recently came across this recipe for Heston Blumenthal's Barbecue Chicken Wings and talked about making them for a couple of weeks.  I have to admit they sounded good on paper but they were magnificent in real life.

To quote the great man himself Heston said "Chargrilled chicken wings slathered in a rich, sticky sauce has got to be one of the all-time barbecue classics. This recipe will have those wings flying off the barbecue faster than you can make them. A little lime marinade to season and soften the meat, a coating of sauce made from the gutsy, punchy flavours and a sprinkle of sesame seeds for a toasted note and some crunch – and you’re good to go. Especially with a cooling, easy-to-make blue cheese dip on the side."


Heston’s Barbecue Chicken Wings
(Recipe adapted from Waitrose.com)

Serves: 4 – 6

For the barbecue sauce
2 cups chicken stock
100 grams white caster sugar
100 mls rice wine vinegar
200 mls tomato ketchup
1 tablespoon mushroom oyster sauce
1 tablespoon Worcestershire sauce
1 tablespoon sesame oil
1 tablespoon Tabasco Pepper Sauce, to taste
2 teaspoon Cayenne pepper

For the cheese dip:
300 grams blue cheese
300 ml soured cream

For the chicken wings:
juice of 4 limes
2 teaspoon salt
4 tablespoon oil
1 kilogram chicken wings
50 grams sesame seeds, toasted

To make the barbecue sauce, place the chicken stock in a pan over medium-high heat and reduce until it is approximately 150 ml. Place another pan over medium heat, add the sugar and cook until a medium caramel is formed. Slowly add the rice wine vinegar while whisking until the caramel has dissolved. Add the remaining sauce ingredients and whisk until well combined. Set aside.

To make the blue cheese sauce, removing any rind from the cheese, chop into small pieces and add to a bowl with the soured cream, and use a hand blender to blitz until smooth if desired. Put into a small container and allow to stand in the fridge.

When ready to cook, place the juice, salt and oil in a bowl, add the wings and toss until well coated. Allow to stand in the fridge for 45 minutes. Once the time has elapsed, place the wings on the preheated barbecue and cook for 20 to 25 minutes, turning them every few minutes until cooked through with no pink meat. Once cooked, transfer the wings to the bowl with the barbecue sauce and toss to thickly coat. Remove and transfer the wings to a clean bowl then sprinkle over the toasted sesame seeds.

Serve in a bowl with the cheese sauce, celery and any remaining barbecue sauce on the side.


Thursday, January 8, 2015

A 'Better" Burger with the Lot


Well when asked where I wanted to go for my birthday dinner celebrations I replied that I actually didn't want to go anywhere I simply wanted to stay home and have homemade hamburgers.  Little did my family know that I had been eyeing of the recipe in the January Weight Watchers Magazine which allows me to have a "guilty" meal without all the guilty baggage.  Finally they all relented and I got my wish.
 
A few minor modifications to the recipe and I had, enjoyed and was defeated by my chosen dinner.  It was yummy and oh so filling - it was magnificent. 
 
We cooked on the barbecue as it was a nice night here in Melbourne but stove top would do just fine. The burger pattie itself was very moist and tasty - the paprika giving it a hint the pattie a hint of smokiness without be as overpowering as liquid smoke or the like. 
 
But as usual "the lot" component hit the comfort zone perfectly... LOL.


A "Better" Burger with the Lot
(recipe adapted from Weight Watchers Magazine January 2015)
 
Serves: 4
ProPoints per Serve: 14
 
500 gram lean beef mince
70 grams fresh breadcrumbs (made from 2 slices bread)
1 egg white
1 teaspoon smoked paprika
1 tablespoon tomato sauce
2 tablespoon barbecue sauce
salt
freshly ground black pepper
cooking spray
125 grams Weight Watchers Bacon
4 eggs
4  slices 50% less fat tasty cheese
2 onions, thinly sliced
1 tablespoon balsamic vinegar
4 wholegrain bread rolls. 50 grams each, split
tomato slices
8 slices canned beetroot drained
lettuce leaves

Combine the beef, breadcrumbs, egg white, paprika, tomato and half the barbecue sauce in a bowl.  Season with salt and pepper.  Mix well to combine and shape into 4 same sized patties.
 
Heat a barbecue flat plate and spray with cooking spray.  Cook the patties for 5 - 10 minutes each side or until cooked through or to your liking.  Cook the bacon and the pineapple for 4 - 5 minutes each side or until browned.  Place the cheese on patties to melt.  Cook eggs, to your liking
 
Meanwhile, spray a saucepan with cooking spray and heat over medium-high heat.  Cook the onion, stirring, for 5 - 7 minutes or until lightly golden.  Add the vinegar and cook for a further 1 minute or until the liquid evaporates.
 
Grill cut sides of the rolls.  Top with lettuce, tomato, beetroot, patties, cheese, bacon, pineapple, onion and egg.  Top with remaining barbecue sauce and roll tops.

Enjoy.....


Wednesday, February 5, 2014

Rosemary, Lemon and Seeded Mustard Lamb Cutlets

It was our first night back at football training for the kids tonight so another quick dinner was required.  A BBQ is always a great option for this.

This quick, simple and very tasty marinade was perfect for the lamb cutlets and was delicate as no to overpower the beautiful tender lamb.  I get worried with using lemon as it can be very strong but coupled with another bold flavour, rosemary, it worked very well.  Served with a stunning Spinach and Carrot Salad there were no complaints.
 
 
 Rosemary, Lemon and Seeded Mustard Lamb Cutlets
(Recipe sourced from Taste.com)

Serves: 4
ProPoints per Serve: 5

60ml (1/4 cup) white wine
1 tbs wholegrain mustard
2 tsp chopped fresh rosemary
2 tbs fresh lemon juice
12 lamb cutlets, French trimmed

Whisk together the wine, mustard, rosemary and lemon juice in a glass or ceramic bowl. Add the lamb and turn to coat. Cover and place in the fridge for 30 minutes to marinate.

Preheat a barbecue grill or chargrill on high. Lightly spray both sides of the lamb with oil spray. Cook on grill for 2 minutes each side for medium or until cooked to your liking. Transfer to a plate and cover with foil. Set aside for 5 minutes to rest.
 

Monday, March 4, 2013

Balsamic and Garlic Lamb Cutlets

I am definitely playing catch up once again with blogging.  Please forgive me for my lack of recipe sharing it saddens me but aat this point in time it has been totally unavoidable with our life just being so full on and I have to say I do not have much idle time anymore.  Many of you know that my work load has increased, I have been travelling with work, we had a well earned family camping trip and are planning one for the Easter break not to mention school (Miss 11 started high school this year) and football season is starting up again with training currently 3 nights per week.

BUT..... Life is so busy but not busy enough to not cook good food!!
I do hope you enjoy what we have been cooking.....

Lamb cutlets are always devoured at the House of Murray - to be honest they are inhaled by everyone rather than chewed delicately but at least they are always enjoyed.

We always tend to marinate our lamb cutlets as its a meat that is complimented by many flavours.  Tonight we tried something new by using balsamic vinegar where we usually would use red wine as a marinade base. I have to say I have used balsamic vinegar before in one of my favourite meals, Chicken with Balsamic Glaze and a few steak recipes so tonight was a new experience.

A very nice experience I have to admit.  The combination of the balsamic vinegar, fresh garlic and oregano made a delicate yet noticeable in taste.

Please note:  I actually doubled the recipe as we had visitors for dinner.


Balsamic and Garlic Lamb Cutlets
(recipe adapted from WW 1 Recipe 3 Ways Cookbook)

Serves: 4
ProPoints per Serve: 8

2 tablespoons balsamic vinegar
2 garlic cloves, crushed
1 tablespoon dried oregano
1 tablespoon olive oil
salt
freshly ground black pepper
8 x 50 gram French lamb cutlets, fat trimmed
cooking spray
500 grams chat (baby) potatoes, halved
200 grams baby spinach leaves
2 truss tomatoes, chopped
1 small red onion, finely sliced
1 tablespoon white wine vinegar

Combine vinegar, garlic, oregano and half the oil in a large glass or ceramic bowl.   Add lamb and turn to coat.  Cover and refrigerate for 3 hours.
Preheat oven to 200 degrees Celsius.
Place potatoes on a prepared cooking tray.  Spray with cooking spray.  Cook in oven for 40 - 45 minutes or until crisp and golden.
Preheat a chargrill or barbecue over medium high heat.  Lightly spray both sides of lamb with oil.  Cook for 3 - 4 minutes each side or until cooked to your liking.
Meanwhile place spinach leaves on a plate, top with tomatoes and scatter over onion.  Whisk white wine vinegar and reamining oil in a small jub.  Drizzle over salad.  Serve lamb with potatoes and salad.


(click here for a printable version of this recipe)

Thursday, January 10, 2013

Barbecued Lamb and Vegetables

We are still cooking on the barbecue - probably will until the novelty wears off again this summer.  To be honest we don't use it enough or should I say we don't use it too it's full potential.  Really, a girl can only have so many sausages on the barbie!! If we continuously cook the same thing that's when I start thinking to myself that I am sooooo over barbecues!!

So with all that said, the challenge then is to keep barbecuing exciting and this recipe is a perfect example of not only an easy dish but a very flavoursome meal.  Right from the preparation stage and the aromas of the garlic and rosemary I knew we would all enjoy.


Barbecued Lamb and Vegetables
(recipe adapted from Weight Watchers Cook Easy Cookbook)

Serves: 4
ProPoints per Serve: 9

4 cloves fresh garlic, crushed
2 tablespoon fresh rosemary, plus extra sprigs to garnish
salt
freshly ground black pepper
2 tablespoons olive oil
500 gram trimmed lamb fillet or backstrap
2 carrots halved lengthways, cut into 3 cm pieces
2 medium zucchini, thickly sliced
1 small red onion, cut into thin wedges
1 medium red capsicum, cut into 3cm pieces
cooking spray

Combine garlic, chopped rosemary and oil in a small bowl. Place half of the rosemary mixture in a shallow dish. Add lamb and turn to coat.

Steam, boil or microwave carrots until just tender.  Drain and allow to cool slightly.

Combine carrot, zucchini, onion, capsicum and eggplant in a large bowl. Add remaining rosemary mixture and toss to coat.

Heat an oil-sprayed chargrill or barbecue over medium-high heat. Chargrill lamb for 3–4 minutes each side or until cooked to your liking. Transfer to a plate. Cover to keep warm. Rest lamb for 10 minutes before slicing thickly.

Meanwhile, chargrill vegetables, turning occasionally, for 8–10 minutes or until golden and tender. Transfer to a large serving bowl. Add sliced lamb and rosemary sprigs and toss to combine. Serve.


Sunday, January 6, 2013

Beef Tomato and Zucchini Kebabs with Chutney

Another night of balmy weather called for more barbecuing.... tonight with what my children have always fondly called "Meat on Sticks".

These marinated Beef, Tomato and Zucchini Kebabs were a breeze to prepare, cook and devour complimented with a sweet, slightly spicy chutney that screamed homemade... jar chutney is so boring.  The pungent spices used in the marinade surprisingly matched each other creating a really enjoyable flavour on the tender beef.

Served with Smashed Potatoes and a green salad - I would definitely recommend these at your next barbecue.....


Beef, Tomato and Zucchini Kebabs with Chutney
(recipe sourced from WW 1 Recipe 3 Ways Cookbook)

Serves: 4
ProPoints per serve: 7

1 teaspoon ground cumin
1 teaspoon smoked paprika
1 teaspoon fennel seeds
1 teaspoon dried oregano
1 garlic clove, crushed
3 teaspoons olive oil
600 grams lean beef rump, fat trimmed and cut into 3cm pieces
500 grams baby chat potatoes
cooking spray
1 red onion, finely chopped
1 teaspoon brown sugar
2 teaspoons red wine vinegar
1 small fresh birdseye chilli, deseeded if desired, finely chopped
400 gram can cherry tomatoes
2 small zucchini thickly sliced
8 cherry tomatoes

Place cumin, paprika, fennel, oregano, garlic and half the oil in a large glass or ceramic dish.  Add beef and turn to coat.  Cover and refrigerate for 3 hours.

Preheat the oven to 220 degrees Celsius or 200 degrees Celsius fan forced.  Lightly spray a baking tray with oil.  Boil, steam or microwave potatoes until tender.  Drain and allow to cool for 5 minutes.  Using a potato masher gently press potatoes until lightly crushed.  Lightly spray with oil and bake for 20 minutes or until golden.

Meanwhile, heat remaining oil in a small suacepan over medium heat.  Add onion and cook, stirring, for 5 minutes or until softened.  Add sugar, vinegar and chilli and cook, stirring, for 1 minute.  Add canned tomatoes and bring to the boil.  reduce heat and simmer, uncovered, for 10 minutes or until chutney is thick.

Thread beef, zucchini and fresh cherry tomatoes onto 8 wooden skewers (see note).  Preheat a chargrill or barbecue over medium high heat.  Lightly spray skewers with oil and cook, turning occasionally, for 3 - 4 minutes each side or until cooked to your liking.

Serve skewers with crushed potatoes and tomato chutney.

Note: Soak skewers in cold water for 10 minutes to stop them burning during cooking.

(Click here for a printable version of this recipe)


Wednesday, January 18, 2012

Tandoori Chicken

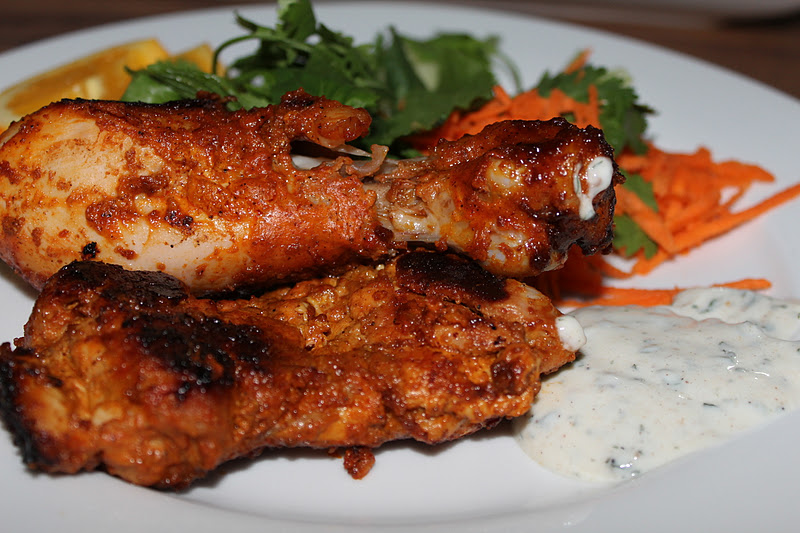
This has to be one of the easiest ways of making Tandoori Chicken - cooked on the bbq and served with a salad, Mint Raita and mango chutney it becomes a perfect balmy evenings dinner.

The trick to tandoori marinade I believe is the length of time you allow it to stand and gather all the flavours.  I always marinade mine overnight, covered in the fridge.


Tandoori Chicken

Serves: 6
ProPoints per serve: 8

4 tablespoons tandoori paste
1 cup no fat natural yoghurt
6 x skinless chicken thighs, all visible fat removed
6 x skinless chicken drumsticks, all visible fat removed

Mix together tandoori paste and yoghurt until well blended.

Place chicken in a large bowl or large snap lock bag.  Pour yoghurt mixture over chicken, toss to combine completely.  Allow to marinate for at least 1 - 2 hours or overnight if possible.

Preheat a barbecue.  Cook chicken, brushing with marinade, for 4 - 5 minutes each side ensuring chicken is cooked through.

Alternatively, preheat oven to 220 degrees Celsius.  Place chicken, in single layer, on an oiled wire rack set inside a large shallow baking dish.  Cook, uncovered, for about 25 - 30 minutes or until chicken is browned and cooked through, occasionally brushing with remaining marinade.


(click here for a printable version of this recipe)

Tuesday, January 3, 2012

Barbecued Lamb and Vegetables

" HAPPY NEW YEAR" to each and every one of you.  I wish you, your family and your friends best wishes for 2012.

Summer is definitely the time for cooking on the barbecue. There is something about the ease, the aromas and the relaxing atmosphere that comes from cooking outside.

We tend to have the same things on the grill.. sausages, hamburgers, steaks so last night I decided it was time to try something different.

Everyone enjoyed the flavour of this dish - as usual the rosemary and garlic complimented the lamb.  It was a nice change but will stick to the recipe next time.  I used lamb stir fry strips instead of lamb fillets which of course cooked too quickly on the bbq but didn't need to rest.  Although the lamb wasn't as tender as we would have liked but it was edible and all consumed.

Cross fingers 2012 allows me to be more regular with blogging as last year my work was so hectic, especially with the additional travel,  leaving me struggling to keep up with my precious hobby.  Thank you all for being patient with me and my erratic recipe blogging.  So here goes - the first recipe post for this year!! 

Enjoy....


Barbecue Lamb and Vegetables
(recipe adapted from WW Cook Fresh)

Serves: 4
ProPoints per serve: 9

4 cloves fresh garlic, crushed
2 tablespoons fresh rosemary, chopped, plus extra sprigs to garnish
2 tablespoons olive oil
500 grams lean lamb fillet
2 medium zucchini, thicly sliced
1 onion, cut into wedges
1 medium red capsicum, cut into 3cm pieces
1 bunch brocolini cut into 4 cm pieces
cooking spray

Combine garlic, chopped rosemary and oil in a small bowl. Place half of the rosemary mixture in a shallow dish. Add lamb and turn to coat.

Combine zucchini, onion, capsicum and eggplant in a large bowl. Add remaining rosemary mixture and toss to coat.

Heat an oil-sprayed chargrill or barbecue over medium-high heat.

Chargrill lamb for 3–4 minutes each side or until cooked to your liking. Transfer to a plate. Cover to keep warm. Rest lamb for 10 minutes before slicing thickly.

Meanwhile, chargrill vegetables, turning occasionally, for 8–10 minutes or until golden and tender. Transfer to a large serving bowl.

Add sliced lamb and rosemary sprigs and toss to combine. Serve.


Thursday, October 13, 2011

Caribbean Style Pork Cutlets with Rice Salad

OMG the flavour on these pork cutlets was truly amazing - a hit with both adults and kids tonight.

I was a little worried with the use of cinnamon, nutmeg and allspice as these are ingredients I associate with baking but these combined with the garlic and the lime flavours made a rub that absolutley complimented pork. 

The rice salad was light and not as stodgy as some made with a mayonnaise dressing - the fresh pineapple made it very refreshing to eat with the pork cutlets.

I will definitely be doing this marinade again and will try on chicken.


Caribbean Style Pork Cutlets
(recipe sourced from WW Eat and Enjoy Cookbook)

Serves: 4
ProPoints per serve: 8

2 garlic cloves, crushed
2 teaspoon finely grated lime rind
1/4 teaspoon ground cinnamon
1/4 teapsoon ground nutmeg
1/2 teapsoon ground allspice
1 tablespoon olive oil
4 x 180 gram lean port cutlets, fat trimmed
2 cups cooked long-grain rice
1/2 small pineapple, cut into 1cm pieces
1/2 red onion, finely chopped
1 red capsicum, finely chopped
1/4 cup small fresh basil leaves
2 tablespoons lime juice

Combine garlic, rind, cinnamon, nutmeg, allspice and half the oil in a small bowl.  Rub spice mixture over pork.

Heat a barbecue or chargrill over medium-high heat.  Cook pork for 4 minutes each side or until cooked to your liking.  Transfer to a plate. Cover with foil and rest for 5 minutes before serving.

Meanwhile, place rice, pineapple, onion, capsicum and basil in a medium bowl.  Drizzle with juice and remaining oil and toss gently to combine.

Serve pork with rice salad.


Monday, March 21, 2011

Portuguese Grilled Chicken

I know many of you visit us and are probably wondering what is happening with A Dash Of Flavour. We have been very very busy so once again I apologize for the lack of updates on this blog - please be assured we are not abandoning A Dash Of Flavour as this is a passion of ours we just need to work out how to become more time savvy.

Takeaway!! A downfall when one is time poor is the option of getting takeaway. Thankfully we enjoy food too much to resort to McDonalds or KFC, etc but when it comes to the choice of chinese, indian there is some temptation for at least they are "better" options than mass produced fast food. But another favourite of ours is Nandos - mainly just the chicken not the sides. So the chance to recreate this at home arrived this weekend and I must say this may be our answer to avoiding one temptation of take away.

We love cooking half chickens on the weber especially marinated and over the coals. They have such a flavour - the taste of the chargrill and then this marinade, which I must say kept the chicken moist and it was full of fresh flavour from the lemon juice and the fresh coriander.

Last night we used small chickens cut in half but I am sure this recipe would work well with chicken peices or even fillets. Propoints wise this is a high value dinner due to the skin being on the whole chicken which you could remove to reduce points.

Overall a delicious easy dish full of flavour and much cheaper than Nandos.


Portuguese Grilled Chicken

Serves: 4
ProPoints per serve: 14

2 small chickens, cut in half
8 cloves garlic, crushed
juice of 2 lemons
1/3 cup Jack Daniels Whiskey
2 bay leaves
1 - 2 tablespoon paprika (depending on taste)
1 tablespoon brown sugar
1 tablespoon olive oil
1 bunch of coriander, roughly chopped
salt
freshly ground black pepper

Clean chicken halves and pat dry. Place in a large snap lock bag or deep casserole dish.

In a jug combine remaining ingredients and mix well.

Cover the chicken with marinade ensuring all chicken in coated. Seal bag or cover dish with plastic wrap. Allow to marinade for 1 hour or overnight if time permits.

Light weber or heat bbq grill. Cook for 5 - 8 minutes each side ensuring that chicken is cooked through.


(click here for a printable version of this recipe)

Friday, December 17, 2010

Grilled Chicken with Salsa Verde

I love barbecued chicken! No I am not talking about charcoal chicken from a shop I love chicken cooked on the barbecue plate. It takes on such a different flavour than being fried or roasted. When I saw this recipe I knew we would all enjoy.

Salsa Verde is an Italian sauce made with fresh green herbs and served cold. I wasn't sure about it to be honest but to my surprise it was very nice and complimented the smokiness of the chicken, which Noel cooked on the Weber over the coals.


Grilled Chicken with Salsa Verde
(recipe sourced from WW Programme Cookbook 2010)

Serves: 4
ProPoints per serve: 6

1 teaspoon fresh lemon rind, finely grated
3 teaspoons olive oil
4 lean chicken breasts, (180g each)
1/3 cup fresh parsley, finely chopped
1/4 cup fresh basil, finely chopped
1/2 bunch fresh chives, finely chopped
2 tablespoons fresh lemon juice
1 individual fresh garlic, crushed
2 teaspoons wholegrain mustard

Make the salsa verde, combine the parsley, basil, chives, juice, garlic, mustard and 2 teaspoons of the oil in a small bowl.

Combine rind and 1 teaspoon of the oil in a small bowl. Rub all over chicken and season with salt and freshly ground black pepper.

Preheat a barbecue or chargrill over medium heat. Cook chicken for 3–4 minutes each side or until cooked through.

Slice chicken and serve topped with the salsa verde.

(click here for a printable version of this recipe)

Thursday, August 19, 2010

Teriyaki Steak with Onion Rings

I needed a quick dinner for tonight as I worked back late and this quick marinade for steak was the simple answer. The steak only needs to marinade for a little as 15 minutes for the flavour to be absorbed into the meat but you can marinate for longer. I used rump steak but any cut of steak would work well with this recipe.

Not only is this a simple marinade but it is very flavoursome and I am sure will go down a treat with everyone as it does in our house.


Teriyaki Steak with Onion Rings
(recipe adapted from The Backyard Barbecue Cookbook)

Serves: 4
Points per serve: 5

1/4 cup dry sherry
1/4 cup soy sauce
1 teaspoon crushed garlic
1 teaspoon grated ginger
freshly ground black pepper
4 x 200g rump steaks, all visible fat trimmed
cooking spray
2 teaspoons oil
2 large brown onions, sliced into rings

In a large bowl combine sherry, soy sauce, garlic and ginger. Season with freshly ground black pepper and mix well. Add steaks ensuring they are completely covered by the marinade. Allow to stand for at least 15 minutes.

Preheat a barbeque flat plate or large frying pan and heat oil. Cook onion over medium heat until golden, sprinkle with 1 - 2 tablespoons of the marinade and continue to cook until caramelised, approximately 5 minutes. Remove and keep warm.

Clean and respray the flat plate or frying pan and cook beef on high heat for 5 minutes on one side and 3 minutes on the other side or to desired liking. Serve meat with onion rings.

Saturday, February 13, 2010

Balsamic and Herb Mushrooms

I love eating the large mushrooms and although jam packed with flavour and vitamins they are sometimes a little boring so I decided to marinade giving them just that extra little zing. The marinade was a basic combination of balsamic vinegar, olive oil and herbs.

These were cooked over direct heat on the weber whilst Noel cooked the steak but they could be easily (and I have) roasted in the oven.


Balsamic and Herb Mushrooms

Serves: 8
Points per serve: 1


8 large or 16 medium mushrooms
1/4 cup olive oil
1/2 cup balsamic vinegar
1/4 cup red wine
1 tablespoon dried oregano flakes
1 tablespoon dried parsley flakes
pinch of salt
freshly ground black pepper

Place mushrooms in a large snap lock bag.

In a small jug mix together remaining ingredients, seasoning to taste with salt and pepper. Pour of mushrooms, seal bag and toss mushrooms around ensuring mushrooms are well coated.

Cook until soften and starting to darken, turning several times.

If cooking in the oven:

Preheat oven to 180 degrees Celsius.

Place mushrooms on a lined oven tray or baking dish. Cook for 20 - 30 minutes turning several times.

(click here for a printable version of this recipe)

Thursday, January 7, 2010

Jamaican BBQ Chicken

I love experimenting with marinades and we also are the proud owners of a new coal barbecue with we are loving to experiment with also. Needless to say tonight's dish was brought to you buy "experiments!"

I have always yearned to visit Jamaica and the flavours of any food from the Carribbean has always intrigued me... normally the tastes are a balanced blend between spicy and sweet but it's always a taste that leaves your mouth happy, sometimes wanting much more and more importantly leave you with a pleasant memory of that dish.

This dish did exactly that.... excited the mouth and the tastebuds, had a great aftertaste and I know I will talk about this one in the future so therefore leaving me a great memory.

It's not a traditional Jamaican recipe, I can claim this as my own but I did stick in line with many of the ingredients used in Jerk Chicken, although I just added a few of my own desired bits and pieces.


Jamaican BBQ Chicken

Serves: 8
Points per serve: 7

4 small chickens
1 onion, peeled
4 garlic cloves, peeled
2 teaspoons grated ginger
1 tablespoon dried thyme
1/2 teaspoon cayenne pepper
pinch nutmeg
1 teaspoon salt
1 teaspoon freshly ground black pepper
2 teaspoons crushed chilli
1/2 cup fresh coriander
1 cup orange juice
1/2 cup rum
1/4 cup olive oil
juice of 2 limes

Cut chickens in half using chicken scissors, clean and towel dry.

In a food processor add remaining ingredients and blend until smooth and combined.

Place chickens in a snap lock bag or large casserole dish and pour over marinade. Place in the refrigerator and leave for 4 hours or overnight if time permits.

Heat a bbq grill and brush with oil. Cook chickens 5 - 8 minutes each side or until no longer pink and cooked to your liking, basting with remaining marinade several times.

Wednesday, December 9, 2009

Lamb Skewers with Satay Sauce

Something extra tasty and always a winner in our house was on the menu tonight. Skewers! Doesn't matter what meat is on the bamboo skewer but the fact that it's on a stick and nine times out of ten serve with satay sauce they are always devoured normally ending in an argument as to who is having the last one.

Tonight we had lamb skewers, marinated in a combination of prepared satay sauce and dry sherry, then barbequed. They taste brilliant by themselves but are accompanied sensationally by homemade satay sauce.

Lamb Skewers with Satay Sauce

Serves: 8

Points per serve (2 skewers): 2
Points per serve with sauce: 3

16 bamboo skewers
500 grams lean lamb strips
1 tablespoon prepared satay sauce
1 tablespoon dry sherry
1 tablespoon oil
1 brown onion, finely diced
3 teaspoons curry powder
2 tablespoons prepared satay sauce
1 tablespoon dry sherry
1 teaspoon sugar
1 cup lite and creamy evaporated milk
1 tablespoon water
2 teaspoons cornflour

Soak bamboo skewers in water for at least 30 minutes (this will prevent them from burning).

In a glass bowl add lamb, satay sauce and dry sherry. Mix well to coat, cover and refrigerate for at least 30 minutes.

Meanwhile add oil to a small saucepan and over medium heat cook onions until transparent. Add curry powder and saute for 1 minute. Add satay sauce, soy sauce, sherry and sugar and cook for a further 2 minutes stirring constantly. Add the evaporated milk, bring to the boil, reduce heat and simmer uncovered for 2 minutes. Remove from heat until meat is cooked.

Heat the bbq flat plate or large frying pan. Spray with cooking spray and cook skewers for 2 - 3 minutes on each side or until cooked for your liking.

Reheat sauce and add combine cornflour and water. Stir constantly until thickened slightly. Serve with skewers.

(click here for a printable version of this recipe)

Thursday, November 26, 2009

Chermoula Prawns

Chermoula or charmoula is a marinade used in Algerian, Moroccan and Tunisian cooking. This marinade is usually used with fish or seafood, but works well with most meats. Chermoula is often made of a mixture of fresh herbs, spices, oil and lemon juice. As you can imagine there are many different recipes for this marinade.

I had never cooked with chermoula before so I was a little excited about what would come of these lovely ingedients. The aroma while they were cooking filled the kitchen And I knew just from the smell that as soon as I tried these they were going to be my new favourite prawns dish. The flavour was amazing.

We used hot paprika but you could tone down the heat of this dish by using sweet paprika if you don't like the taste hot... mmmm we do!!


Chermoula Prawns

Serves: 4
ProPoints per serve: 5

1 small brown onion, finely chopped
2 tablespoons coriander leaves, chopped
2 tablespoons flat-leaf parsley leaves, chopped
2 garlic cloves, crushed
1 tablespoon ground cumin
3 teaspoons hot paprika
2 teaspoons ground turmeric
1 teaspoons lemon juice
1 tablespoons olive oil
1 kilograms peeled raw prawns, tails left intact
lemon or lime wedges, to serve

Combine onion, coriander, parsley, garlic, cumin, paprika and turmeric in a large bowl. Stir in oil. Add prawns. Toss until prawns are well coated. Cover and refrigerate for 1 hour to marinate.

Coat a wok or large frying pan with cooking spray and over a very high heat add the prawns. Cook for 2 - 3 minutes, tossing continuously, until prawns are pink and cooked through. Place on serving platter and serve with lemon or lime wedges.

These could be cooked on the barbecue also. Preheat a barbecue plate on medium-high heat. Place half the prawns, in a single layer, on barbecue. Cook for 1 to 2 minutes each side or until prawns turn pink. Transfer to a bowl. Repeat with remaining prawns.


Friday, July 3, 2009

Tandoori Lamb Cutlets

My children have called these "orange chops" ever since I can remember and still do. There is something tantalising about the colour and flavour of these especially when they have been cooked on the barbecue and the chargrill does it's magic by leaving patterns and blackened edges..... mmmm what more can I say.

These lamb cutlets are marinated in a combination of plain yoghurt and tandoori paste. I have chosen to use premade tandoori paste, which has a nice flavour and a lot easier to use. I always serve these with a nice fresh salad of lettuce, tomato, onion, cucumber, grated carrot and thin orange slices, as I find these refreshing accompaniments. A side serve of mint raita is always on hand also.

Last night we served this with "Rice Stuff", her personally named dish which is a version of Kedegree... a friend of mine introduced me to this easy to make rice dish.


Tandoori Lamb Cutlets

Serves: 4 as a main
6 as an entree

Points per main: 6
per entree: 4

12 lamb cutlets, fat trimmed
8 tablespoons low fat plain yoghurt
4 tablespoons tandoori paste

Mix yoghurt and tandoori paste together until well combined. Place cutlets in a large snap lock bag or bowl. Cover with paste mixture and toss to coat well. Allow to marinade for a minimum of 2 hours or overnight if time permits.

Heat a barbecue or grill. Place tandoori cutlets and cook for 2 - 3 minutes each side or cooked to your liking. (Do not overcook as they will be tough). Baste with remaining marinade while cooking.

~~~~~~~~~~
Don't forget to enter my giveaway which ends
Monday 6th July, 12pm EST, click here.
~~~~~~~~~