Showing posts with label difficulty: 2 - medium. Show all posts

Wednesday, May 15, 2019

Baked Spicy Chicken Tacos

I have really been wanting Mexican for some time now but didn't want the usual boring beef tacos that are normally a mid week quick fix for dinner.  Then, as normal, I enlisted the help of my friend Google and came up with some fantastic ideas as always.

After deciding I would try baked tacos - the next decision was all about what filling I wanted.  There are so many different flavour combinations out there.  Something that everyone would eat is always the main criteria so chicken was a must.  And of course, being me, I had to add those vegetables in.  In this version I just used onion, corn, capsicum and black beans - I guess any vegetable would work though depending on your preferences.

This meal was so easy and perfect for a mid week dinner.  To make it even easier you could always used a cooked chicken from the supermarket rather than poaching the chicken yourself.  If you can save time cooking dinner during the week - go for it!

Flavours were magic - fixed my Mexican craving that's for sure.  A little spicy as I used my Homemade Taco Seasoning rather than shop brought.  However the additional cumin and garlic gave the flavours a little more depth and the lime juice added a beautiful zing.

I was pleasantly surprised at the crunchiness of the taco shells as I did expect them to sog a little and set the table with knives and forks at the ready.  No need.  This dinner was definitely finger food worthy and I am pleased to say completely all eaten... with lots of compliments from the family.


Baked Spicy Chicken Tacos

Serves: 6 - 8

4 chicken breast fillets
1 teaspoon salt
1 teaspoon ground black pepper
2 onions, diced
1 cup corn kernels
1 x 400 gram can Black Beans, rinsed and drained
1 red capsicum, finely diced
2 limes, juiced
2 teaspoons taco seasoning (or as desired)
1 teaspoon ground cumin
1/2 teaspoon garlic powder
20 Stand and Stuff (flat bottomed) taco shells
2 cups grated  cheddar cheese
1½ cups shredded iceberg lettuce
2 tomatoes, diced
2 tablespoons chopped coriander
taco sauce or preferred sauce, for garnish

Trim fat off the chicken fillets and cut into 3 pieces.

Bring a medium saucepan of water to boil and add the chicken, salt and pepper.  Stir to ensure that the fillets do not stick together.  

Bring the water to the boil again and reduce heat to medium-low.  Allow chicken to simmer for 20 minutes. After 10 minutes add the onions.  Drain and set aside allowing to the chicken to cool.

In a large bowl mix together the corn, black beans, capsicum, lime juice, taco seasoning, cumin and garlic powder.

When chicken has cooled, shred using 2 forks or your preferred method.

Add chicken and onions to the bowl of vegetables.  Stir to combine well.

Preheat the oven to 200 degrees Celsius. 

Arrange the taco shells inside 2 large baking dishes (not too loosely or they will fall over).

Sprinkle a little cheese into the bottom of each taco shell.

Divide the chicken mixture among the taco shells and top with the remaining cheese.

Bake for 10 - 15 minutes or until tacos are warmed through and cheese is golden and melted.

Serve accompanied with lettuce, tomato and coriander.  Top with taco sauce if desired.


(Click here for a printable version of this recipe)


Sunday, April 21, 2019

Bakewell Tart

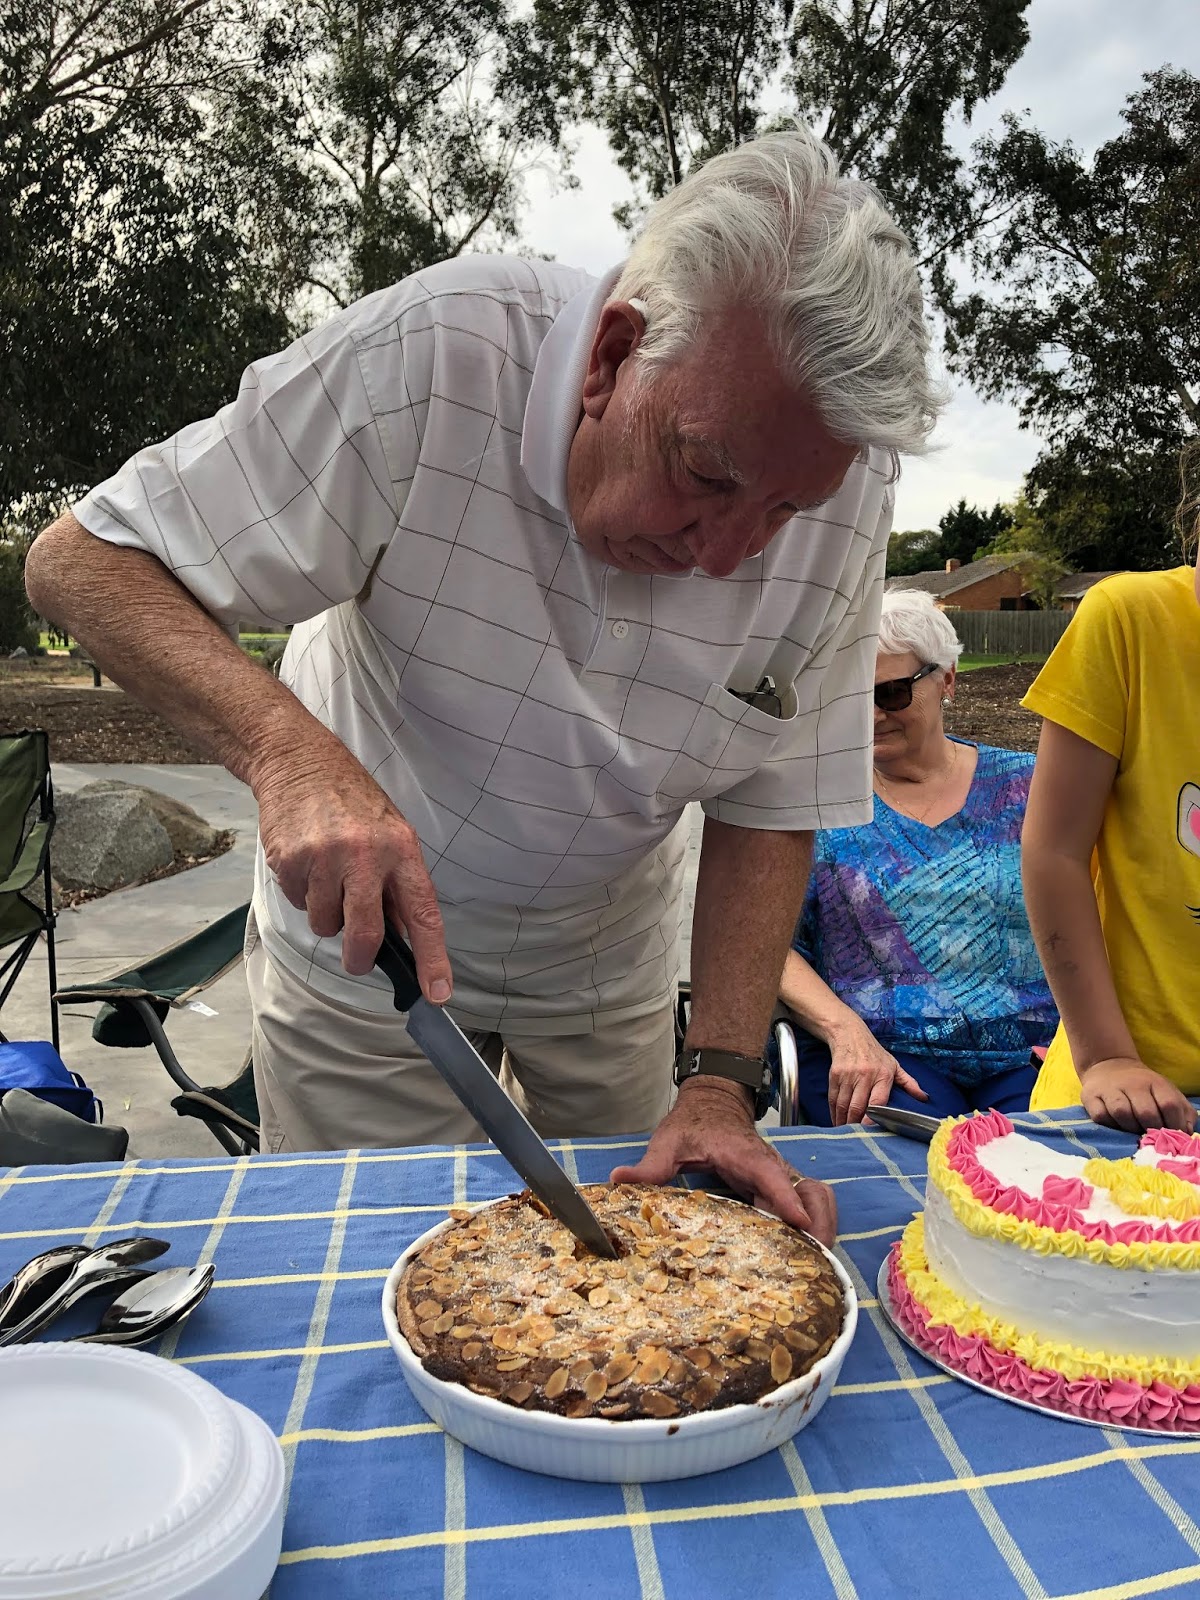
March and April see a string of birthdays in our family.  This year we were bless with our daughter turning 18 and our son turning 21 both in March.  April followed up with our niece's 8th birthday, Dad/Grandad's birthday and of course, hubby turning 50!  No shortage of candles in the House of Murray that's for sure. 

There were several French Vanilla Cheesecakes made along with a couple of Gluten Free Devil's Food Cakes (Chocolate Mud Cakes) but for Dad/Grandad I really wanted to make something that was old school and being that we are all from British background this Bakewell Tart really hit the spot.

A Bakewell tart, as I believe it should be, has a crisp sweet shortcrust pastry base, a layer of thick jam, a generous frangipane filling and flaked almonds.  But honestly, like with everything, everyone has their own versions and there are so many recipes out there to follow.

All I can say is that Dad/Grandad was very happy with his birthday Bakewell Tart (not to mention everyone else in the family).  


Bakewell Tart
(Recipe adapted from Delicious Magazine UK)

Serves: 8 - 10

Pastry
200 grams plain flour, plus extra for dusting
2 tablespoons icing sugar
100 grams unsalted butter, chilled and diced
1 large free-range egg, beaten
1 tablespoon milk

Filling
150 grams  unsalted butter, at room temperature
150 grams caster sugar
3 large free-range eggs, at room temperature, beaten
150 grams ground almonds
grated zest of 1 lemon
6 tablespoons cherry or raspberry jam
2 tablespoons flaked almonds

Sift the flour, icing sugar and a pinch of salt into a large bowl. 

Using your fingertips, rub in the butter until it forms fine crumbs. 

Add the beaten eggs and milk and lightly bring together to form a firm dough, taking care not to handle it any more than necessary. 

Shape into a disc (which will be easier to roll out later), then chill, wrapped in cling film, for 30 minutes.

Preheat the oven to 180 degrees Celsius.   

Roll the pastry out on a lightly floured surface to 4mm thick. 

Lift pastry, trying not to stretch and place over a 23cm fluted, loose-bottomed tart tin or a quiche/flan dish.  Using your fingers gently push the pastry into the tin. Trim the excess and prick all over with a fork. Chill for 30 minutes.


Place the tin onto a baking tray.  Line the pastry case with baking paper and fill with baking beans or rice.

Place tray in oven and bake for 15 minutes, then remove the beans/rice and paper.

Cook for a further 5 minutes until pale golden and dry on top.

Meanwhile beat the remaining butter and sugar together until pale and fluffy. 

Beat in the eggs a little at a time, then fold in the ground almonds and lemon zest.

Spread the jam evenly across the base of the pastry case, then spoon over the sponge mixture, levelling the surface with the back of the spoon. Scatter with almonds. 


Bake for 35-40 minutes until golden, well risen and just set in the centre.


Leave to cool in the tin for 5 minutes, then lift onto a wire rack and leave to cool completely, if desired (we enjoy ours still warm).


Happy Birthday Dad/Grandad


Tuesday, January 29, 2019

Baked Jalapeño Popper Stuffed Chicken

Welcome to 2019!  Yes I am aware that it is nearly the end of January so I am a little behind.  To be honest, January has been a very hard and busy month with some days being unforgiving and others allowing us to create some beautiful memories.

As many of you may know, we moved house at the end of October so the last few months of 2018 were kind of busy especially working full time and trying to unpack a house in time for Christmas.  Christmas, my favourite time of the year, was held at our house this year.  It was extra special with several family members arriving from interstate and staying with us.

My mam nearly didn't make it as she is battling (and kicking arse) with Breast Cancer.  She was diagnosed in August and has several operations to remove the tumour, which we have been told was a success.  To ensure that all the gremlins are out of her body her doctor advised that she undergo Chemotherapy more as a preventative measure rather than a treatment.  The chemo sessions were fast tracked and she actually didn't know if she would get to spend Christmas in Melbourne with us.  However mam underwent her first chemo on the 19th December in Brisbane and arrived in Melbourne on the 20th.  She looked fantastic, she was in good spirits and somewhat good heath during her visit.  The chemo didn't really hit her that hard (as you hear horror stories from other people's journeys) but her visit was only short due to having to return to Queensland for her 2nd chemo session on the 7th January.

Not only was my mam with us for Christmas and the New Year but as was my gorgeous sister Clare and niece Charlie.  They live in Sydney and came down for a few weeks, spending most of the time with her's and Noel's parents, but as she does every year celebrates New Years with us.  We also had the pleasure of having my Aunty Maggie, who lives in Anna Bay (near Newcastle, NSW).  Aunty Maggie and I are both January babies with her birthday being on the 7th and mine being on the 8th.  This special year my Aunty turned 80 and even though we haven't celebrated our birthday's together for many years - we did this year and it was beautiful to be able to do so.

Needless to say with everything going on in December and January, I have had to focus on me and my family.  A little selfish but I am sure, totally understandable.  Saying this the house as we know it is starting to return to some sort of normality and while I didn't stop cooking during our absence I am truly looking forward to getting back in to trying new dishes and sharing them with you all.

This said, I had been dying to try this recipe not only due to simple mention of a Jalapeño Poppers but because it's ingredients including several of my favourite foods - bacon, cheese and Jalapeños!  Not to mention it being stuffed chicken dish.  I love cutting into a chicken kiev or really any stuffed chicken dish and watching the fillings ooze out... mmmmmm.

Speaking of Jalapeño Poppers here a few of our favourites:
This dish, as mentioned, is flavoursome due to the bacon, two types of cheese and the ever popular Jalapeño.  The flavours literally melted together and produced this creamy filling the tantalised the taste buds. The coating was crisp and laced with mixed herbs.  I used Gluten Free rice crumbs but you could use normal bread crumbs or even Panko for extra crispiness.  To get the coating to stick to the chicken a combination of lime juice and olive oil did the job perfectly.

Jalapeños, like all chillis, are very interesting as you never know the intensity of the heat that they will produce.  Removing the seeds and the membranes does reduce the heat associated with chillis but then sometimes you just get a bloody hot chilli with or without the seeds and membrane!

Rolling up this parcel of goodness was a little fiddly.  To be honest I probably put too much filling in considering a few of my chicken breast fillets were a little small.  But overall not upset as I created a nice sauce also to serve on the side.

Everyone enjoyed the combination of flavours, the textures and the overall dish.  Every mouthfull was creamy, smoky, and spicy laced with lime and herb crumbs.  Well worth the effort - thank you Gina for sharing this and many more "Skinny Taste" recipes.


Baked Jalapeño Popper Stuffed Chicken
(Recipe adapted from Skinnytaste.com)

Serves: 4
SmartPoints per serve: 6

cooking spray
100 grams center cut bacon
4 skinless chicken breast fillets
2 spring onions, finely sliced
3 jalapeños, chopped (remove seeds for milder)
85 grams reduced fat cream cheese, softened
110 grams reduced fat grated tasty cheese
1/2 cup Gluten Free rice crumbs
2 teaspoons dried mixed herbs
1 1/2 juicy limes, juiced
1 tablespoon olive oil
salt
freshly ground pepper


Preheat oven to 220 degrees Celsius.

Lightly spray a baking dish with non-stick spray.

Place one chicken fillet between two pieces of grease proof paper and using a kitchen mallet or rolling bin flatten until each is of an even thickness.


Heat a large frying pan over medium high heat.  Spray with cooking spray and cook bacon until crisp.  Remove from pan to cool.


Finely slice spring onions.


Finely dice jalapenos, removing seeds and membranes if you prefer a milder heat.


Place cream cheese, cheddar, scallions, jalapeño and bacon crumbles in a medium bowl.


Mix well to combine.


Lay chicken fillets on a working surface and evening spread the cream cheese mixture on each fillet.


Loosely roll each one, secure the ends with toothpicks to prevent the cheese from oozing out.


Place breadcrumbs and mixed herbs in a bowl.  Mix well.


In a second bowl combine olive oil, lime juice, salt and pepper.  Mix well.


Dip chicken in lime-oil mixture.


Then in breadcrumbs and place seam side down on a baking dish.


Repeat with the remaining chicken.


When finished, lightly spray the top of the chicken with oil spray.

Bake 22-25 minutes, serve immediately.


Serve with 0 SP salad, if desired.


Monday, August 21, 2017

Beef Cheeks with Thyme, Chilli and Ginger Beer with Saffron Risotto

And now for something completely different - LOL!! 
 
As always I am constantly on the hunt for a "different" recipe, dish or really anything to cook.  It's somewhat looked upon as an obsession, an illness perhaps but to be perfectly honest I don't care.  I enjoy what I do, it makes me happy and I take great pride in introducing my family to different foods, flavours, textures experimenting to find their likes and dislikes. 
 
I have mentioned before that this was the way I was raised by my parents - I was taught never to fear food but to taste and decided if I liked it or not.  Nothing was left far from the imagination - we always had food made from little or many ingredients and from many countries or regions.  My parents enjoyed their relationship with food and this was passed on to me - I believe everyone should have a good understanding of foods especially those void of all the added chemicals, additives and preservatives evident in many foods of today's world.
 
My kids have embraced the love of food - although there have been many times over the years that there have been pleas of "can we please have normal food for a change" and many nights where beans, eggs and chips have been served at our table.  However saying this I absolutely adore being at a restaurant and listening to my kids order their meals.  To my delight they often try something other than Parma and Chips.  I remember my daughter as an 8 year old sitting in the local Chinese restaurant boldly asking for Chicken and Sweet Corn Soup followed by Peking Duck.  The waitress was amazed and yelled to the chef telling him of her order.  I still chuckle when I think of that moment.
 
We have a new member in our household, our son's girlfriend.  She has been with us for several months now and I am impressed with her willingness to embrace our lifestyle and our food.  To date she has tried everything put before her and yes there are things that she wasn't a fan of but has had the openness and honestly to speak her thoughts.  I am very proud of her - she definitely belongs in our family.
 
Saying this, beef cheeks were on the menu last night and of course, I would not have done them justice if I had just slow cooked them in red wine.  Research completed and several recipes morphed together plus a few little twists of my own saw this creation - Beef Cheeks with Thyme Chilli and Ginger Beer served with Saffron Risotto.  This recipe is loosely based on a recipe that appeared in the August/September 2008 issue of Gourmet Traveller WINE but as usual I had to change ingredients and put the House Of Murray twist on things.
 
Beef cheeks must be slow cooked - there is no other way to cook them so don't even consider it.  Low and slow either in the oven or a slow cooker.  A quick fry is NOT an option of cooking these meat pieces - they will be tough.

A word of warning also - beef cheeks are a rick meat to start with and most recipes are served with a rich red wine jus or sauce in which they are cooked.    I wanted something different as much as love a good full bodied red wine sauce there was the need to experiment.  So I substituted half the red wine with white wine and also added a bottle of sugar free ginger beer.  The result was fantastic - although still a little rich which I did expect it wasn't as heavy as it would normally be.  Also added the subtly of fresh thyme and a little heat from chilli flakes. 

Overall, a truly hearty dish which served also side a Saffron Risotto was filling and well received at the table.

 
Beef Cheeks with Thyme, Chilli and Ginger Beer
(Recipe adapted from August/September 2008 issue of Gourmet Traveller WINE)
 
Serves: 4 - 6

1 litre beef stock
4 - 6 beef cheeks (approx. 250 grams each), trimmed
salt
freshly ground black pepper
3 large carrot, cut into large chunks
1 onion, diced
3 garlic cloves, roughly chopped
1 bunch fresh thyme
2 cups dry red wine
2 cups dry white wine
750 ml bottle sugar free ginger beer
2 teaspoons dried chilli flakes
2 tablespoons extra-virgin olive oil
600 ml chicken stock
80 ml extra-virgin olive oil
200 grams risotto rice
1 brown onion, finely diced
2 garlic cloves, finely chopped
2 teaspoons saffron threads
150 ml dry white wine
80 grams butter

Place beef stock in a saucepan over medium heat and cook until the liquid reduces by half, or for about 30 minutes.

Season beef cheeks with sea salt and freshly ground black pepper.

In a large jug combine red wine, white wine, ginger beer and chilli.
 
Place beef cheeks in a large bowl and pour over wine mixture. Cover with cling film and marinate in the refrigerator overnight.

Remove from refrigerator and separate beef cheeks and marinade.

Heat olive oil in a large frying pan over medium heat and cook beef cheeks for about 5 minutes or until browned. Transfer to a plate.

Add vegetables to the pan and sauté for 5-7 minutes until softened. Transfer to a bowl.

Place stock and marinating liquid in a saucepan over medium heat, bring to the boil then remove from heat.

Place beef cheeks and vegetables in a roasting dish and cover with stock mixture. Cover tightly with foil and cook in a preheated oven at 150C for 3- 4 hours or until tender.

 
Meanwhile heat the chicken stock in a saucepan over low heat.

Heat oil in a large saucepan over medium heat, add rice and cook, stirring continuously, for 2 minutes. Add shallots, garlic and saffron and cook for another 2 minutes.

Add white wine and shake pot occasionally until wine begins to reduce or for about 3-5 minutes. Add stock a ladle at a time until stock just covers the rice, making sure it continues to just cover the rice. After rice has been cooking for 10 minutes, stir for 2-3 minutes.

Check rice is al dente, remove from heat, stir in butter and season to taste with sea salt and freshly ground black pepper.

 
Serve risotto immediately with beef cheeks, vegetables and sauce.


(Click here for a printable version of this recipe)

Wednesday, August 2, 2017

Thai Style Chicken Satay Skewers with Peanut Sauce

I have been cooking the same Satay Sauce since I was a kid... it's the same one my mam cooks.  It comes from a old Women's Weekly Cookbook titled Chinese Cooking Class Cookbook.  Many of you would have seen this cookbook whether it was when it was first published, then republished or more likely on the shelf at an Opportunity Shop.  However saying this I thought it was time to try a different Satay Sauce to accompany some chicken skewers. 
 
Have you ever google a recipe and been amazed by how many different results you get?  Makes me wonder how big Google is or then again how big the world really is! I think I could have read about Satay Sauce for days.  Instead of the Chinese style sauce this time I thought I would be adventurous and try a recipe from another style of cooking, Thai.  While both hubby and I enjoy eating Thai foods we rarely cook it at home for a reason I can not produce.  I guess it's a style that we just haven't really experimented with - yet!

The marinade should taste sweet, spicy, and salty. It doesn't have to be the spiciest but the stronger more vibrant flavours should be sweet and salty. If you need to adjust the taste add more sugar or more fish sauce to adjust the taste. However if you would want it to be spicier you also can add more chilli.

Now for the sauce.  No peanut butter in sight as this authentic recipe for Thai peanut sauce is made with real peanuts! This part of the meal was quick and easy to make.  While this sauce is meant to have be smooth, but if you prefer it with a bit of crunch when processing the nuts leave some smaller pieces to the side. Adding more fish sauce (or soy sauce) if not salty enough, or more cayenne if not spicy enough. If too salty, add a squeeze of fresh lime juice. If you'd prefer it sweeter, add a little more sugar.

Overall this wasn't one of the easiest recipes to make but well worth the effort.

 
Thai Style Chicken Satay Skewers with Satay Sauce
(Recipe adapted from The Spruce)
 
Serves: 6
 
1/4 cup minced lemongrass, fresh or frozen
2 shallots
4 cloves garlic
1 to 2 fresh red chillies, sliced
1 thumb-size piece galangal or ginger, thinly sliced
1/2 teaspoon turmeric
2 tablespoons ground coriander
2 teaspoons cumin
3 tablespoons dark soy sauce (available at Asian food stores)
3 tablespoons fish sauce
6 tablespoons brown sugar (you need all of this)
2 tablespoons vegetable oil
18 chicken tenderloins or 1 kilogram chicken breast fillets, sliced thinly
1 cup fresh-tasting dry roasted peanuts, unsalted
1/3 cup water
2 cloves garlic, minced
1/2 teaspoon dark soy sauce
2 teaspoons sesame oil
1 - 2 tablespoons brown sugar, to taste
2 - 2 1/2 tablespoons fish sauce
2 tablespoons lime juice
1/2 teaspoon cayenne pepper
1/3 cup coconut milk
18 wooden skewers

Make the marinade by placing the lemongrass, shallots, garlic, chiles, galangal or ginger, turmeric, coriander, cumin, soy sauce, fish sauce, brown sugar, and oil in a food processor or chopper. Process well.


Place chicken in a bowl and pour the marinade over. Stir well to combine. Cover and allow to marinating for at least 2 hours but overnight if time permits.


Soak skewers in hot water for 30 minutes.

Meanwhile place remaining ingredients in a blender or food processor. Blend or process until sauce is smooth. If you prefer a runnier peanut sauce, add a little more water or coconut milk.  Place in a bowl.
 
 
Thread chicken onto the skewers leaving a quarter of the skewer empty to act as a handle when grilling or frying.

Grill or fry the satay, basting the first time you turn it with a little of the leftover marinade from the bowl. Depending on how thin your meat is, the satay should be done in 10 to 20 minutes.

 
Place satay sauce in the microwave on high for 1 - 2 minutes or until warmed through.

Serve with Thai jasmine rice and Thai peanut sauce for dipping.
 
Note:  This sauce tends to thicken as it sits so just add a little water or coconut milk to thin it out, as needed. Otherwise, it stores well if kept covered in the refrigerator for up to 2 weeks or you can place in the freezer.

Monday, May 1, 2017

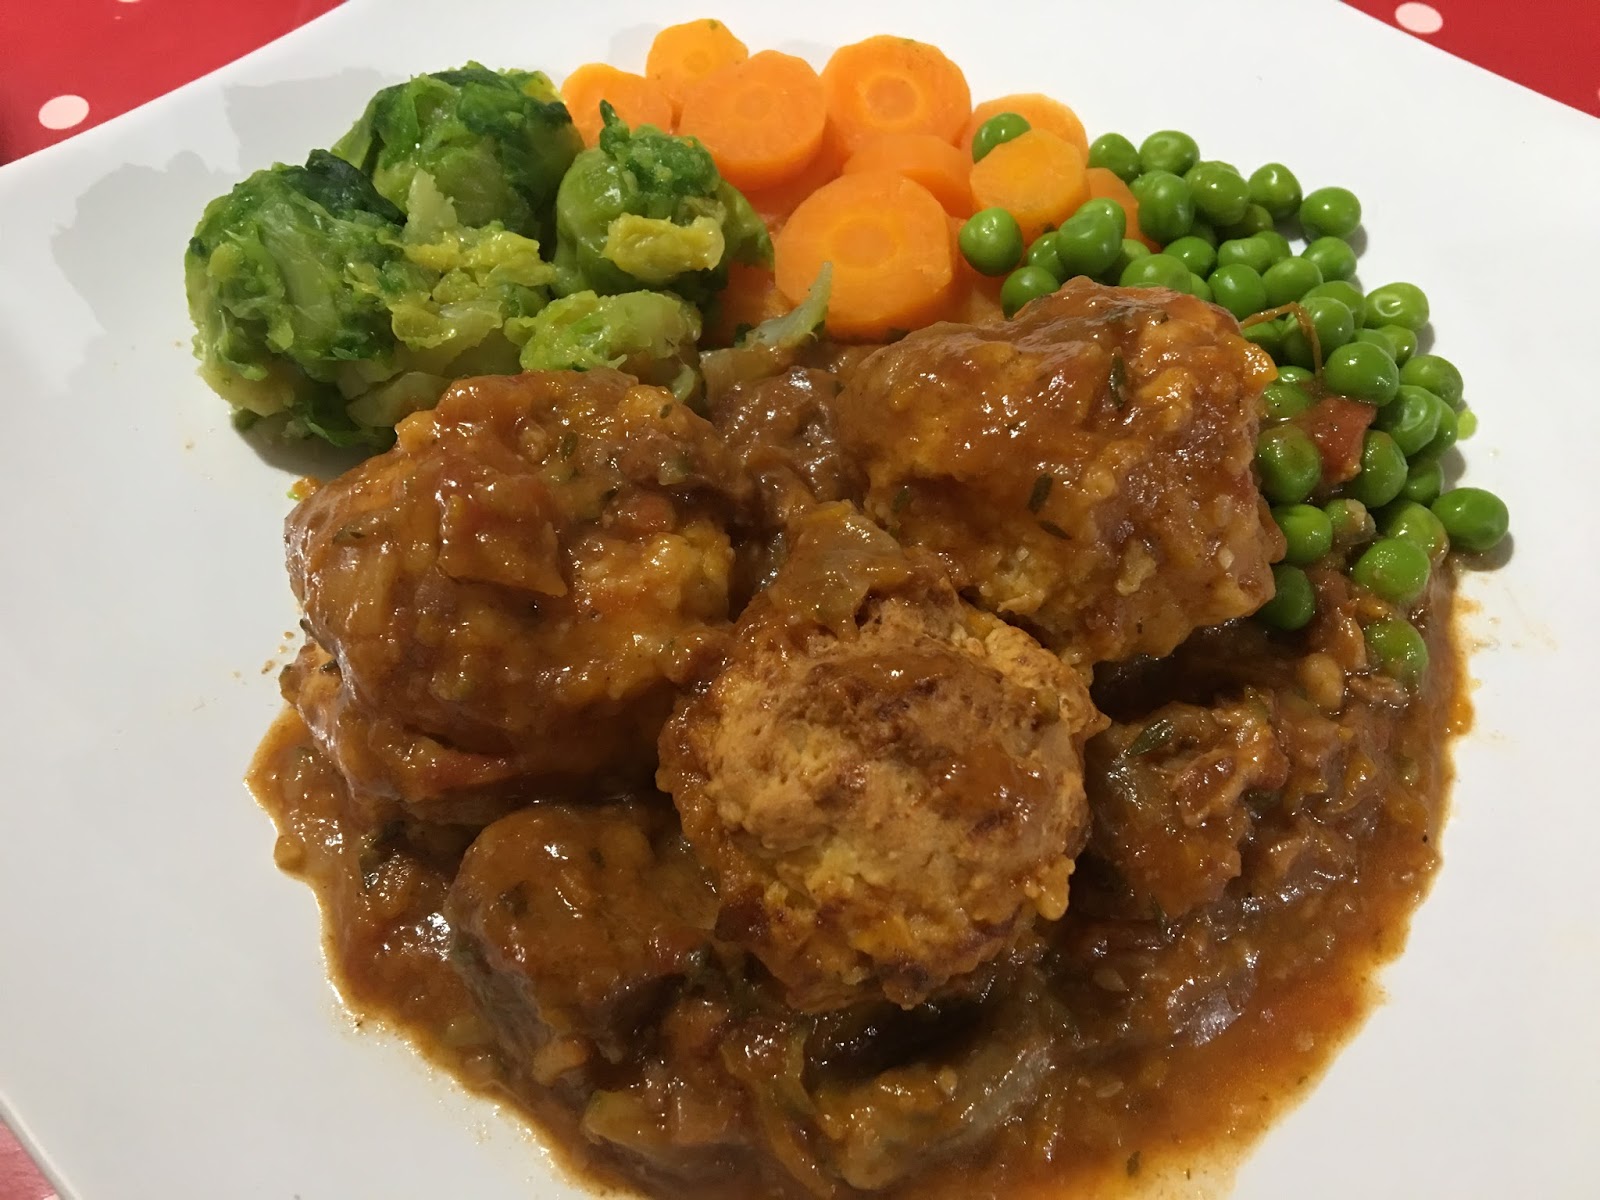
Beef and Mushroom Casserole with Parmesan Dumplings

Another winter warmer to make an appearance on this blog is Beef and Mushroom Casserole with Parmesan Dumplings.  

Who could want more on a colder evening that fills you to your toes? A nice thick rich beef casserole with mushrooms and thyme as the main stars with secretly hidden carrots and zucchini complimented with nice soft dumplings laced with Parmesan cheese.  

This recipe was slow cooked in the oven but could easily be cooked in a slow cooker for those that need to be prepared (normally I have the slow cooker on at least 3 times a week in our house).


Beef and Mushroom Casserole with Parmesan Dumplings
(recipe adapted from Taste.com)

Serves: 8

1.5 kilograms gravy beef, cut into 2cm chunks
1 tablespoon olive oil
2 onion, chopped
10 bacon rashes, chopped
500 grams button mushrooms, halved
4 whole garlic cloves, peeled
2 tablespoons plain flour
2 cups beef stock
1 cup red wine
2 cans 400 grams chopped tomatoes
1 bunch fresh thyme sprigs
4 carrots, peeled and grated
2 zucchini, grated
salt
freshly ground black pepper
75 grams butter
3 cups self-raising flour
3/4 cup fresh parmesan grated
1 1/4 cup milk

Preheat oven to 150 degrees Celsius.

Brown diced beef in 1 tablespoon olive oil over medium heat. Transfer to plate.

To the same pan add onion, bacon, mushrooms, garlic and cook until soft. Stir in flour.

Add beef stock, red wine, tomatoes, thyme and smoked paprika. Bring to the boil. Reduce heat to low, add carrots and zucchini.  Return beef to the mixture and simmer covered for 1 1/2 hours. Season with salt and pepper to taste.  Spoon into a large ovenproof dish.

Cook covered for 2 hours, stirring occasionally or until beef is tender.

Increase oven to 200 degrees Celsius.

In a large bowl rub butter into self-raising flour. Stir in Parmesan and milk. Bring together. Roll into 24 balls. Place on casserole mixture.

Bake uncovered for 20 minutes.

Alternatively slow cooker directions:

Place in beef mixture in a slow cooker vessel and cook on low for 8 hours.

Preheat oven to 200 degrees Celsius.

Transfer mixture into a large oven proof dish.

Make dumplings as above and place on casserole mixture.

Bake uncovered for 20 minutes.

Serve with steamed vegetables.


(Click here for a printable version of this recipe)

Sunday, April 30, 2017

Spicy Pork Meatballs with Spaghetti

Pasta is one of those dishes that even the fussiest of eaters will enjoy... ultimately pasta is a comfort food for many.  In our house it is definitely held in high regard when you just want to eat something for the soul and to make you feel better about everything.

Today, with having a full day of football ahead, I knew that we need a quick easy dinner that when we got home from football.  Knowing all I had to do was to make the tomato sauce and cooked pasta, this ensured that we had an hearty Sunday night dinner but I wasn't spending all evening in the kitchen.  While I made this recipe today in halves - in total it would take less than 45 minutes to take this dish from kitchen to table so it would be a perfect weeknight wonder also.

I quickly made some yummy bite size meatballs, pork laced with thyme, chilli and as usual, hidden vegetables.  These were baked in the other rather than fried in an effort to reduce the fat content of adding extra oil.    The meatballs themselves, can be cooked at an earlier date, cooled and frozen in preparation for this dish or another.

The tomato sauce, in this instance, was a very easy mix very similar to a Marinara Sauce.  Tomatoes, simmered with onions until thickened laced with a little sweetness to compliment the herbs and spices in the meatballs.

Serve with a pasta of your choice.  In our house it's Meatballs with Spaghetti - just like in that memorable Disney movie Lady and the Tramp.  Whichever pasta you choose I am sure this will become a favourite on your menu.


Spicy Pork Meatballs with Spaghetti

Serves: 8

cooking spray
1 kilogram lean minced pork
2 onions, finely diced
2 carrots, peeled and grated
2 zucchini, grated
2 teaspoons crushed garlic
1 teaspoon crushed chilli or sambal oelek
3 tablespoons tomato paste
1 teaspoon ground white pepper
2 tablespoon dried thyme
1 tablespoon dried parsley
2 teaspoons smoked paprika
1 brown onion, finely diced, additional
2 cans diced tomatoes 
2 cup water
1 tablespoon white sugar
salt 
freshly ground black pepper
spaghetti or pasta of your choice
grated Parmesan Cheese, for serving
dried chilli flakes, optional

Preheat oven to 180 degrees Celsius.  

Line a large baking tray with baking paper.  Spray with cooking spray.

Place pork, onions, carrots, zucchini, garlic, chilli paste, tomato paste, pepper, thyme, parsley and paprika in a very large bowl.  Mix, using your hands, until well combined.  Shape pork mixture into 48 evenly sized meatballs.  

Place meatballs on a baking tray in a single layer.  Bake in oven for 30 or until browned, turning several times during cooking.

Meanwhile spray a large saucepan with cooking spray and heat over low heat. Add onion and cook, stirring, until softened. Add tomatoes, water and sugar. Season with salt black pepper. Bring to the boil, stirring, reduce heat to a simmer.

Remove meatballs from oven and add to the tomato mixture carefully.  Stir gently to mix through and simmer until thickened and liquid has slightly reduced, stirring occasionally.

While sauce is simmering, bring a large saucepan of water to the boil and cook spaghetti or pasta as per the directions on the packet.  Drain.

Serve spaghetti or pasta topped with the meatballs and sprinkle with Parmesan Cheese and additional chilli flakes, if desired.


(Click here for a printable version of this recipe)

Thursday, November 3, 2016

Pork, Artichoke and Spinach Meatloaf

Meatloaf - just an easy dish to prepare and everyone loves it!  But the great thing about meatloaf is that you can honestly use any meat and any flavourings and it is always delicious.
 
Normally when we cook meatloaf we always use beef mince... not sure why?  Just seem to always do.  Well this time was totally different as I had found a recipe for a pork meatloaf that really intrigued me.
 
Pork mixed with spinach, home roasted capsicums, artichoke hearts - what a flavour combination.   The subtle hint of lemon and thyme gave the meatloaf a nice touch but the sticky topping finished the dish off perfectly.
 
As usual we had some beautiful soft bap rolls and accompanied with our favourite Creamy Coleslaw Supreme.
 
Quite simple to make, this dish can be cooked either in the oven or the slow cooker and I am sure your family will enjoy.
 
 
Pork, Artichoke and Spinach Meatloaf
(recipe adapted from Weight Watchers Real Food Slow)
 
Serves: 4
SmartPoints per serve: 8
 
cooking spray
2 red capsicum
500 grams lean pork mince
1 1/2 cups fresh wholegrain breadcrumbs
1 brown onion, finely chopped
300 grams artichoke hearts in brine, drained
100 grams baby spinach, chopped finely
1 teaspoon finely grated lemon rind
1 tablespoon lemon juice
2 tablespoon fresh thyme leaves
salt
freshly ground black pepper
1/4 cup sweet chilli sauce
1 tablespoon tomato sauce
 
Preheat grill.
 
Line a baking tray with foil and spray with cooking spray.
 
Cut capsicum into quarters and deseed.  Place on baking tray skin side up.  Grill until black.  Turn off grill and remove capsicum and place in a plastic bag to sweat.  Allow to cool.  
 
Once cooled remove all the blackened skin from capsicum.  Chopped finely and place in large bowl.
 
Preheat oven to 180 degrees Celsius.
 
Add mince, breadcrumbs, onion, artichoke, spinach, rind, juice, thyme and 2 tablespoons chilli sauce to capsicum.  Season with salt and pepper.  Mix until well combined.
 
Line baking tray with cooking paper.  Shape mixture onto tray into a 20 cm x 10cm loaf shape.
 
 
Bake in oven for 20 minutes.
 
Combine remaining chilli sauce and tomato sauce in a small jug and spoon over top of meatloaf.
 
 
Return meatloaf to oven and cook for 20 - 25 minutes or until cooked through.
 
To cook in slow cooker:
 
Shape mixture into 20 cm x 10 cm loaf shape in a 4.5 litre slow cooker. 
 
Combine remaining chilli sauce and tomato sauce in a small jug and spoon over top of meatloaf.
 
Cook, covered, on low for 6 hours (3 hours on high).
 
Serve with a salad, if desired.


Thursday, October 27, 2016

Creamy Slow Cooked Pulled Pork Enchiladas

There are two dishes I really definitely enjoy experimenting with - the first is lasagne and the second is enchiladas.  The potential for flavours is endless.

Lasagne and enchilada fillings can consist of anything... here are a few of our other creations, just to name a fewm, that have been enjoyed in the past.
This dish was no exception.  The flavours really complimented by a creamy white sauce smothered in cheese.  Yes this will also appear on the comfort food list as it really was so good.

Start by slow cooking the pork in the sauce and once cooled enough, shred and roll in the burrito wraps.  Very simple!  Without including the slow cooking time, this meal will be on the table in under 1 hour.

Strangely enough, there was no taco seasonings were used and you really wouldn't even realise that when you are eating it.  A combination of garlic, chilli and capsicum is the basic flavourings - to be honest it's amazing.


Creamy Slow Cooked Pulled Pork Enchiladas
(Recipe adapted from Weight Watchers Eat Well Diabetes)

Serves: 6

cooking spray
500 grams lean pork neck or shoulder, fat trimmed
1 brown onion, diced
1 green capsicum, chopped
1 garlic clove, crushed
1 small fresh red chilli, thinly sliced
400 gram can diced tomatoes
1 tablespoon apple cider vinegar
salt
freshly ground black pepper
1/2 cup corn kernels
30 grams low fat butter
30 grams plain flour
2 cups skim milk
2 teaspoons dijon mustard
white pepper
6 low fat burrito
100 grams reduced grated fat tasty cheese
1 teaspoon smoked paprika

Lightly spray a frying pan with cooking spray and heat over medium-high heat.  Cook pork, turning, for 5 minutes or until browned all over.  Remove from heat and place pork in slow cooker vessel.

Add onion, capsicum, garlic, chilli, tomatoes and apple cider vinegar.  Season with salt and pepper.
Stir to combine.  

Cook on low for 8 - 10 hours or until pork is tender.  Leave to cool.

Once pork is cool, remove pork from sauce.  Using two forks, coarsely shred he pork apart.  Return pork to the sauce and add corn kernels.  Mix well to combine.

In a heavy based saucepan over medium-heat add butter.  Heat until melted and using a wooden spoon add flour, stirring continuously, until you form a roux.  Remove from heat.  Add milk and using a whisk, stir until roux is dissolved.  

Place saucepan back on stove over heat and bring to the boil, stirring continuously.  Lower heat, add mustard and season with white pepper.  Continue stirring until slightly thickened.  Remove from heat. 

Preheat oven to 180 degrees Celsius.

Spray a large baking dish with cooking spray.

Take one burrito and lay flat on chopping board or bench.  Top with 1/6 of the pulled pork mixure.  Roll up and place in baking dish.  Repeat with remaining burritos.

Smother the buritto rolls with white sauce.

Sprinkle with grated cheese and smoked paprika.

(Yes I doubled the recipe and made 2 - oops)

Place in oven and cook for 30 - 40 minutes until cooked through and cheese is melted and golden.

Enjoy with a leafy salad, if desired.


Saturday, October 1, 2016

Oven Baked BBQ Beef Ribs

To say that we really enjoy pork ribs is an understatement - this house goes mad for them.  However there is also a sneaky admiration for thick cut beef ribs (or short ribs as they can be known by). There is nothing more enjoyable than slow cooked beef ribs that are tender and melt in your mouth.  Now normally I would marinade them in an Asian influenced style sauce and slow cook for 8 hours in my trusty slow cooker but this time I decided to try an American BBQ based recipe and I am so glad that we did.

Half way through making the dry rub, when I realized that I didn't have any Cajun Seasoning and had to make my own (lol a recipe within a recipe), I knew just from the combination of the herbs and spices that these beef ribs were going to have so much flavour not to mention a little kick of heat with having both chilli and cajun seasoning in the mix.  I marinade these overnight to allow the flavours to develop.

Slow cooked in the oven on a very low temperature for 4 hours ensured that these nice plump beef ribs were tender and fell off the bone.  The addition of the BBQ sauce in the last step not only added the sweetness but also the stickiness that gave you a reason to lick your fingers to ensure you savour every mouthful.

It was the AFL Grand Final today and these ribs would be our dinner after watching the match. Not really an traditional Aussie meal (we ate party pies during the game) but OMG I enjoyed these ribs, and so did the others, and will definitely be cooking them again.     


Oven Baked BBQ Beef Ribs
(Recipe adapted from Diva's Can Cook)

Serves: 8

2 kilograms meaty beef ribs
 2 - 3 tablespoons Liquid smoke (optional)
2-4 tablespoons olive oil
2 tablespoon garlic powder
2 tablespoon onion powder
2 tablespoon cajun seasoning
4 tablespoon brown sugar, packed
1 teaspoon chili powder
2 teaspoon salt
2 teaspoon paprika
4 teaspoons oregano
 4 tablespoons of your favorite BBQ Sauce

Rinse ribs and dry with paper towels
.
Douse dry ribs with liquid smoke if using.

Lightly coat ribs in olive oil.

Mix together seasoning and sprinkle generously over ribs, front and back.


Massage the spices into the ribs, adding more olive oil to help distribute the spices well if needed.


Place the ribs in a large ziplock bag or covered bowl and marinate in the fridge for 1-2 hours or overnight.

Preheat the oven to 120 degrees Celsius.

Place the ribs on a foil lined baking tray in a single layer.

Add another piece of foil on top to create a pouch for the ribs to cook in. Be sure to seal the edges of the foil so that it's tight and steam won't seep out.

Bake on the middle rack of 3½ -4 hours. Check on it after the 3½ hour mark.


When the ribs are done to your liking, drain off the excess fat.

Brush the ribs with desired amount of BBQ sauce.

Grill until the sauce is sticky.


Serve with oven baked potato wedges and coleslaw.

(Click here for a printable version of this recipe)