Showing posts with label comfort food. Show all posts

Friday, May 29, 2020

Penne Boscaiola with Chicken

Fakeaway is always better when cooked at home.... no matter what cuisine. I am sure you will agree?

Tonight's fakeaway is actually an adaptation of a meal, Penne Boscaiola, that is always a hit here at A Dash Of Flavour's home base - to the point the recipe is always doubled so lunches can be taken the next day.

For a very simple pasta dish this packs a punch of flavour with every mouthful. The sauce, creamy yet made from Light and Creamy Evaporated Milk laced with sweet chilli and Parmesan has a wonderful combined flavour that smothers the pasta. Along with the bacon and chicken I love the combination of the mushrooms, capsicum and baby spinach - simple but enough.

I added the chicken tonight just for some extra protein. I am sure this would also work well with tuna or even prawns should you wish to do the same. Just be warned it's very moreish and inviting - very easy to overindulge.


Penne Boscaiola with Chicken
(Recipe adapted from WW Heavenly D’Lites Cookbook)

Serves: 6
💚 sp per serve: 11
💙 sp per serve: 10
💜 sp per serve: 10

375 grams penne pasta or GF penne pasta (or pasta of your choice)
cooking spray
1 brown onion, finely chopped
3 teaspoons crushed garlic
150 grams middle bacon, fat trimmed
1 red capsicum, thinly sliced
150 grams button mushrooms, sliced
375 ml can Carnation Light and Creamy Evaporated Skim Milk
3 tablespoons sweet chilli sauce
150 grams baby spinach leaves
salt
freshly ground black pepper
80 grams finely grated Parmesan cheese

Cook pasta in pan of boiling water following packet instructions until just tender.  Drain.

Coat a large frying pan with cooking spray.  Cook the onions, garlic and bacon until onion is soft.  Add capsicum and mushroom and cook for a further 2 - 3 minutes until capsicum begins to soften.

Add the milk and chilli sauce to the pan.  Season with salt and freshly ground black pepper to taste.  Stir through the pasta, spinach and half the Parmesan cheese until mix through well and spinach just wilted.

Serve with remaining Parmesan cheese.


Tuesday, June 4, 2019

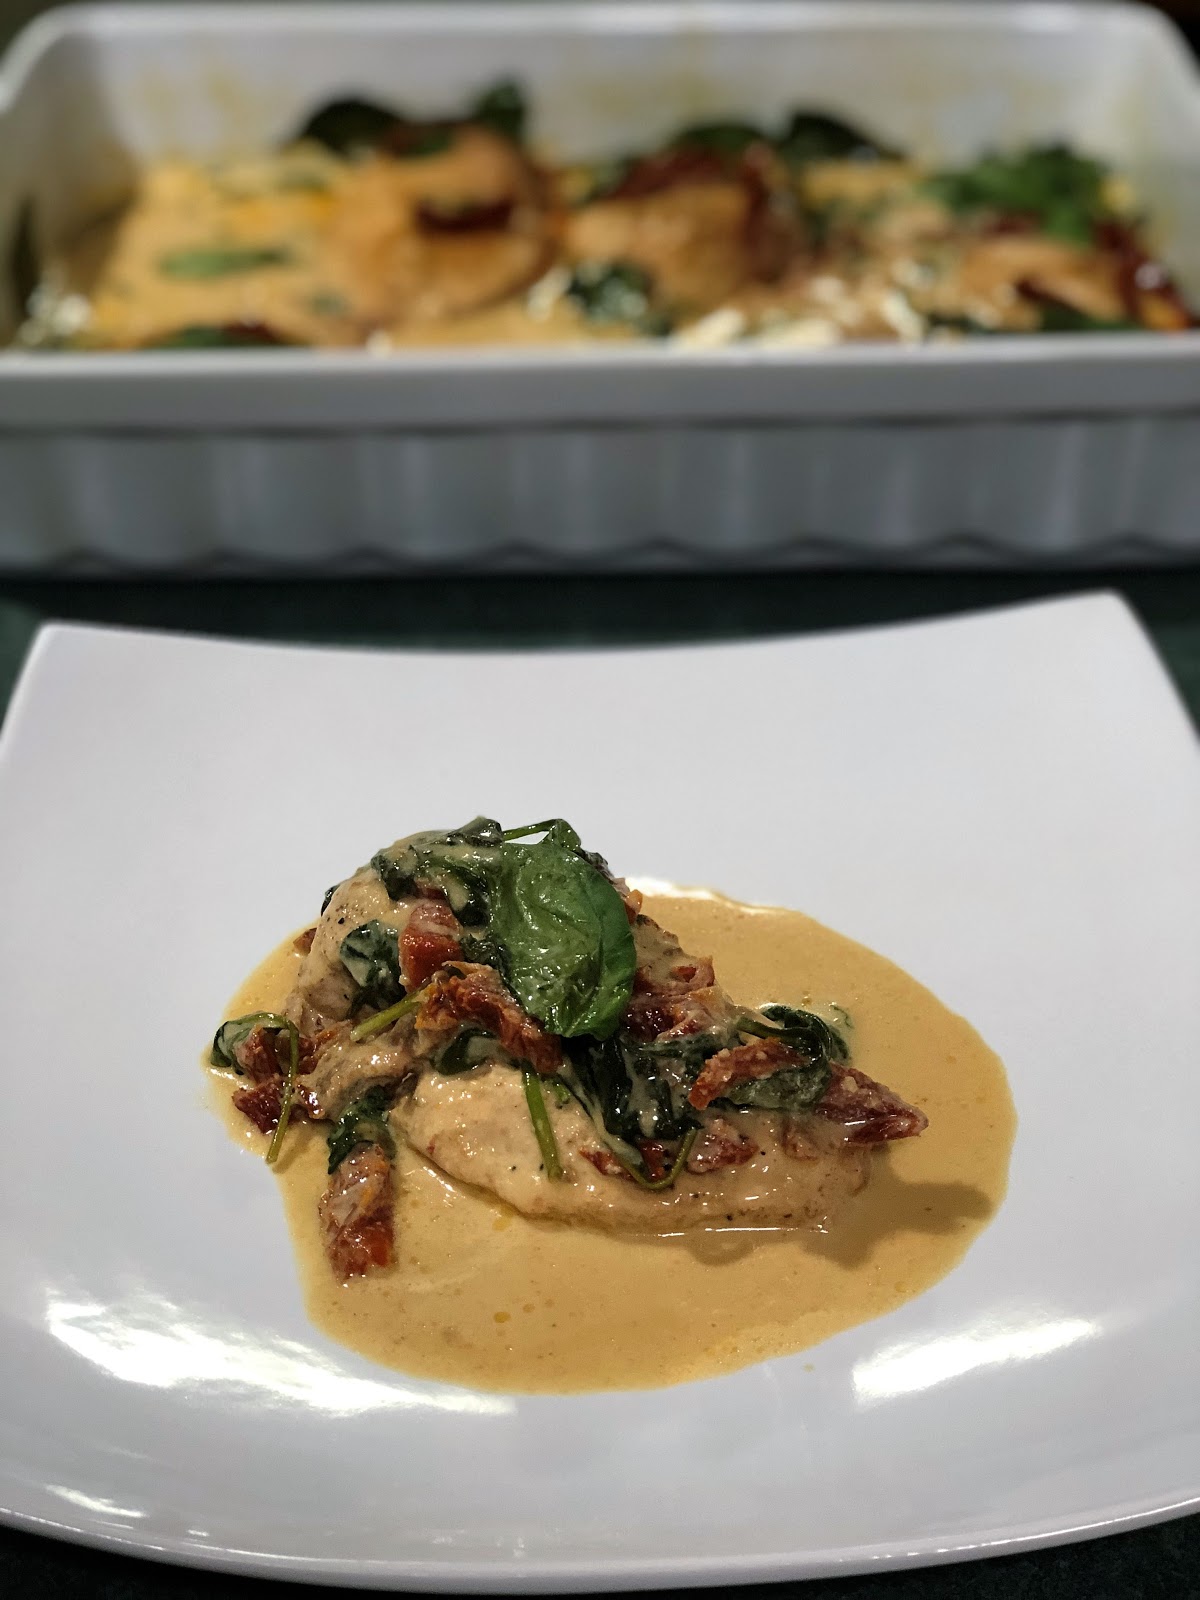
Creamy Italian Chicken


Wanting something different but quick and easy considering winter has officially arrived here in Melbourne (although it's been here for a few weeks now) however I really didn't fancy a heavy dish such as a pasta or a bake but still wanted that comfort food sensation.  This is how everyone feels mid week and during winter right?

I find cooking with chicken breast fillets easy for a mid week meal.  They tend to cook quickly in most applications and unless overcooked are a tender juicy protein for a good dinner.  So armed with a few nicely sized chicken breasts I set upon preparing a comfort food dish and knew it had to be creamy of some sort.  An email had arrived, Taste were promoting 50 One-Pot Winners, so of course I had to stop and have a read... love celebration posts highlighting certain ingredients, seasons, styles of cooking, etc.  I came across One Pot Italian Chicken and was intrigued with the flavours.

Pure Italian flavours of garlic, tomato and basil enveloped in a creamy sauce - aaaaahhhhh my tastebuds were in heaven just reading the recipe let alone cooking it.   It sounded easy.  It sounded delicious. It was now on the menu.

Everything I have just mentioned was true - quick (on the table in less than 30 minutes), easy (simple ingredients and techniques) and flavoursome (who doesn't like Italian?).

No pasta in sight tonight, instead I roasted some chat potatoes, steamed carrots and broccoli.  There was a bread basket of small crusty bread rolls to sop up the creamy sauce - you know that you just have to do that when it comes to a dish with lots of sauce.

Delizioso .... 


Creamy Italian Chicken
(recipe adapted from Taste.com.au)

Serves: 4

4 small chicken breasts fillets, trimmed
salt
freshly ground black pepper
2 teaspoons olive oil
20 grams reduced fat butter
2 garlic cloves, finely chopped
80 grams sun-dried tomatoes, sliced
1/3 cup dry white wine
1 cup reduced fat thickened cream
1/2 cup chicken stock
60 grams baby spinach
1 cup fresh basil leaves, torn

Season chicken with salt and pepper.

Heat the oil and butter in a large non-stick frying pan over high heat until butter is foamy. Add the seasoned chicken  to the pan. Reduce heat to medium-high. Cook the chicken for 5 minutes each side to until just cooked through. Transfer to a plate. Cover with foil to keep warm.

Place the garlic in the pan. Cook, stirring, for 1 minute or until aromatic.

Add the tomatoes and stir to coat.

Add the wine and cook for 1 minute or until reduced.

Add the cream and stock. Return the chicken to the pan and simmer for 5 minutes or until liquid is reduced.

Stir through the spinach until wilted. 

Season to taste and sprinkle with the basil leaves.

Serve with vegetables and crusty bread, if desired.


(Click here for a printable version of this recipe)


Saturday, April 27, 2019

Fettucine Carbonara


Delicious and rich, this pasta dish makes the ultimate occasional indulgence.  I say this as it is definitely something that you wouldn't have too often for two reasons.

The first being that the flavours are so decadent and mourish that it is hard to stop at one bowl full even if you have eaten enough.

The second is that it isn't the best dish to cook if you are on a diet.  I do try and lighten up a lot of the recipes that I cook but some you just have to keep it basic and stick to the original recipes.  (However saying this I have made this one gluten free by swapping out the pasta).

My kids adore this dish - it is definitely a comfort meal and it's one that I go to as it is very quick and easy to prepare, cook and serve.


Fettucine Carbonara

Serves: 4

400 grams gluten free fettucine, or pasta of your choice
1 tablespoons olive oil
250 grams pancetta or bacon, cut into strips
1 large brown onion, finely chopped
3 garlic cloves, crushed
300 ml pure cream
3 eggs
1 cup finely grated parmesan, plus extra to serve
1/3 cup chopped continental parsley

Boil a large saucepan full of water and cook pasta following packet directions until al dente. Drain well.

Meanwhile, heat the oil in a large frying pan over medium heat. 

Add pancetta and onion. Cook for 8 minutes or until pancetta is golden. 

Add the garlic and cook for a further 2 minutes.

Whisk cream and eggs in a bowl. Stir in parmesan and season with salt and pepper. 

Add pancetta mixture and cream mixture to hot pasta and toss to combine. 

Stir through parsley and serve immediately sprinkled with extra parmesan.

(Click here for a printable version of this recipe)

Thursday, January 31, 2019

Spicy Prawn & Scallop Fettuccine

While hubby and I are absolute self confessed foodaholics there are times (not many) that we are actually over food.  This obvious happens after we have eaten too well for too long.  Every now and then we fancy something plain Jane and easy.  This often includes Eggs, Beans and Chips for dinner which the kids think is actually fantastic by the way.

Tonight, after eating an abundance of good food between Christmas through to Australia Day weekend (last weekend) we both fancied something simple and easy yet full of flavour.  Funnily enough we both fancied seafood but didn't want anything Asian as we had just had lunch in Chinatown the previous Sunday.  Plus we always seem to cook prawns and scallops with an Asian influence.

While googling recipes, my next favourite hobby after cooking, I came across an Aussie blogger and her website Em's Food for Friends.  Let me tell you I am so glad that I did.  A really good read, full of recipes and delicious pictures.  And thats where I found a recipe for Spicy Prawn and Scallop Spaghetti.  From that moment dinner was sorted although there would be a few small alterations.

I didn't cut the prawns and scallops up as I prefer them whole.  I did however remove the shells of the tails of the prawns as that is a PET HATE of mine when you go to a restaurant and order a dish where you use cutlery and you have to battle prawn tail shells.  I am also not a fan of the roe on scallops so I purchase scallops with the roe already removed.  If you like the roe, add that in it too.

Overall this seafood laced pasta dish was magic. Starting with the simplicity of cooking all components right through to eating perfectly cooked seafood and pasta in a chilli, garlic and lemon tomato based sauce.  Both hubby and I were really surprised by the dish we will now also put on our comfort food list especially when we fancy something different.  We will definitely be cooking this again.


Spicy Prawn & Scallop Fettuccine
(Recipe adapted from Ems Food For Friends)

Serves: 4
SmartPoints per Serve:

300 gram fettuccine or pasta of your choice
2 teaspoons olive oil
1 tablespoon crushed garlic
2 teaspoon of dried chilli flakes
1 lemon
1/2 cup dry white wine
400 gram tin chopped tomatoes
1/2 cup reduced fat cream
1/2 teaspoon white sugar
salt 
freshly cracked pepper
600 grams raw green prawn meat, cleaned and patted dry
400 grams scallops, without roe, cleaned and patted dry
1/4 cup finely chopped flat leaf parsley


Cook your pasta according to packet instructions.  When almost al dente, drain and set aside.


Heat a large fry pan and add a little olive oil. Lightly fry the garlic, lemon zest and chilli flakes for approximately 1 minute.


Pour in the lemon juice and wine.


Allow to reduce for a few minutes.


Add the tomatoes, cream and sugar, season with salt and pepper. Stir well to combine and allow to simmer.


Fold the scallops, prawns and 2 tablespoons parsley through the simmering sauce.


Bring the mixture back to a simmer.


Add the pasta to the pan.


Toss well to combine.


Place in a large serving bowl, sprinkle with remaining parsley and serve immediately.


(Click here for a printable version of this recipe)


Tuesday, May 22, 2018

Goulash Tirolese aka Tyrolean Beef Stew

I know a lot of my friends and family think I am made for menu planning.  But although I look nerdy and to some a control freak there are benefits to being organised. A major benefit is that I have meals I want to try and know how long they are going to take to prepare and cook.  This means that I can not only work out which meals are suitable for weeknights and which meals take a little more time.  It also means that from menu planning I create a shopping list and therefore have all the ingredients needed in one shop to pull off a week of cooking.  Totally win win for me... sadly totally outrageous to others.

Needless to say I love finding new recipes to try and share with our friends and family and you, the readers of my blog.

Anyway - I would like to introduce you to Gennaro Contaldo. Gennaro was born in Amalfi, Italy, and came to public attention as the chef who inspired Jamie Oliver when they worked together at Antonio Carluccio’s Neal Street restaurant.  He also co-presents the BBC2 Two Greedy Italians series with Carluccio and has published several cookbooks, including the recently released Slow Cook Italian, from which he shares the following recipe for Goulash Tirolese (Tyrolean beef stew).

“This classic stew from the Trentino-Alto Adige or South Tyrol region of northern Italy is slow cooked with onions, cumin and paprika – its distinct central European flavour is influenced by neighbouring Austria,” he writes in the recipe introduction.

To read this recipe was a pleasure but I must say to cook it and stand in my kitchen just smelling the Goulash (occasionally tasting it because I had too) was an honour.  I am so glad that I tried this recipe.  The flavour matched the aroma that filled the house.  The ease of the recipe was unbelievable especially compared to the flavour.

A very robust goulash style stew with only a few ingredients.  The beef was very tender and the pieces of pancetta that laced the thick sauce were tasty and added a salty yet salty element to the dish.  As we are not a polenta loving household (I am the only one that likes it) we had mashed potatoes to make ensure comfort food status was achieved.


Goulash Tirolese aka Tyrolean Beef Stew
(Recipe sourced from Indaily.com - Slow Cook Italian)

Serves: 4

3 tbsp extra virgin olive oil
2 large onions, sliced
100g pancetta, cubed
About 1 litre (4 cups) hot vegetable stock
1kg stewing beef, cut into chunks
2 garlic cloves, sliced
1 tsp cumin seeds, crushed
1 tsp paprika
2 sprigs thyme
freshly ground black pepper

Heat the olive oil in a large saucepan and sweat the onions on a medium heat for about 5 minutes, stirring all the time to prevent sticking, until softened. Remove and set aside.


Add the pancetta to the pan and cook on a medium heat until coloured but not burnt. Remove from the pan and set aside. 


Return the onions to the pan, add about 3 tablespoons of stock and cook for a minute or so until the liquid has evaporated.


Add the beef, increase the heat and brown the meat all over.


Add 100ml (scant ½ cup) of stock, reduce the heat to low, cover with a lid and cook very gently for 30 minutes, then add another 100ml of stock and continue to cook for 30 minutes.


Stir in the garlic, cumin, paprika, thyme and pancetta.


Add 400 ml of stock, cover with a lid and cook over a low heat for a further 1 hour, gradually adding more stock and stirring from time to time to ensure the meat doesn’t stick.


Remove from the heat and serve with creamy polenta or mashed potato or crunchy bread.


For a slow cooker

Cook the onions, pancetta and beef as above.

Once the beef is browned add 750 ml (3 cups) stock, the garlic, cumin, paprika, thyme and pancetta.
Bring to the boil, stirring, then transfer to a large slow cooker pot, press the meat beneath the liquid, cover and cook on low for 8-9 hours.


(Click here for a printable version of this recipe)

Monday, January 1, 2018

Bubble and Squeak - New Year 2018

Firstly I would like to wish you all a very Happy New Year and hope that 2018 is magnificent in every way.  I decided this year that there would be no New Years' Resolutions, no promises that I will fail to keep, no grand plans that will depress me if I do not complete them, etc, etc.  This year I just want to ensure that I make the most of every new day and to love, to learn, to grow and to discover.
 
Part of my new resolve is to ensure I have time for me.  Time for things I enjoy, time for me to chill, relax, refresh and enjoy me. I thought about trying a new hobby - something that would interest me and I would enjoy.  But then I thought why? I already have a hobby!  Something I enjoy doing, which challenges me and keeps me happy.  What is it?  Cooking and blogging, of course!
 
2018 will be a year that I have promised myself to make time to continue my love of cooking.  Experimenting with flavours, challenging myself with technique and more importing expanding my tastebuds to ensure that new foods are tried.  It's all very exciting and best of all I am going to share this culinary adventure with you.
 
So here we go......
 
The Festive Season means a lot of different things to different people.  For us it's family being together, traditions and love.  But it also means FOOD - and lots of FOOD.  Too much to eat in all honesty but it seems that we must over cater just to make sure there is enough.  Seriously there is always enough and that can only mean one thing.  Leftovers!  Left over ham, turkey, seafood, vegetables - everything.
 
This morning our fridge was a smorgasbord of food possibilities. Quite exciting really.  There is literally enough of so many different foods all leftover.  I also have a house full of teenagers from last nights' New Years Eve celebrations.  So I decided to first feast of the New Year would be good old fashioned Bubble and Squeak or as we prefer to call it Fry Up.  This meal is definitely on the Comfort Food listing.

Bubble and squeak is a traditional British dish made with leftover vegetables from a roast dinner. The main ingredient is potato but cabbage, carrots, peas, Brussel sprouts, or any other leftover vegetables can be added. The chopped vegetables and any left over meat are fried in a pan together with mashed potatoes or crushed roast potatoes until the mixture is well-cooked and brown on the sides. The dish is so named because the cabbage makes bubbling and squeaking sounds during the cooking process.

Sadly this isn't really a great recipe to blog as there are really no quantities to follow - it really just depends what you have in your fridge.  This morning we were lucky as I had a large bowl of mashed potatoes left over from dinner the other night along with carrots and roast pumpkin.  I did add some freshly boiled Brussel sprouts, peas and corn to give the dish more colour.  But seriously you can use anything you have on hand and theoretically they don't have to be leftover.

An absolutely perfect way to start the New Year.....


Bubble and Squeak

Serves: 8
 
2 teaspoons oil
1brown onion, diced
leftover ham, diced
leftover mashed potatoes
leftover vegetables (that you have available) chopped into bite size pieces
1 cup grated low fat tasty cheese
salt
freshly ground black pepper
1 - 2 tablespoons dried thyme
2 tablespoons butter

Preheat oven to 200 degrees Celsius.

Heat oil in a large frying pan over medium heat.  Add onion and cook for 2 - 3 minutes or until softened.  Add ham and fry for a further 5 minutes or until ham is browned and crispy.  Remove from heat.

Put the mashed potato, vegetables, cheese, salt, pepper, thyme and bacon mixture into a large bowl.  Gently mix until all vegetables are mixed through the potatoes but are still chunky.

Using the same large frying pan add butter and melt over low heat.

Place the potato mix in the pan pressing down to compact mixture.  Cook on stove top for about 10 minutes.

Transfer to oven and cook for a further 20 - 30 minutes or until cooked through.

Serve immediately.


Tuesday, October 24, 2017

Old Fashioned Sausage Casserole

The clock is ticking so fast this year and of course, as always, we are busy with both work and family life.  Seriously another few blinks of our eyes and Christmas will be on our doorsteps.  Yikes - another busy time of year.
 
Sausages are something we always seem to have in the freezer ready for the next barbecue but they are something that we don't normally cook with otherwise.  Do you?  How do you all enjoy sausages?
 
Deciding that we need to eat through our very full freezer I sat down and menu planned our meal out for the next 3 weeks - YES 3 WEEKS!  So I did it - I put sausages on the menu.  Not destined for the barbecue but in a casserole.  My family were very surprised.
 
So armed with low fat beef sausages and a recipe I found online from the Hairy Bikers I prepared a casserole dinner for the family and it was bloody nice.  The Hairy Bikers have been a long time favourite cooking partnership that both my husband and I have always enjoyed watching.  However many of their recipes have been very stodgy and not great for those watching their waistlines.  Their cooking shows however were always entertaining and often did get one drooling to try what they did cook.  This recipe was shown in an episode called "Mums Know Best Recipes", where they cooked family loved and trusted recipes.

This dish has a really nice and thick tomato based sauce infused with smoked paprika, thyme and bay leaves was perfect to cook these sausages in.  I did change the original recipe a little to reduce the calorie count, not that you would really notice and all up the meal was on the table within the hour.
 
I served this Old Fashioned Sausage Casserole with mashed potatoes and a fresh crusty French Breadstick.  It was definitely a hit.  So if you are looking for something quick and easy here you go..... 
 
 
Old Fashioned Sausage Casserole
(Recipe adapted from BBC Food - Recipes)
 
Serves: 6
 
cooking spray
12 reduced fat beef sausages
6 rashers rindless streaky bacon, cut into 2.5cm lengths
2 medium onions, thinly sliced
2 garlic cloves, crushed
1 tsp smoked paprika
1 x 400gram can chopped tomatoes
300ml chicken stock
2 tablespoons tomato paste
1 tablespoon Worcestershire sauce
1 tablespoon dark brown sugar
1 teaspoon dried mixed herbs
2 bay leaves
3–4 sprigs of fresh thyme
100ml red wine
100 ml water
salt
freshly ground black pepper

Preheat oven to 180 degrees Celsius.
 
Spray a large non-stick frying pan with cooking spray and fry the sausages gently for 10 minutes, turning every now and then until nicely browned all over. Transfer to a large flameproof casserole dish and set aside.

Fry the bacon pieces in the frying pan until they begin to brown and crisp then add to the sausages.
 
Place the onions in the frying pan and fry over a medium heat for five minutes until they start to soften, stirring often.
 
Add the garlic and cook for 2–3 minutes more until the onions turn pale golden-brown, stirring frequently.

Sprinkle over the smoked paprika and cook together for a few seconds longer.

Stir in the tomatoes, chicken stock, tomato paste, Worcestershire sauce, brown sugar and herbs.

Pour over the wine and water and bring to a simmer.
 
Tip carefully into the pan with the sausages and bacon.  Season to taste with salt and freshly ground black pepper.  Cover with foil and place in the oven.  Cook covered for 20 minutes.  Remove foil and cook for a further 10 minutes.
 
Serve with mashed potato, steamed rice or slices of rustic bread.
 

Sunday, April 30, 2017

Spicy Pork Meatballs with Spaghetti

Pasta is one of those dishes that even the fussiest of eaters will enjoy... ultimately pasta is a comfort food for many.  In our house it is definitely held in high regard when you just want to eat something for the soul and to make you feel better about everything.

Today, with having a full day of football ahead, I knew that we need a quick easy dinner that when we got home from football.  Knowing all I had to do was to make the tomato sauce and cooked pasta, this ensured that we had an hearty Sunday night dinner but I wasn't spending all evening in the kitchen.  While I made this recipe today in halves - in total it would take less than 45 minutes to take this dish from kitchen to table so it would be a perfect weeknight wonder also.

I quickly made some yummy bite size meatballs, pork laced with thyme, chilli and as usual, hidden vegetables.  These were baked in the other rather than fried in an effort to reduce the fat content of adding extra oil.    The meatballs themselves, can be cooked at an earlier date, cooled and frozen in preparation for this dish or another.

The tomato sauce, in this instance, was a very easy mix very similar to a Marinara Sauce.  Tomatoes, simmered with onions until thickened laced with a little sweetness to compliment the herbs and spices in the meatballs.

Serve with a pasta of your choice.  In our house it's Meatballs with Spaghetti - just like in that memorable Disney movie Lady and the Tramp.  Whichever pasta you choose I am sure this will become a favourite on your menu.


Spicy Pork Meatballs with Spaghetti

Serves: 8

cooking spray
1 kilogram lean minced pork
2 onions, finely diced
2 carrots, peeled and grated
2 zucchini, grated
2 teaspoons crushed garlic
1 teaspoon crushed chilli or sambal oelek
3 tablespoons tomato paste
1 teaspoon ground white pepper
2 tablespoon dried thyme
1 tablespoon dried parsley
2 teaspoons smoked paprika
1 brown onion, finely diced, additional
2 cans diced tomatoes 
2 cup water
1 tablespoon white sugar
salt 
freshly ground black pepper
spaghetti or pasta of your choice
grated Parmesan Cheese, for serving
dried chilli flakes, optional

Preheat oven to 180 degrees Celsius.  

Line a large baking tray with baking paper.  Spray with cooking spray.

Place pork, onions, carrots, zucchini, garlic, chilli paste, tomato paste, pepper, thyme, parsley and paprika in a very large bowl.  Mix, using your hands, until well combined.  Shape pork mixture into 48 evenly sized meatballs.  

Place meatballs on a baking tray in a single layer.  Bake in oven for 30 or until browned, turning several times during cooking.

Meanwhile spray a large saucepan with cooking spray and heat over low heat. Add onion and cook, stirring, until softened. Add tomatoes, water and sugar. Season with salt black pepper. Bring to the boil, stirring, reduce heat to a simmer.

Remove meatballs from oven and add to the tomato mixture carefully.  Stir gently to mix through and simmer until thickened and liquid has slightly reduced, stirring occasionally.

While sauce is simmering, bring a large saucepan of water to the boil and cook spaghetti or pasta as per the directions on the packet.  Drain.

Serve spaghetti or pasta topped with the meatballs and sprinkle with Parmesan Cheese and additional chilli flakes, if desired.


(Click here for a printable version of this recipe)

Thursday, October 27, 2016

Creamy Slow Cooked Pulled Pork Enchiladas

There are two dishes I really definitely enjoy experimenting with - the first is lasagne and the second is enchiladas.  The potential for flavours is endless.

Lasagne and enchilada fillings can consist of anything... here are a few of our other creations, just to name a fewm, that have been enjoyed in the past.
This dish was no exception.  The flavours really complimented by a creamy white sauce smothered in cheese.  Yes this will also appear on the comfort food list as it really was so good.

Start by slow cooking the pork in the sauce and once cooled enough, shred and roll in the burrito wraps.  Very simple!  Without including the slow cooking time, this meal will be on the table in under 1 hour.

Strangely enough, there was no taco seasonings were used and you really wouldn't even realise that when you are eating it.  A combination of garlic, chilli and capsicum is the basic flavourings - to be honest it's amazing.


Creamy Slow Cooked Pulled Pork Enchiladas
(Recipe adapted from Weight Watchers Eat Well Diabetes)

Serves: 6

cooking spray
500 grams lean pork neck or shoulder, fat trimmed
1 brown onion, diced
1 green capsicum, chopped
1 garlic clove, crushed
1 small fresh red chilli, thinly sliced
400 gram can diced tomatoes
1 tablespoon apple cider vinegar
salt
freshly ground black pepper
1/2 cup corn kernels
30 grams low fat butter
30 grams plain flour
2 cups skim milk
2 teaspoons dijon mustard
white pepper
6 low fat burrito
100 grams reduced grated fat tasty cheese
1 teaspoon smoked paprika

Lightly spray a frying pan with cooking spray and heat over medium-high heat.  Cook pork, turning, for 5 minutes or until browned all over.  Remove from heat and place pork in slow cooker vessel.

Add onion, capsicum, garlic, chilli, tomatoes and apple cider vinegar.  Season with salt and pepper.
Stir to combine.  

Cook on low for 8 - 10 hours or until pork is tender.  Leave to cool.

Once pork is cool, remove pork from sauce.  Using two forks, coarsely shred he pork apart.  Return pork to the sauce and add corn kernels.  Mix well to combine.

In a heavy based saucepan over medium-heat add butter.  Heat until melted and using a wooden spoon add flour, stirring continuously, until you form a roux.  Remove from heat.  Add milk and using a whisk, stir until roux is dissolved.  

Place saucepan back on stove over heat and bring to the boil, stirring continuously.  Lower heat, add mustard and season with white pepper.  Continue stirring until slightly thickened.  Remove from heat. 

Preheat oven to 180 degrees Celsius.

Spray a large baking dish with cooking spray.

Take one burrito and lay flat on chopping board or bench.  Top with 1/6 of the pulled pork mixure.  Roll up and place in baking dish.  Repeat with remaining burritos.

Smother the buritto rolls with white sauce.

Sprinkle with grated cheese and smoked paprika.

(Yes I doubled the recipe and made 2 - oops)

Place in oven and cook for 30 - 40 minutes until cooked through and cheese is melted and golden.

Enjoy with a leafy salad, if desired.


Saturday, October 8, 2016

Macaroni and Cheese with Bacon

Our princess Alexandria will eat pasta every day if we let her.  She enjoys pasta more than anything in the world.  As a special treat I thought I would cook one of her all time favourites - Mac and Cheese.  Of course, there had to be a twist.  I added bacon and onion to the mix to make it a one pot dish for her dinner.

This has to be one of the easiest pasta dishes to make - it's creamy and gooey texture screams comfort food with every mouthful.  The soft pasta is so tender it almost melts in your mouth and being enveloped with the cheesy sauce is just a perfect partnership but made more so tempting with bacon pieces scattered through the mix.  OMG - normally more than one serve is eaten.  Trust me you will be going back for more than seconds.....

Please note that you want to make more than the recipe - just simply double it.  Please resist adding more pasta and cheese!  Please resist the urge to add more pasta to stretch the recipe. You need a lot of sauce with that pasta.  As this is baked after both the pasta and sauce is cooked the pasta will continue to soak up the liquid while baking.  If you want a cheesier Mac and Cheese sprinkle more in between layers of pasta and on top - do not add extra cheese to the sauce as it will change the consistency in a bad way.


Macaroni and Cheese with Bacon
(Recipe adapted from Kitchen Treaty)

Serves: 6 - 8

250 grams macaroni or pasta elbows (or pasta of your choice)
cooking spray
1 brown onion, finely diced
150 grams bacon, diced (or more if desired)
3 tablespoons butter
1/4 cup all-purpose flour
1/2 teaspoon salt
1 dijon mustard
1/4 teaspoon black pepper
1/8 teaspoon smoked paprika plus more for sprinkling on top
2 1/2 cups skim milk
3 cups grated medium cheddar cheese

Boil the pasta until al dente, according to package directions. Drain and rinse with cool water to stop the cooking, and return to the pan you boiled it in. Set aside.

Spray a frying pan with cooking spray.  Heat over medium high heat.  Add onion and bacon.  Cook, stirring, for 5 - 8 minutes or until onion has softened and bacon starting to crisp.  Remove from heat and drain on paper towel.  Once cooled add to the pasta.

Preheat the oven to 180 degrees Celsius.

To a medium saucepan over medium heat, add the butter. When the butter has melted, add the flour, salt, mustard, pepper, and 1/8 teaspoon smoked paprika. With a wooden spoon or whisk, stir constantly for three minutes.

Add the milk in a thin stream, stirring constantly with a whisk. Continue to stir constantly until the sauce thickens, about 10-12 minutes.

Remove from heat and add 2 cups of the cheese, stirring until melted. Pour the cheese sauce over the pasta and toss gently until all of the pasta is coated.

Add half the pasta to a large casserole dish (I used a 20cm x 30cm baking dish). Sprinkle on half the cheese. Add the rest of the pasta. Sprinkle on the rest of the cheese, then dust lightly with the smoked paprika.

Bake for about 25-30 minutes, until the mac and cheese starts getting a slightly dry and a tiny bit brown on top.

Serve or eat straight from the casserole dish LOL.


(Click here for a printable version of this recipe)