Showing posts with label ww 8 propoints. Show all posts

Tuesday, June 9, 2015

Cottage Pie with Cauliflower Parmesan Mash

With our long weekend finishing yesterday - sadly it was back to work for me. Noel on the other hand had another day off with him taking one of his RDO's (Rostered Day Off). I have to officially say that I hate, absolutely HATE, going to work when he is lying in bed and I have to leave, a quick kiss goodbye then it's out the door.

As most of you know, I am an avid menu planner - avid I say - control freak Noel would say. But working full time (both of us) it's been a necessity for the past 20 odd year especially with having the two kids. I sit down normally on a Thursday evening and plan both the menu for the next week along with the shopping list.  I write the cookbook and page number next to the meal so realistically I remember where the recipe to follow is so we are super organised when it comes to cooking dinners nightly.

Needless to say, today Cottage Pie with Cauliflower Parmesan Mash was on the menu along with a committee meeting for the local Junior Football Club that we are involved in - meaning a HUGE evening of kitchen work and then the meeting. 
 
Thankfully, Mr Murray stepped up to the mark and made the Cottage Pie for tonight's dinner.  OMG the relief and the appreciation..... 
 
This cottage pie was a quite different to my normal gravy based minced and vegetable combination.  The meat mixture was of a tomato base but still jam packed with vegetables which I love - "sneaky vegies" are my favourite vegetables.  Now the topping.... where do I start.  I thought it was brilliant - not stodgy and heavy like a normal full potato mash.  The cauliflower made it so light and the was no overpowering cauliflower flavour. 

 
Cottage Pie with Cauliflower Parmesan Mash
(Recipe sourced from Weight Watchers Double-Up Dinners)
 
Serves: 8 (4 if freezing half)
ProPoints: 8
 
1 tablespoon olive oil
2 onions, finely chopped
2 carrots, finely chopped
4 garlic cloves, crushed
2 teaspoons smoked paprika
1 kilogram lean pork and veal mince
2 tablespoons plain flour
1/2 cup tomato paste
2 cups chicken stock
2 teaspoons red wine vinegar
2 tablespoons Worcestershire sauce
600 grams potatoes, chopped
1/2 large cauliflower, chopped
2 tablespoons chopped fresh chives, plus extra to garnish
salt
freshly ground black pepper
1/4 cup finely grated fresh parmesan cheese
 
Heat oil in a large saucepan over medium-high heat.  Cook onion, carrot and celery, stirring, for 5 minutes or until softened.  Add garlic and paprika.  Cook, stirring, for 1 minute or until fragrant.
 
Add mince and cook, stirring to break up lumps, for 5 minutes or until browned.  Add flour and cook, stirring, for 1 minute.  Add paste, stock, vinegar and Worcestershire sauce and bring to the boil.  Reduce heat and simmer, uncovered, for 20 minutes or until thickened.
 
Meanwhile, preheat oven to 180 degrees Celsius.
 
Boil, steam or microwave potatoes and cauliflower until just tender.  Drain.  Mash in a large bowl with chives until smooth.  Season with salt and pepper.  Cover and keep warm.
 
Lightly spray two 1.25 litre capacity ovenproof dishes with oil.  Divide mince mixture between prepared dishes.
 
Top with mash and sprinkle with parmesan cheese.  Bake for 20 minutes or until golden.  Serve sprinkled with extra chives.
 
If freezing do not bake.  Cool and wrap dish in a double layer of plastic wrap.  Wrap in foil.  Freeze for up to 2 months.  Defrost in fridge overnight and bake as per recipe above. 
 

Tuesday, March 31, 2015

Slow Cooked Thai Beef Coconut Curry

As winter approaches the nights getting cooler and day light savings is just about to leave Victoria for another year it signals it's nearly slow cooker season..... I know that there is no ruling on what time of the year that you can use your slow cooker - however my five (yes I own five) seem to get a work out during the colder months.

Curry is one of the best things to cook in a slow cooker in my opinion - two reasons.  One the flavour has more time to develop and the beef (or the meat) becomes so wonderfully tender due to the slow cooking process.

This recipe I found on a Facebook page "Slow Cooker Recipes 4 Families" and immediately knew we would love the flavours.  A little tweaking to suit us and voila - a mild curry with a hint of Thai flavourings that we all enjoyed.  I hope you do too.


Slow Cooked Thai Beef Coconut Curry
(Recipe Adapted from Tricia King on Facebook Slow Cooker Recipes 4 Families)

Serves: 8
ProPoints per Serve: 8

1 tablespoon oil
2 large onions, diced
1 teaspoon crushed ginger
6 cloves of garlic, crushed
1kg of gravy beef, diced
1 tablespoon turmeric
2 teaspoons ground cumin
1 tablespoon ground coriander
2 tablespoons fish sauce
2 teaspoons crushed chilli
2 tablespoons brown sugar
1 cup beef stock
salt
freshly ground black pepper
2 cans of Lite coconut milk
4 carrots, peeled and thickly sliced
1 red capsicum, large dice
1 green capsicum, large dice

Add oil to a large frying pan and place on medium heat.  Fry onion, garlic and ginger till soft. Add beef and cooked until browned. 

Add turmeric, cumin, coriander, fish sauce chilli, sugar and stock.  Stir well and season to taste with salt and black pepper.

Place the beef mixture in the slow cooker vessel.  Add carrots.

Stir through the coconut milk and cook on high for 4 - 5 hours and on low for 8 hours.

Add capsicum to curry when you have approximately 1 hour remaining on your cooking time

Serve with steamed rice (4ppts for 1/2 cup) and garnished with chopped coriander, if desired.


(Click here for a printable version of this recipe)

Sunday, March 8, 2015

South West Chilli

There was a moment where I swear we must have all woken up after a siesta with the taste of Mexico because there seems to quite a few dishes being cooked in the House of Murray with the Tex Mex flavours.  Don't get me wrong we LOVE it... Mexican food can be so simple to prepare yet so complex in flavours always making the taste buds dance. 
 
While I cannot take credit for this recipe - it's not a "hand me down" family recipe full of secret ingredients - it's actually a combination of internet researched (yes thank God for Google again) recipes and flavours that we like.  I must say that researching Chilli came up with some interesting information.  Many bloggers, especially those located in the Southern USA have their own take on what makes the best chilli - is it the heat?  Is it the texture? Beans or no Beans?  As you can imagine there are many, and I mean many, versions of this dish all differing slightly but all sounding delicious.
 
My favourite Chilli making tip that I stumbled across is to toss a grating of bitter chocolate into chili to give it body and mellow the flavours however I did not do that on this recipe.
 
I do agree with this tip - for maximum flavour, cool chilli and refrigerate overnight so flavours will develop.  It's similar to the fact that curry always tastes better the next day.
 
This is just a perfect meal in a bowl but if you wish you could serve with steamed rice, mashed potato or even boiled pasta.  It's great by itself though and you will be wanting seconds so no real need to fill up on the carbs!!


South West Chilli

Serves: 12
ProPoints per Serve: 8
 
cooking spray
1 kilogram lean beef mince
2 large onions, chopped
6 cloves garlic, crushed
1 tablespoon dried ground cumin
1 tablespoon dried oregano
2 tablespoons chilli powder or to taste
2 x 700 gram jars Passata or tomato puree
2 x 440g tins diced tomatoes
4 cups beef stock
salt
freshly-ground black pepper
2 tablespoons honey
2 x 440 g cans kidney beans, rinsed and drained
2 green capsicums, diced
2 red capsicums, diced
1 cup frozen corn kernels
 
In a large saucepan over medium-high heat, spray with cooking spray and sauté ground beef, onion, and garlic until the meat is browned.
 
Add cumin, oregano, chili powder, Passata, tomatoes, and beef stock. Reduce heat to low and simmer, covered, approximately 3 to 4 hours, stirring often. Additional beef broth, water, or wine may be added as needed.  Season to taste with salt and freshly ground black pepper.
 
Add honey, beans, capsicum and corn.  Continue to simmer another 30 minutes, testing and adjust seasoning to taste if required.

Serve topped with 1 tablespoon of reduced fat sour cream (additional 1 ProPoint) and 15 grams grated 50% reduced fat tasty cheese (additional 1 ProPoint).
 

Friday, January 9, 2015

Creamy Garlic and Chilli Mussels

Tonight we needed something quick and simple to make without too much fuss but as always we wanted maximum flavour.  The first thing that sprung to mind was mussels as they are such a versitale ingredient and cheap here in Australia.
 
A quick garlic and chilli sauce and we were in business.  One kilogram demolished in no time with some crunchy bread to soak up the juice.
 

Creamy Garlic and Chilli Mussels
 
Serves: 4
ProPoints per serve: 8
 
1 kilogram mussels
1 tablespoon olive oil
1 tablespoon crushed garlic
2 teaspoons crushed chilli
1 onion, sliced
1 red capsicum, sliced
1/2 cup dry white wine
1/2 cup low fat cream
freshly ground black pepper
fresh coriander leaves, for garnish


Clean mussels removing all barbs and dags from the outer shell.  Rinse.

Heat oil over medium- high heat in a deep frying pan, saucepan or wok.  Add onion and capsicum and cook, stirring, for 5 minutes until softened.

Add garlic and chilli, stirring for 1 minute or until fragrant.

Add the mussels and toss for 2 minutes.

Add the wine and the cream, stirring until combined completely, season with freshly ground black pepper.  Cover with a lid and let steam for 5 minutes.

Remove lid and transfer to a bowl, if desired, and serve garnished with fresh coriander.

Add extra ProPoints should you wish to serve with crusty bread (bread type depending).

(click here for a printable version of this recipe)

Monday, January 5, 2015

Mustard Maple Chicken Fillets (aka World's Best Chicken)

So chicken fillets in hand (well out defrosting for dinner) and I really needed some inspiration.  So I turned to good old Google.  Typing in "Chicken Fillet Recipes" and praying that something would catch my eye and inspire me.
 
One of the google hits was called 60 Awesome Ways to Spice Up Boring Chicken Breasts (yep of all the eye grabbing titles to choose). Of course me being me that was the first link I clicked on - and gee was I amazed!!  After having a look at several of the recipes via links I got down to number 45 and it was hook, line and sinker for me.  I immediately thought that is what we are having for dinner.
 
Oven baked with minimal ingredients always is a win win - often these recipes are quick, simple and involve the least amount of washing up.  There was no need to marinate before hand and all the ingredients I had on hand.
 
The title of "World's Best Chicken" of course is quite bold.  But it's an understatement.  For such a truly easy and foolproof dish the flavour was magnificient.  The chicken was tender and juicy.  The sweet tanginess of the mustard, maple syrup and vinegar combined was out of this world. 
 
Infact, for the first few mouthfuls the table was silent savouring every mouthful each of us took but at the same time we were looking around the table to see if others were having the same experience....
 
You MUST try the Worlds Best Chicken....


Mustard Maple Chicken Fillets (aka World's Best Chicken)
(recipe adapted from Rachel Schultz)
 
Serves: 6
ProPoints per serve: 8
 
cooking spray
6 boneless, skinless chicken breasts
3/4 cup Dijon mustard
1/2 cup maple syrup
2 tablespoons red wine vinegar
salt
freshly ground black pepper
2 tablespoons fresh rosemary, chopped

Preheat oven to 180 degrees Celsius.

In a small bowl, whisk together mustard, syrup, and vinegar.

Place chicken breasts into a large rectangle casserole dish or a lined baking dish. Season with salt and lots of pepper. Pour mustard mixture over chicken. Make sure each breast is coated. Sprinkle with some more pepper.  Sprinkle with chopped rosemary.

Bake for 30-40 minutes or until chicken is cooked through.

Place fillets on serving platter or individual plates.  Drizzle remaining sauce evenly over chicken.  Serve.


 (Click here for a printable version of this recipe)

Tuesday, July 15, 2014

Pork Cutlets with Pear and Maple Sauce

I know that the tradtion is to serve Apple Sauce with pork dishes especially Roast Pork but pears are becoming a very popular replacement. 

Many recipes have roasted pears, using the nice Beurré Bosc pears which become very soft and creamy flavoured when roasted.  I saw this recipe which combined pears, maple syrup and fresh thyme and was immediately excited by the thought of combining all three flavours - three of my favourite flavours.
 
The pork cutlets, were easy to cook so the hero of the dish was the Pear and Maple Sauce.  And a hero it was... tasty and also very easy to make.  The recipe called for the sauce to be blended at the end of the cooking time but I was impressed with the chunky rustic look and left it that way.


Pork Cutlets with Pear and Maple Sauce
(Recipe adapted from Weight Watchers Cook The Classics Cookbook)
 
Serves: 4
ProPoints per Serve: 8
 
1 tablespoon olive oil
1 brown onion, finely chopped
1 garlic clove, crushed
2 teaspoons fresh thyme leaves
3 pears, peeled and chopped
1 tablespoon maple syrup
1/2 cup chicken stock
cooking spray
4 x 150 gram pork cutlets, fat trimmed
4 carrots, cut into batons
2 cups frozen peas
 
Heat oil in a medium saucepan over medium heat.  Add onion, garlic and thyme leaves and cook, stirring, for 5 minutes or until softened.  Add pears, maple syrup and stock and bring to the boil.  Reduce heat and simmer, covered, for 10 minutes or until pears have softened.  If desired, process pear mixture in a food processor until smooth.
 
Lightly spray a large non-stick frying pan with cooking spray and heat over a medium heat.  Cook pork for 5 minutes each side or until browned and cooked through.  Remove from pan and allow to rest.
 
Meanwhile, boil, steam or microwave peas and carrots until tender.  Drain.  Serve pork with carrots, peas and pear sauce.  Add an addition 3 propoints if served with a medium baked potato.


Thursday, February 6, 2014

Beef Larb Lettuce Cups

Due to both Noel and I having to attend a committee meeting so again (yes very regularly) we needed something very quick to prepare and eat together as a family.

These Beef Larb Lettuce Cups were perfect and were very tasty.  Crunchy, sweet, fresh and a little spicy all great combinations.  The meat mixture, laced with sweet chilli and lime, was the only warm element in the lettuce cup.  The fresh mint was vibrant yet not overpowering as it was a flavour that did not appear in every mouthful.

Best of all, the time factor, a 30 minute recipe that was a replica of a meal you would order at an Asian restaurant was the perfect treat tonight.


Beef Larb Lettuce Cups
(recipe adapted from WW Easy as 1, 2, 3 Cookbook)

Serves: 4
ProPoints per Serve: 8

50 grams dried rice vermicelli noodles
1 tablespoon Jasmine rice
1 tablespoon sunflower or canola oil
500 grams extra lean beef mince
1/4 cup sweet chilli sauce
2 tablespoons lime juice
12 butter lettuce or baby cos lettuce leaves
2 lebanese cucumbers, cut into ribbons
1 carrot, cup into ribbons
1 cup fresh bean sprouts
1 cup fresh mint leaves
lime wedges, to serve

Prepare noodles following packet instructions or until just tender.  Drain.  Rinse under cold water.  Drain.  Using scissors, cut noodles into 6cm lengths.

Meanwhile, heat a large non stick fryind pan over high heat.  Cook rice, stirring, for 2 minutes or until light golden.  Transfer to a plant to cool.  Grind in a mortar and pestle until just crushed.

Heat oil in the same pan.  Ad mince and cook, stirring to break up lumps, for 5 minutes or until browned.  Add sweet chilli sauce and lime juice and stir to combine.

Arrange lettuce on serving plates.  Top with cucumber, carrot, noodles, beef mixture and sprouts.  Sprinkle with mint and toasted rice.  Serve with lime wedges.


(click here for a printable version of this recipe)

Friday, December 27, 2013

Hoisin and Chilli Chicken Chow Mein

I love Chow Mein and like many reciipes, there are so many different versions. 

I love the Chinese version with noodles.. sometimes soft noodles and other times the crispy noodles take my preference.  There is something wonderful about a dish of noodles accompanied with tender meat and vegetables encased in a thick yet simple sauce.

As the kids were not eating with us tonight I fancied adding some chilli along with the sweet sour taste of hoisin sauce.  Adding two bold flavours to a simple dish could be a little overpowering but it was a risk I was willing to take especially after eating Christmas food for the last few days I was yearning a different flavour - and I had all my money on the fact that this dish may just give me the taste that I wanted.

And boy did it work - it was fantastic.  Both Noel and my Mam were in agreeance that the flavours complimented the chicken, vegetables and noodles. 


Hoisin and Chilli Chicken Chow Mein
 
Serves: 6
ProPoints per Serve: 8
 
200 gram packet Changs Egg Noodles
1 tablespoon peanut oil
600 grams diced chicken
1 teaspoon crushed garlic
1 teaspoon crushed ginger
1 onion, sliced
2 carrots, peeled and sliced
1 bunch broccolini, chopped into 3 cm pieces
200 grams button mushrooms, sliced
1/2 cup hoisin sauce
1/2 cup dry sherry
1 teaspoon crushed chilli
 
 
Boil water in a kettle.  Place noodles in a large bowl and cover with boiling water.  Allow to stand for 5 minutes or until tender (not too soft).  Drain, return to bowl and mix through 1 teaspoon of peanut oil.
 
Heat wok over high heat and add 2 teaspoons peanut oil.  Cook chicken, garlic and ginger, in batches, until browned and just cooked.  Remove from wok.
 
Heat remaining oil in wok.  Cook onion, carrots and broccolini stalks over medium heat for 5 minutes or until softened.   Add mushrooms and cook for a further 3 - 5 minutes.  Add the broccolini heads and return the chicken to the pan. 
 
Mix together the hoisin sauce, sherry and crushed chilli in a small jug.  Add to the chicken and vegetables in the wok.  Toss together for 2 minutes.
 
Add noodles and toss very gently until mixed and noodles heated through. 
 
Serve immediately.


(Click here for a printable version of this recipe)

Friday, October 11, 2013

Friday Night Pizza

Homemade pizza is always a welcome alternative to take away in the House of Murray.  I immediately fell in love with this pizza on the first mouthful.

I have to say I love Vegetarian Pizza but also like to change the ingredients sometimes to include some chicken, bacon or salami depending on my taste fancies at the time.  For me this pizza was the bomb - it had the lot and I was one happy diner!!
 
 
Friday Night Pizza
(recipe sourced from Weight Watchers Simply Delish)

Serves: 4 (Makes 2 pizzas)
ProPoints per Serve: 8

250 grams butternut pumpkin, thinly sliced
1 small zucchini, thinly sliced
1 tablespoons olive oil
1 brown onion, thinly sliced
1 garlic clove, crushed
150 grams button mushrooms, quartered
1 small red capsicum, chopped
2 x 100 grams wholemeal Lebanese bread
1/3 cup (80ml) pizza sauce
100 grams cherry tomatoes, halved
50 grams shaved hot salami, chopped
75 grams reduced fat feta cheese, crumbled
1/4 cup (25 grams) reduced fat grated mozzarella cheese
1 tablespoon barbecue sauce
1/3 cup fresh basil leaves

Preheat oven to 200 degrees Celsius or 180 degrees Celsius fan forced.

Place pumpkin and zucchini in a medium blow.  Add half the oil and toss to combine.  Preheat a chargrill or barbecue over high heat.  Cook pumpkin and zucchini, in batches, for 2 - 3 minutes each side or until lightly charred and tender.

Meanwhile, heat remaining oil in a large non stick frying pan over medium - high heat.  Add onion, garlic, mushroom and capsicum and cook, stirring, for 5 minutes or until just tender.

Place bread on 2 pizza or baking trays.  Spread pizza sauce over bread.  Top with pumpkin, zucchini, mushroom mixture, tomatoes and salami.  Sprinkle with feta and mozzarella.  Bake for 12 - 15 minutes or until bread is crisp and golden.  Serve pizza drizzled with barbecue sauce and sprinkled with basil.

Tuesday, June 25, 2013

Sweet Potato Fritters with Lemon Chicken

As sands through the hour glass so are the days of my life... currently at the moment there is lots on the go with several post backed up due to being time poor from being busy with both family life and work.

Before I go any further I need to formally announce the winner of my giveaway...... Congratulations to Erin Roe!!!  Well done and as mentioned in my original post Sirloin Steak with Tomato Kasundi and Potato Wedges I am jealous.  Can you send me an email to me and I will give you instruction on how to activate your course?

One of the posts I have trying to post during the last few weeks has been this one.  Sweet Potato Fritters with Lemon Chicken is a very elegant dish to look at but is very simple with only very few components to complete.  Not to mention it is a favourite of mine.

The lemon chicken isn't like that of a chinese restaurant where it is battered, deep fried and then coated in a sticky sweet lemon sauce.  The chicken is pan fried with the lemon juice is added during the last few minutes of cooking.  Served on top of the sweet potato fritters that are flavoured with spring onions and ginger, all drizzled with sweet chilli sauce makes for a perfect mid week dinner or for a special easy meal for a dinner party.


Sweet Potato Fritters with Lemon Chicken
(recipe sourced from WW Pure Test Cookbook)

Serves: 4
ProPoints per serve: 8

600gram chicken breast fillets
2 tablespoons lemon juice
600 grams sweet potatoes, peeled and grated
5 shallots, finely chopped
2 teaspoons fresh ginger, minced
2 eggs, lightly beaten
1/3 cup flour
1/3 cup Thai sweet chili sauce
4 tablespoons coriander leaves (optional)

Coat a large non-stick fry pan with cooking spray and cook the chicken breast fillets for 5 minutes each side. Pour over the lemon juice during the last minute of cooking. Transfer to a plate, cover with foil and keep warm while you make the fritters.

Place the grated sweet potato, shallots and ginger in a large mixing bowl and combine. Stir through the egg and flour.

Recoat the pan with cooking spray and heat. Scoop a quarter of the mixture into the pan and form into a circle about 12cm in diameter. Cook over a low heat for 4 minutes on each side or until golden and cooked. Remove from the pan and keep warm while cooking the remaining fritters.

Divide the fritters between 4 serving plates. Cut the chicken into slices and place on top of the fritters. Spoon over the sweet chili sauce and scatter with coriander, if using.

(Click here for a printable version of this recipe)

Tuesday, May 21, 2013

Sirloin Steak with Tomato Kasundi and Potato Wedges and a Give Away

Once again it has been so long in between posts and I assure you (as always) I haven't given up... it's called being time poor!  But I finally have a meal to share and also a great giveaway.
 
Tonight we had char grilled steak cooked on the open flame of the Weber... Noel's favourite way of cooking steak.  I decided that I wanted us to have something different to accompany the steak and when I came across this recipe I knew it was that "something different" we were having tonight.
 
Kasundi is a spicy Indian relish and not only was it full of flavour - it was easier to make than I had imagined.  Considering the depth and range of it's taste, spicy and sweet,  the steps involved were very basic which of course is always a win in the kitchen.  All up on the table in under 1 hour.
 
We used scotch fillet steak with this recipe as that is what we had on hand and even though we barbecued our meat this made no real change to the meal itself.  I really enjoyed the Kasundi and found it an enjoyable side to accompany the steak.  I presume that it would be a nice element to add to various meats.

Oh keep reading below to see details of our fantastic give away........


Sirloin Steak with Tomato Kasundi and Potato Wedges
(recipe adapted from WW 1 Recipe 3 Ways Cookbook)
 
Serves: 4
ProPoints per Serve: 8
 
4 (680 grams) desiree potatoes, cut into wedges
cooking spray
1 teaspoon sea salt flakes
2 teaspoons black mustard seeds
2 teaspoons cumin seeds
2 teaspoons turmeric
1/4 teaspoon chilli powder
1 tablespoon finely grated fresh ginger
3 cloves garlic, crushed
1/3 cup white vinegar
400 gram can diced tomatoes
2 tablespoons brown sugar
4 x 150 gram lean sirloin steaks (or steak of your choice), fat trimmed

Preheat oven to 220 degrees Celsius or 200 degrees Celsius fan-forced.  Line a baking tray with baking paper.  Place potatoes on prepared tray and lightly spray with oil.  Sprinkle with sea salt.  Bake for 45 minutes or until tender and crisp.
 
Meanwhile, heat oil in a medium saucepan over medium high heat.  Add mustard and cumin seeds and cook, covered, for 1 minute or until seeds begin to pop.  Add turmeric, chilli powder, ginger and garlic and cook stirring, for 30 seconds or until fragrant.  Add vinegar, tomatoes and sugar and bring to the boil.  Reduce heat and simmer, covered, stirring occasionally, for 20 minutes or until kasundi is thick.
 
Meanwhile, lightly sray a large non-stick frying pan with oil and heat over medium heat.  Cook steak for 3 - 4 minutes each side for medium or until cooked to your liking.  Transfer to a plate.  Cover steak with foil and set aside to rest for 5 minutes.
 
Top steaks with kasundi and serve with potato wedges.
 
 
(Click here for a printable version of this recipe)

Now for the giveaway......

The wonderful prize I have to giveaway is actually a Food Safety Supervisor's Course with the Australian Institute of Food Safety.  Many thanks to Australian Food Safety News for this fantastic food related give away.
 
Most food businesses in Australia have a legal obligation to employ a qualified Food Safety Supervisor on their team. Whether you are a business who needs to meet these requirements, or a food worker who wants to develop new skills and obtain a qualification, then this course is for you. Our course is nationally accredited and covers all of the key skills required to be a Food Safety Supervisor in today's food-handling environment.

This engaging and interactive course is designed to take you step-by-step through the food safety laws in Australia and help you understand what you need to do to ensure that food is handled, prepared, cooked and stored safely in your organisation. You'll also learn about the requirements of a Food Safety Plan.

 
Other information regarding this opportunity:
- International entrants are accepted

- Prize can not be exchanged for money 

- No entries will be accepted after Wednesday 12th June 2013 7pm EST.

- Winner will be announced Friday 14th June 2013.

- The winner will be enrolled in the Food Safety Supervisor course and receive instructions via email.

Course information can be found here: Food Safety Supervisor's Course.

This course is normally valued at AUS $249.95.

So how do you get the chance to win this fantastic opportunity:

Simply leave a comment on this recipe.  Easy right? 

Your comment should tell me why you would like to complete this course and how it will help you in your future whether it's in the food industry, volunteer work, personal life etc. In others word tell me why you want to undertake this training.

If you do not have a google account you can leave an anonymous comment but please leave your name.  Then send me an email to: houseofmurray@optusnet.com.au to advise your contact details just incase you are the winner.

Good luck and I am really jealous as this is a training course that I would love to win for myself... that however may look a little too suspect!

Thursday, April 4, 2013

Choo Chee Prawns


This would have to be one favourite prawn dishes of all time.  We have been cooking this dish for years now and it never fails to amaze with flavour.  This version is a low fat take on the traditional Thai Dish but I don't beleive it is any less as flavoursome than the original.

The amazing spicy yet somewhat creamy sauce is created using few ingredients and it's cooked in no time at all. 

I love the final addition of flavours from the fresh curry leaves, the basil and the coriander. It is delish.


Choo Chee Prawns
(recipe adapted from Taste.com)

Serves: 4
ProPoints per serve: 8

2 teaspoons peanut oil
1 brown onion, finely chopped
3 garlic cloves, finely chopped
1 fresh red chilli, finely chopped
1kg medium green prawns, peeled
2 tablespoons sambal oelek
1 x 400ml can lite coconut milk
2 teaspoons soy sauce
2 teaspoons fish sauce
2 teaspoons oyster sauce
2 teaspoons cornflour
1 tablespoon water
12 fresh curry leaves
1 bunch fresh Thai basil, leaves picked
1 bunch fresh coriander, sprigs picked

Heat oil in a wok or large deep frying pan over medium-high heat. Stir-fry onion, garlic, chilli, prawns and sambal oelek for 2-3 minutes or until prawns change colour.

Add the coconut milk, soy sauce, fish sauce and oyster sauce. Bring to the boil. Reduce heat to medium and simmer for 1 minute.  Stir in combined cornflour and water.

Stir in the curry leaves, basil and coriander.

Serve with steamed rice if desired, allow an additional 4 ProPoints per 1/2 cup.

(Click here for a printable version of this recipe)

Tuesday, March 5, 2013

Ham, Zucchini and Caramelised Onion Lasagne

As intriguing as this dish sounds was exactly how it tasted.  My tastebuds were intrigued with every mouthful and every mouthful was enjoyed. I have tried so many lasagne recipes but this one really surprised me. For a different lasagne you should really give this a go.

The flavours were amazing yet so different.  The sweetness of the carmalised onion complemented the chargrilled zucchini perfectly. In fact I would have never thought of this flavour combination. 

There is no thick Bechamel Sauce with this dish either but to be honest it doesn't need it.  It has a fresh flavour and is nice and light for either lunch or dinner.


Ham, Zucchini and Caramelised Onion Lasagne
(Recipe adapted from WW 1 Recipe 3 Ways Cookbook)
 
Serves: 8
ProPoints per serve: 8
 
cooking spray
1 tablespoon olive oil
6 brown onions, thinly slice
1 tablespoon brown sugar
1 tablespoon balsamic vinegar
1 kilogram small zucchini, thinly sliced lengthways
2 2/3 cups (660ml) tomato pasta sauce
2 tablespoons dried oregano
6 x 47 gram fresh lasange sheets
300 grams shaved ham, fat trimmed and chopped
1 1/2 cups Bega So Extra Light grated Tasty Cheese
4 tablespoons finely grated parmesan cheese

Preheat oven to 200 degrees Celsius or 180 degrees Celsius fan-forced.  Lightly spray a large lasagne or baking dish with cooking spray.

Heat oil in a large non-stick frying pan over medium heat.  Add onion and cook, stirring occasionally, for 15 minutes or until golden.  Add sugar and vinegar and cook, stirring, for 3 - 4 minutes or until sugar has dissolved and onions have caramelised.  Transfer to a bowl.  Cool.

Meanwhile, preheat a chargrill or barbecue over high heat.  Lightly spray zucchini with cooking spray.  Cook zucchini in batches for 1 minute each side or until charred and tender.  Transfer to a plate.

Spread 2/3 cup pasta sauce over base of prepared dish.  Top with 1 layer (2 sheets) of lasagne, cutting sheets to fit. Top with half the zucchini, caramelised onion and ham.  Top with 2/3 cup pasta sauce.  Sprinkle over 1 tablespoon of oregano.  Top with another layer of lasagne sheets.  Repeat layer of zucchini, onion, ham, pasta sauce and oregano.  Finsh layering with the remaining sheets and sauce.  Sprinkle with combined cheeses.

Bake for 30 - 35 minutes or until pasta is tender and top is golden. 

Serve with a ProPoint free salad.


(Click here for a printable version of this recipe)

Monday, March 4, 2013

Balsamic and Garlic Lamb Cutlets

I am definitely playing catch up once again with blogging.  Please forgive me for my lack of recipe sharing it saddens me but aat this point in time it has been totally unavoidable with our life just being so full on and I have to say I do not have much idle time anymore.  Many of you know that my work load has increased, I have been travelling with work, we had a well earned family camping trip and are planning one for the Easter break not to mention school (Miss 11 started high school this year) and football season is starting up again with training currently 3 nights per week.

BUT..... Life is so busy but not busy enough to not cook good food!!
I do hope you enjoy what we have been cooking.....

Lamb cutlets are always devoured at the House of Murray - to be honest they are inhaled by everyone rather than chewed delicately but at least they are always enjoyed.

We always tend to marinate our lamb cutlets as its a meat that is complimented by many flavours.  Tonight we tried something new by using balsamic vinegar where we usually would use red wine as a marinade base. I have to say I have used balsamic vinegar before in one of my favourite meals, Chicken with Balsamic Glaze and a few steak recipes so tonight was a new experience.

A very nice experience I have to admit.  The combination of the balsamic vinegar, fresh garlic and oregano made a delicate yet noticeable in taste.

Please note:  I actually doubled the recipe as we had visitors for dinner.


Balsamic and Garlic Lamb Cutlets
(recipe adapted from WW 1 Recipe 3 Ways Cookbook)

Serves: 4
ProPoints per Serve: 8

2 tablespoons balsamic vinegar
2 garlic cloves, crushed
1 tablespoon dried oregano
1 tablespoon olive oil
salt
freshly ground black pepper
8 x 50 gram French lamb cutlets, fat trimmed
cooking spray
500 grams chat (baby) potatoes, halved
200 grams baby spinach leaves
2 truss tomatoes, chopped
1 small red onion, finely sliced
1 tablespoon white wine vinegar

Combine vinegar, garlic, oregano and half the oil in a large glass or ceramic bowl.   Add lamb and turn to coat.  Cover and refrigerate for 3 hours.
Preheat oven to 200 degrees Celsius.
Place potatoes on a prepared cooking tray.  Spray with cooking spray.  Cook in oven for 40 - 45 minutes or until crisp and golden.
Preheat a chargrill or barbecue over medium high heat.  Lightly spray both sides of lamb with oil.  Cook for 3 - 4 minutes each side or until cooked to your liking.
Meanwhile place spinach leaves on a plate, top with tomatoes and scatter over onion.  Whisk white wine vinegar and reamining oil in a small jub.  Drizzle over salad.  Serve lamb with potatoes and salad.


(click here for a printable version of this recipe)

Saturday, September 8, 2012

Sticky Pork

There are so many version of this Thai favourite.  We recently cooked this version of Slow Cooked Sticky Pork which was delish. I have purchased a new cook book so I am trying out another recipe.  The new cookbook is Takeaway At Home available from Weight Watchers.

This is not the meal that I had menu planned for tonight but as I couldn't find any Gummy Shark that meal will have to wait for another night. I wanted something quick, simple but jam packed with flavour.  Not to mentiom dished up in lettuce leaves finger dinner never tasted so good.

While the meal itself was nice both Noel and I found it very sweet not having all the usual qualities of a Thai dish.  The acutal sweetness overpowered the chilli component and the lime flavour.  We will cook again as it was pleasing to eat but add some kaffir lime leaves and fresh red chilli to the mix.


Sticky Pork
(recipe sourced from WW Takeaway At Home Cook Book)
 
Serves: 4
ProPoints per Serve: 8
 
2 teaspoons sesame oil
4 green shallots, thinly sliced
1 green capsicum, finely chopped
500 grams lean pork mince
1/4 cup lime juice
227 gram can sliced water chestnuts, drained, finely chopped
1/3 cup sweet chilli sauce
2 tablespoons soy sauce
1 tablespoon hoisin sauce
2 small carrots, grated
1 celery stick, finely sliced
280 grams baby cos lettuce leaves

Heat a wok over high heat.  Add oil and heat for 5 seconds.  Add shallots and capsicum and stir fry for 2 - 3 minutes or until sofetened.  Add pork and stir fry, breaking up any lumps, for 5 minutes or until browned.

Add juice, water chestnuts and sweet chilli, soy and hoisin sauces and stir fry for 2 minutes or until heated through.  Stir in carrot and celery.  Spoon pork mixture into lettuce leaves. Serve.

Serve with: Brown Rice: Add 3 ProPoints values per serve for 1/2 cup steamed rice.


(Click here for a printable version of this recipe)

Sunday, July 1, 2012

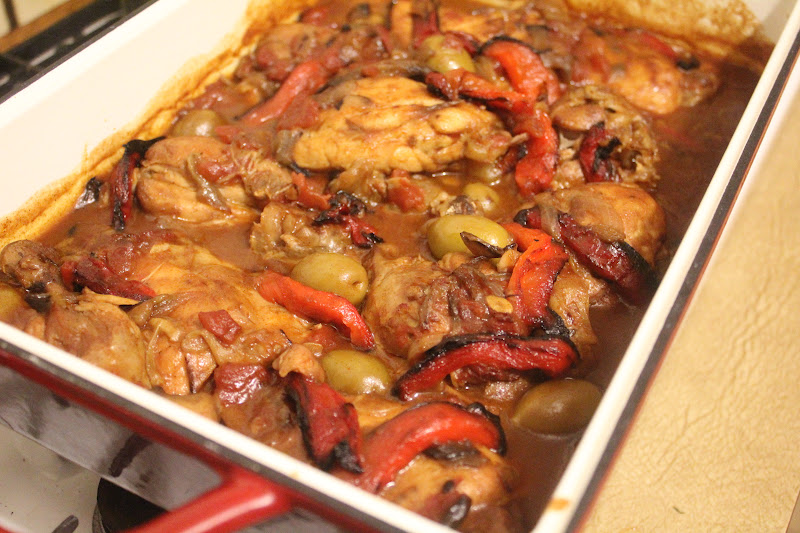
Smoked Paprika Chicken

A bit of a spice theme happening here lately.. maybe it's what my tastebuds are fancying or maybe it's just by chance.. whichever I know that we are all enjoying the meals.

The house smells good that's for sure.  The aroma of a smokey tomato broth with the obvious hints of fresh garlic were delish.

One of the ingredients is saffron threads. I am very lucky as I was recently given a small plastic container of saffron threads from my in laws who recently travelled overseas.  To me it was a present worth millions I am sure others wouldn't agree.  But to know that I was thought of in a special way while they were overseas in the Spice Market makes me feel very treasured.

This dish was very easy to prepare and bring it all together in the one casserole dish.  The original recipe called for shop brought chargrilled capsicum (not in oil) but I grilled my own.


Smoked Paprika Chicken
(recipe adapted from WW Food You'll Love Cookbook)

Serves: 6
ProPoints per serve: 8

2 teaspoons olive oil
6 chicken chops, skin removed, fat trimmed
6 drum sticks, skin removed, fat trimmed
1/4 teaspoon saffron threads
2 tablespoons hot water
1 red onion, thinly sliced
3 cloves garlic, thinly sliced
2 teaspoons smoked paprika
1/4 cup dry sherry
400 gram can diced tomatoes
1 cup chicken stock
100 grams green Sicilian olives
2 red capsicums
cooking spray
2 teaspoons cornflour
2 tablespoons water
1 tablespoon honey

Preheat oven to 180 degrees Celsius.

Heat half the oil in a large non stick frying pan over high heat.  Cook chicken, in batches, turning for 5 minutes or until browned.  Transfer chicken to a large ovenproof casserole dish.

Place saffron in a small bowl.  Add 2 tablespoons hot water and set aside to soak for 5 minutes.

Meanwhile heat remaining oil in the same pan over medium heat.  Add onion and cook, stirring, for 5 minutes or until softened.  Add garlic and paprika and cook, stirring, for a further 1 minute.  Add saffron liquid and sherry and cook for 2 minutes.  Add tomatoes, stock and olives and bring to the boil.

Pour onion mixture over chicken in the casserole dish,  Bake, covered, in the oven for 1 hour.

Meanwhile cut capsicum into thick strips and place on a foil lined oven tray.  Spray with cooking spray and place under a high grill for 5 minutes until black and blistered.  Remove and place into a sealable plastic bag to sweat for 10 minutes.  Remove outer layer of skin and slice into 2 cm strips.

Blend cornflour with water in a small bowl.  Stir cornflour mixture into casserole with the honey.  Add the capsicum strips.  Bake, uncovered, for 15 minutes or until sauce is slightly thickened.  Stir sauce around chicken.  Serve immediately.

(click here for a printable version of this recipe)

Friday, June 29, 2012

Portuguese Chicken and Prawn Pizza

Home made pizza night always works well .  Everyone makes their own flavours - Alex had a Satay Chicken, Ollie a BBQ Meatlovers and Noel made a pizza with Chicken, Hot Salami and Chilli BBQ Sauce.  As you can see we all have a creative streak when it comes to making pizza!

Tonight inspired by a dish one of my previous bosses had at Kelly's hotel in Cranbourne when we went out for dinner Thursday, last night.  Joe ordered Piri Piri Chicken and Prawn Rissotto.  It looked nice although it was too spicy for Joe.  The dish itself looked like a paella so I used that style of cooking as a basis for my recipe.

Marinating the chicken and prawns in a portuguese marinade topped with spanish style vegetables and of course black olives sprinkled with a little cheese made for a different pizza, that's for sure.


Portuguese Chicken and Prawn Pizza

Serves 4
ProPoints per serve: 8

1 teaspoon extra virgin olive oil
1/4 cup lemon juice
2 teaspoons crushed garlic
1 tablespoon chopped chilli paste
2 teaspoons crushed ginger
2 teaspoons dried oregano flakes
200 grams chicken fillet, sliced
200 grams raw prawns
cooking spray
1 x large pita bread (100 grams)
2 tablespoons tomato paste
1/2 brown onion, sliced
1/2 red capsicum, sliced
1/2 green capsicum, sliced
60 grams grated light cheese
100 grams whole pitted black olives

Mix together olive oil, lemon juice, garlic, chilli, ginger and oregano until well combined.   Place chicken and prawns in a medium bowl, add marinade and toss to coat.  Cover and place in refrigerator for 30 minutes or longer if time permits.

Preheat oven to 180 degrees Celsius.

Spray a frying pan with cooking spray and heat over high heat.  Remove chicken from marinade, reserving the prawns and marinade and cook for 1 -2 minutes until sealed.  Remove from heat.

Place pita bread on a pizza tray sprayed with cooking spray.

Spread tomato paste over entire base.  Sprinkle with 40 grams of grated cheese.

Place chicken over pizza base and top with onions and capsicum.  Place prawns on top.

Sprinkle with remaining cheese and top with olives.

Cook for 20 - 25 minutes or until cheese has melted and pizza cooked through.


(click here for a printable version of this recipe)

Saturday, May 26, 2012

Lamb with Minted Spring Vegetables

There is no lying when we say that lamb is always a huge hit at our house - you can actually feel the excitement in the air around our house when lamb is on the menu. The original recipe was for lamb racks which we have cooked before but this week I was lucky to get some really nice lamb sirloins so I thought I would give these a try.

This is definitely a great meal as it is so quick and easy to make.  The lamb itself is very simple to prepare as were the vegetables that were delicately laced with the taste and aroma of fresh mint.

The redcurrant infused light gravy balanced the whole meal.


Lamb with Minted Spring Vegetables
(recipe adapted from WW Eat & Enjoy Cookbook)

Serves: 4
ProPoints per Serve: 11

480 grams chat potatoes, halved
cooking spray
4 x 250 gram lean lamb sirloins (thick back straps)
1 bunch of asparagus, halved
3 small zucchini, quartered lengthwise
1 bunch baby carrots, peeled and halved
1 cup chicken stock
2 tablespoons redcurrant jelly
2 tablespoons small fresh mint leaves

Preheat oven to 200 degrees Celsius.

Heat a large flameproof baking dish over medium-high heat.  lightly spray lamb with oil and cook, turning, for 5 minutes or until browned.  Transfer lamb to the oven and bake for 15 minutes for medium-rare or until cooked to your liking.  Remove from oven and transfer to a plate, cover with foil and rest for 5 minutes before cutting cutlets from racks.  Reserve pan juices.

Meanwhile boil, steam or microwave all the vegetables, seperately, until tender.  Drain.

Heat baking dish with pan juices over medium heat.  Add stock and redcurrant jelly and cook, stirring, until jelly disolves.  Bring to the boil and cook for 4 - 5 minutes or until slightly thickened. 

Divide vegetables among plates and top with lamb.  Drizzle with reducrrant sauce and sprinkle with mint to serve.


(Click here for a printable version of this recipe)

Monday, May 21, 2012

Slow-cooked Sticky Pork

This dish was very easy to make and was more than flavoursome.  In fact the pork was so tender almost melting in your mouth and the Oriental overtones tantalised the taste buds.

The overall spiciness from the sweet chilli sauce and ginger was evident but it was not too spicy, mind you saying this Alexandria thought it was too spicy for her.

Served with steamed bok choy and rice this mean was delicious and very filling.


Slow-cooked Sticky Pork
(recipe sourced from WW The Complete Meal)

Serves: 4
ProPoints per Serve: 8

2 tsp sesame oil
500 grams pork scotch fillet or neck, fat trimmed, cut into 3cm pieces
2 medium red onions, thinly sliced
3 medium carrots, thickly sliced
1 medium red capsicum, (cut into 3cm pieces)
1/4 cup soy sauce
2 cloves fresh garlic, sliced
1 tablespoon fresh ginger, grated
1/2 cup chicken stock
1/4 cup sweet chilli sauce
1/4 cup hoisin sauce
1 cup water

Heat oil in a large non-stick saucepan over medium-high heat. Add pork and cook, turning, for 5 minutes or until browned. Add onion and cook, stirring, for 5 minutes or until softened. Add carrot, capsicum, soy, garlic, ginger, stock, chilli sauce, hoisin sauce and water. Stir to combine. Bring to the boil.

 Reduce heat to low and simmer, covered, for 1 hour, stirring occasionally, uncovering for the last 30 minutes of cooking, or until pork is tender and sauce has thickened. Serve.

Serving suggestion: Serve with 0 ProPoints value steamed Asian greens such as gai lan (Chinese broccoli), choy sum or bok choy, plus steamed jasmine rice. Add 3 ProPoints values per serve for ½ cup rice.

(Click here for a printable version of this recipe)

Friday, May 18, 2012

Ham, Cheese, Tomato and Avocado Toastie

I rarely blog a breakfast or a lunch but I do realise that this blog cannot just be about mains, it does need to cover other meals that we cook and eat.

Coming home from work early due to Alex being sick all night (long story) I wanted to ensure that I made myself something for lunch that fit into the ProPoints plan and was quick.  I decided on a "toastie".. or as many know the dish - a toasted sandwich.

I love a good toastie.. and any filling normally hits the spot.  Today I went for something basic... a combination of ham, cheese, tomato and tomato and I really enjoyed it.


Ham Cheese Tomato and Avocado Toastie

Serves: 1
ProPoints per serve: 8


2 slices wholegrain bread
1/8 medium avocado, sliced thinly
1 small tomato sliced
30 grams sliced ham
1 slice reduced fat cheese slice
cooking spray

Preheat a sandwich press or similar.

Assemble sandwich on work area having a slice of bread, avocado slices, tomato slices, ham and cheese.  Top with second slice of bread.

Spray hot plates of sandwich press with cooking spray, add sandwich and close lid.

Cook until golden and cooked through.

(click here for a printable version of this recipe)