Our latest feast

Saturday, October 31, 2015

Asian Sweet and Spicy Pork Belly

Nothing can be classed as more naughtier than having a huge serve of pork belly for dinner... and I will be totally honest and tell you that we were very naughty as we cooked up a 1.5 kilogram piece of this magnificent meat.

When I say we I mean Noel, Oliver and myself.  Alex who is very fussy with eating pork was staying out for the night so that means the three of us tend to eat food that would not normally get cooked when she is home.

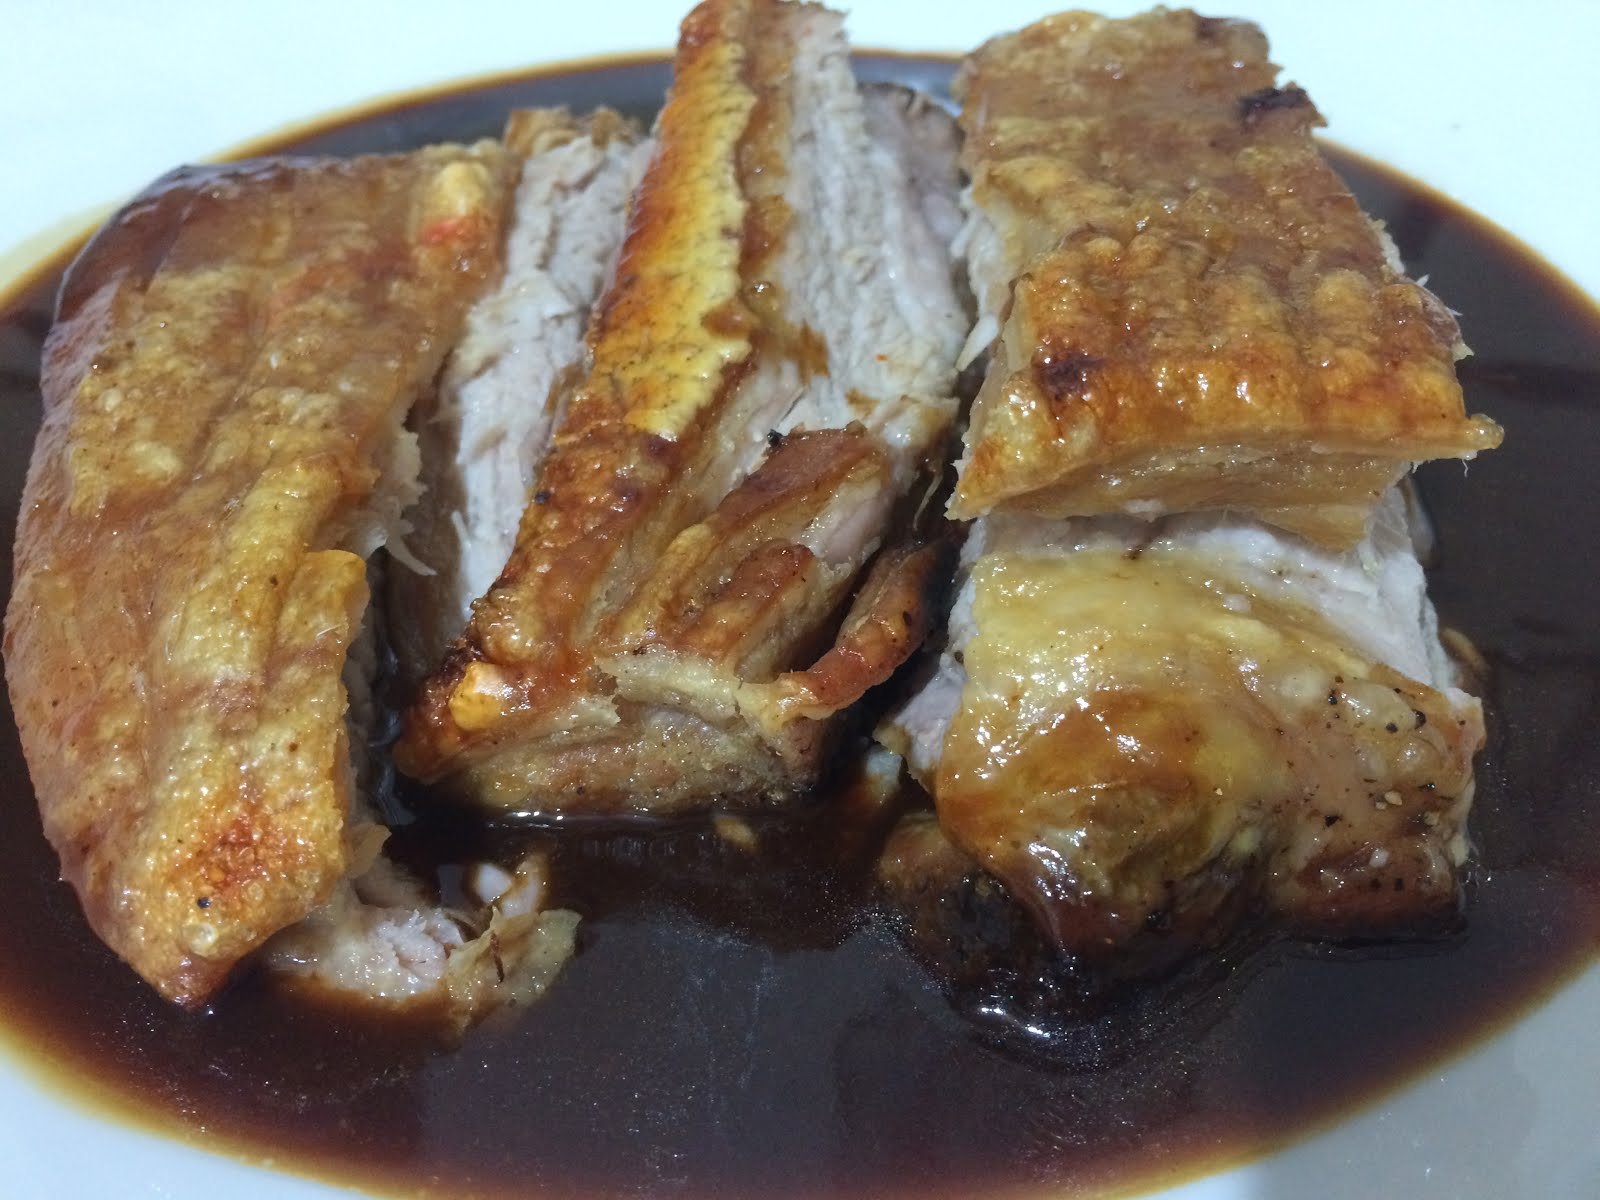
The best pork belly has tender juicy moist meat while being served with crispy crackle.  It must be cooked long and slow then cranked up right at the end to get this correct.

Tonight we had an Asian infused sauce and plain steamed rice with the pork belly and it was perfect.


Asian Pork Belly

Serves: 6

cooking spray
 1 orange, sliced into 6 slices
1 red onion, sliced
6 star anise
1 teaspoon crushed garlic
1 teaspoon crushed ginger
1/2 cup Char Sui Sauce
1/2 cup Spicy Plum Sauce
1 cup chicken stock
1/2 cup dry white wine
2 teaspoons sesame oil
2 tablespoons soy sauce
1.5 kilogram Pork Belly with rind scored
salt
freshly ground black pepper

Preheat oven to 150 degrees Celsius.

Spray a large baking tray or casserole dish with cooking spray.

Layer oranges in a rectangle in the middle of the tray.  Top with onions and star anise.

In a jug add garlic, ginger, Char Sui sauce, Plum Sauce, chicken stock, wine, sesame oil and soy sauce.  Mix well to combine.  Gently pour into the baking tray, do not move the oranges.

Place the pork belly on a chopping board rind side down.  Season generously with salt and pepper. Turn over.  Rub the pork belly rind with paper towel or a clean tea towel ensuring that it is dry all over.  Sprinkle with salt and using your hand rub salt into the scores in the rind.

Place pork on top of the oranges and onions, centering in the baking tray.  Cover with two layers of foil. 

Cook in oven for 2.5 hours.  Remove from oven, remove foil and check level of the sauce.  Add water if it has evaporated too much if necessary.  Check pork to ensure that it is tender and cooked through.

Increase oven to 220 degrees Celsius.  Return pork to the oven and cook for a further 20 - 30 minutes or until crackle is popping and browned.  (You can place under the grill if need be).

Remove from oven, cut into desired pieces and place on a serving tray - keep warm.

Mix together 1 tablespoon of cornflour with 2 tablespoons of water in a small jug.

Drain the juice through a sieve into a small saucepan, disregard solids.  Heat over medium heat until starting to boil. Stir through combined cornflour, continuously stirring, until sauce has thickened.  Remove from heat.

Serve pork belly with the sauce and steamed rice.


Tuesday, October 27, 2015

Glazed Meatloaf

Comfort food doesn't come any better than dishing up slices of meatloaf into a soft white bun with cheese and salad.... and that's what we did tonight.  Everyone here loves quick, fork free dining and this is just perfect.

A glazed meatloaf, somewhat retro is character, is definitely a favourite in our house. Using a combination of beef and pork this meatloaf was moist and as usual I managed to pack it full which was jam packed with vegetables and it was bursting with flavour. I love using fresh herbs as they add so much flavour, dried herbs can be used though and will still give you the flavour.

This meatloaf is perfect hot or cold, served with vegetables or salad and a nice relish or packed up for a picnic..... so versatile but more importantly very yummy!!!


Glazed Meatloaf
(Recipe adapted from A Feast for the Eyes)


Serves: 4
1/2 cup ketchup
1/4 cup light brown sugar
1 1/2 tablespoons cider vinegar
2 large eggs
1/2cup milk
2 teaspoons dijon mustard
1 teaspoon hot sauce or chilli sauce
1 1/2 teaspoons fresh marjoram
1 1/2 teaspoons fresh thyme
salt 
freshly ground pepper
500 grams lean minced beef
500 grams lean minced pork
1 1/2 cups fresh bread crumbs
1/4 cup fresh parsley, minced
1 large onion, chopped
3 garlic cloves, minced
1 zucchini, grated
2 carrots, grated

Preheat oven to 180 degrees Celsius.
 
Stir together ketchup, sugar, and vinegar in a small bowl. Set aside.

In a mixing bowl, whisk the eggs, milk, mustard, and hot sauce together. Add marjoram, thyme, salt, and pepper.

In a large mixing bowl, combine the meats, egg-milk mixture, bread crumbs, parsley, onion, zucchini and carrot.  Mix until well combined (use your hands LOL).

Transfer meat mixture to an oiled loaf pan, place on an oven tray and bake in oven for 15 minutes or until meatloaf feels firm to touch.  Remove from oven.

Line another baking tray with foil and cover with baking paper.  Place this baking tray upside down on top of meatloaf and invert to remove meatloaf from loaf pan.

Brush meat with ketchup glaze. Bake in oven for about 15 minutes, until glaze has set.  Continue to brush meat loaf with remaining glaze every 10 minutes for a further 30 minutes or until meatloaf is cooked through.  Remove from oven and let stand for 5 - 10 minutes prior to slicing.

(Click here for a printable version of this recipe)

Wednesday, October 21, 2015

Creamy Chicken with Tarragon

Chicken in a creamy herb sauce..... mmmmmm and the best bit it is Tarragon. One of my favourite herbs. Tarragon has an intense flavour that's a unique mix of sweet aniseed and a mild vanilla. The French cuisine mastered the use of this herb in BĂ©arnaise sauce, and it compliments many egg, cheese and poultry dishes.

This was a very easy dinner to put together. No over the top preparations which suited me to a tee tonight... didn't want anything too hard or time consuming - to be honest I just wanted to eat. The chicken was coated in flour seasoned with salt and pepper. And the sauce was quickly whipped together and voila then we were done. On the plate very quickly and I must say this dish kept everyone dining very happy.


Absolutely delicious - juicy tender chicken smothered in a creamy sauce. This combination can only mean one thing.... COMFORT FOOD!!

Creamy Chicken with Tarragon
(Recipe adapted from Women's Weekly)

Serves: 4

1/4 cup plain flour
salt
freshly ground pepper
8 chicken thigh fillets or chicken chops, skin removed and fat trimmed
1 tablespoon olive oil
2 tablespoons fresh tarragon leaves
1/4 cup dry white wine
1/2 cup chicken stock
1/4 cup (60ml) thickened cream

Season the flour with salt and pepper.

Toss the chicken in the flour, shake away excess flour.

Heat the olive oil in a large frying pan over a high heat, add the chicken, smooth side down, and cook until browned underneath.

Turn the chicken, sprinkle the chicken with the tarragon, cover the pan and cook until just cooked through. Remove the chicken from the pan.

Add wine and stock to the pan; boil, stirring, until reduced by half. Add cream and stir until hot.

Serve the chicken covered with the sauce.


(click here for a printable version of this recipe)

Tuesday, October 20, 2015

Cafe Style Blueberry Muffins

Café style muffins... who can resist them? It's hard too at the best of times but when they are straight out of the oven sitting on the kitchen bench top it's even harder.

This recipe is super easy and very quick.  You don't even need to use a mixer - a good ol' wooden spoon will be just fine.

Fresh blueberries are obviously the key ingredient in these muffins - frozen can be used.  Buttermilk can be substituted with milk however the buttermilk helps maintain a moister texture.  The wonderful aroma of baking laced with blueberries and cinnamon filled the kitchen not long after they were placed into the oven.

Muffins taste best fresh the same day. Store muffins at room temperature in an airtight container for up to 5 days. Muffins freeze well for up to 3 months.


Cafe Style Blueberry Muffins
(recipe adapted from Sally's Baking Addiction)

Makes: 12

3 cup plain flour (very careful not to overmeasure)
4 teaspoons baking powder
1/2 teaspoon salt
1 teaspoon ground cinnamon
2 eggs, room temperature preferred
1 cup caster sugar
1 cup buttermilk
1/2 cup canola oil (or vegetable or melted coconut oil)
1 teaspoon vanilla extract
1 and 1/2 cups fresh or frozen blueberries
coarse sugar for sprinkling (optional)

Preheat oven to 220 degrees Celsius or 200 degrees Celsius fan forced.

Spray your muffin tin of choice with non-stick spray or line with muffin liners. Set aside.

In a large bowl, gently toss together flour, baking powder, salt, and cinnamon. Mix until all dry ingredients are combined - a 20 second toss to disperse everything together. Set aside.

In a medium bowl, whisk together eggs and sugar until combined. Mix in milk, oil, and vanilla. Mixture will be pale and yellow. Fold wet ingredients into dry ingredients and mix everything together by hand. Avoid over mixing. Gently mix until all the flour is off the bottom of the bowl and no big pockets of flour remain. The batter will be VERY thick and somewhat lumpy. Fold in the blueberries.

Pour batter into prepared muffin tins, filling all the way to the top. Top with a sprinkle course sugar, if preferred.

Bake at 220 degrees Celsius or 200 degrees Celsius fan forced for 5 minutes. Reduce oven temperature to 190 degrees Celsius or 170 degrees Celsius fan forced and continue to bake for 25 minutes until tops are lightly golden and centres appear set. Use a skewer to see if the centres are cooked. Allow to cool for 10 minutes in muffin pan before enjoying.

Friday, October 16, 2015

Massaman Curry Paste

WOW the aromas of all the spices were amazing while making this Massaman Curry Paste from scratch!!  To be honest making any base whether it's a curry paste or a marinade has so much more flavour than a jar or packet and it's much more rewarding.  And surprisingly most of the time pastes and marinades are really easy to make.

This recipe makes approximately 1 cup of paste which unless you were cooking for a small army you would not use in one cook-up!!  It can be store in a small jar or container in the fridge for up to 3 months so you will have it on hand for a quick and easy weeknight dinner.
 
Massaman Curry Paste
(Recipe Sourced from Women's Weekly New Curries Cookbook)

Makes: 1 cup

20 dried long red chillies
1 tsp ground coriander
2 tsp ground cumin
2 tsp ground cinnamon
1/2 tsp ground cardamom
1/2 tsp ground clove
5 cloves garlic, quartered
1 brown onion (200g), chopped coarsely
2 x 10cm sticks fresh lemon grass (40g), sliced thinly
3 fresh kaffir lime leaves, sliced thinly
4 cm piece fresh ginger (20g), chopped coarsely
2 tsp shrimp paste
1 tbsp peanut oil

Place chillies in small heatproof jug, cover with boiling water; stand 15 minutes, drain.

Meanwhile, dry-fry coriander, cumin, cinnamon, cardamom and clove in small frying pan, stirring until fragrant.

Place chillies and spices in small shallow baking dish with remaining ingredients. Roast, uncovered, 15 minutes.

Blend or process roasted mixture, or crush using mortar and pestle, until smooth.


Tuesday, October 13, 2015

Crispy Cream-Braised Potatoes and Fennel

This was definitely another experimental recipe not just with cooking with a new ingredient but also experimenting with the tastes of my family... thankfully my family are open to new foods and flavours and are definitely not fussy eaters.

I must say I enjoy fennel - I enjoy the liquorice/aniseed flavour and the way it actually compliments a lot of foods - something I actually didn't think that it would do.  Having two fennel bulbs in the fridge which I had actually brought for another recipe that just didn't happen I needed to find a recipe to use up these interesting shaped vegetables.  I found this recipe on Food 52 a site that I am quite enjoying at the moment.  We had this as a side dish with crumbed pork cutlets.
 
Very similar to a potato bake, I thought it was rather decadent with the fennel wedges and the garnish of herbs, orange zest and cheese.  Something very different but enjoyable.

Crispy Cream-Braised Potatoes and Fennel
(Recipe adapted from Food 52)

Serves: 4

3 potatoes,  peeled and cut into irregular 3 - 4 cm chunks
2 fennel bulbs,  trimmed (with tough or bruised outer layers removed), then cut lengthwise into wedges about 3 - 4cm wide (leaving core intact)
1 cup fat reduced cream
2 to 3 cups of skim milk, or enough to cover the vegetables
1 bay leaf
1/4 teaspoon fennel seed
salt
freshly ground black pepper
3 or 4 large springs of thyme, leaves removed and finely chopped
1 large leafy sprig of rosemary, leaves removed and finely chopped
1/4 cup finely grated pecorino romano (or parmesan reggiano)
zest from 1 small orange, finely grated
olive oil

In a 3 to 4 quart pan, combine potatoes, fennel wedges, bay leaf, and fennel seed. Add enough cream and enough milk to fully cover the potatoes and fennel. Season generously with salt and freshly ground black pepper. Over medium-high heat, bring the milk mixture to a simmer, then lower heat to just maintain the simmer. Cook until the potatoes and fennel are soft and tender, about 20 minutes. Take off the heat. The potatoes and fennel should be fully cooked at this point.

While potatoes and fennel are braising, preheat broiler to medium-high. In a small bowl, combine rosemary, thyme, pecorino, and orange zest.

Remove potatoes and fennel wedges from the half-and-half with a spider or slotted spoon, and transfer them to a gratin or casserole dish. Some of the half-and-half will cling to the vegetables, which is a good thing. Make sure to generously coat the bottom with olive oil to prevent sticking. Taste the potatoes and fennel for seasoning – if you need more salt or pepper, add them now. Toss with olive oil (about 1 tablespoon), then the herb-cheese-orange zest mixture. Arrange the potatoes and fennel wedges in a single layer to promote even browning.

Place the casserole dish under the broiler (about 6 inches away from the source of heat). Broil for about 3 to 5 minutes, or until the potatoes and fennel are caramelized and crispy around the edges. (I typically brown the vegetables more than the ones in the picture above...just leave them under the broiler until they've reached your desired crispness!)


(click here for a printable version of this recipe)

Saturday, October 10, 2015

Char Grilled Corn, Spinach and Bacon Salad

Although we try to eat salad all year round - I guess I mean it's a huge effort to try and eat salad during the winter months, like most people we tend to eat a lot of salads during summer and the warmer weather.  

Green salad or a general tossed salad gets boring after the second or third time in a row so we are always on the look out for a new and exciting salad.  This one was perfect and went well with the Chicken Spit that we had for dinner.

Char grilled corn was the hero - I love the flavour and aroma that the corn gives when it's barbecued. These little yellow juicy morsels tossed through baby spinach, red onion and crisp bacon were delicious dressed with a balsamic mixture.

Such an inviting and yummy change.... a good start to summer eating.


Char Grilled Corn, Spinach and Bacon Salad
(Recipe adapted from Weight Watchers The Ultimate Family Cookbook)

Serves: 8 as a salad
Serves: 4 as a main

1/4 cup balsamic vinegar
1 tablespoon seeded mustard
2 teaspoons lemon juice
1 teaspoon honey
1 tablespoons chopped parsley
salt
pepper
4 cobs of corn, husks removed
cooking spray
125 grams bacon, fat trimmed
120 grams baby spinach leaves
1/2 small red onion, thinly sliced

Place vinegar, mustard, lemon juice, honey and parsley in a small jug or bowl.  Whisk all the ingredients together until well combined.  Season with salt and pepper.

Heat a barbecue or a chargrill pan to a medium to high heat.  

Lightly coat the corn cobs with cooking spray and season with salt and pepper.  Grill the corn for 7 - 10 minutes or until corn is just slightly charred.  Let cool and then slice off the kernels into a large bowl.

Spray a small frying pan with cooking spray and heat over high heat.  Add bacon and cook, stirring, for 3 - 5 minutes or until crisp.  Place on paper towel to drain and cool slightly.  Add to the corn in the bowl.

Add the spinach and onion to the corn mix in the bowl.  Drizzle over the dressing and toss gently,

Serve immediately.

If serving as a main, serve with 4 x 60 gram pieces of char grilled Turkish bread.

Thursday, October 8, 2015

Easy Butter Chicken

Butter Chicken, I would have to say, is the family's favourite curry. We have been known to all order Butter Chicken at Indian restaurants just to ensure that there is enough. No other curries, just the Butter Chicken!! Strange us lot really are. The richness of the thick creamy tomato sauce enveloping tender chicken pieces - what is there not to love?

Mam's versions!!! This is attempt number I don't know but every now and then I have an urge to make Butter Chicken for the family. Some times it has turned out ok, some times just edible and other times a failure with what can only be describe as "killing the perfect meal".

Tonight was different - I managed a recipe that was not only easy but was also it was actually very authentic tasting in flavour.  Gentle tingle of spices in a creamy tomato based sauce was just like the restaurants serve.  A little less butter than the traditional recipes and I used low fat yoghurt and low fat cream but overall I was, and believe that the family were, happy to eat this version.

Easy Butter Chicken
(recipe adapted from Taste.com.au)

Serves: 6 - 8

1 cup plain low fat Greek-style yoghurt
4 garlic cloves, crushed
5cm piece ginger, peeled, finely grated
1 tablespoon ground cumin
1 tablespoon ground coriander
2 teaspoons garam masala
1/2 - 1 teaspoon chilli powder, depending on taste
1 - 2 teaspoons red food dye
1 kilogram chicken thigh fillets, trimmed, cut into 3cm pieces
1 tablespoon vegetable oil
80g butter
2 brown onion, halved, thickly sliced
700g bottle passata
440g can diced tomatoes
1 cup low fat thickened cream
steamed rice
coriander leaves

Place yoghurt, garlic, ginger, cumin, coriander, garam masala, chilli powder and red food dye in a glass or ceramic dish. Add chicken. Stir to coat. Cover. Refrigerate for 2 hours.

Heat oil and butter in a heavy-based saucepan over medium-high heat. Add onion. Cook, stirring occasionally, for 3 to 4 minutes or until softened. Add chicken mixture to pan. Cook, stirring, for 5 minutes or until chicken just starts to change colour. Add tomato passata and tomatoes. Cover. Bring to the boil. Reduce heat to low. Simmer, stirring occasionally, for 10 minutes or until chicken is tender and mixture has thickened slightly.

Stir in cream. Simmer for a further 5 minutes or until heated through.

Serve with steamed rice and coriander leaves.

(click here for a printable version of this recipe)

Tuesday, October 6, 2015

Sesame and Soy Stir Fried Vegetable Noodles

Vegetables can be boring let's face it. 

Add noodles - instant change and makes eating lots of vegetables in one sitting easy.  We always have noodles on hand and these shelf life noodles are perfect for a whipping up a quick meal.  Using fresh noodles would be fantastic but not as practical as these pantry dwellers.

These noodles laced with the aromatic sesame oil and soy sauce were perfect accompanying Noel's Char Siu Beef Kebabs.   The kebabs were full of flavours and these simple noodles complimented them perfectly.  All the different vegetables release their own flavours so there was no need to make this dish overpowering by using different sauces etc.


Sesame and Soy Stir Fried Vegetable Noodles

Serves: 4

1 x 220 gram pouch Hokkien Noodles
1 x 220 gram pouch Singapore Noodles
1 tablespoon canola or vegetable oil
1 teaspoon crushed garlic
1 onion, sliced
3 carrots, cut into batons
1 red capsicum, sliced
1 head of broccoli, cut into florets
200 grams button mushrooms, sliced
100 grams snow peas, trimmed and halved diagonally
2 teaspoons sesame oil
1 tablespoon soy sauce

Place noodles in a large bowl and cover with boiling hot water.  Allow to stand for 5 minutes, loosening noodles occasionally.  Drain.

Place oil in a wok or large frying pan and heat over high heat.  Add garlic, onion and carrots and cook, tossing constantly, for 5 minutes or until slightly softened.  Add capsicum, broccoli and mushrooms to the wok.  Continue to cook, still tossing, for another 5 minutes or until broccoli is tender.

Add noodles, snow peas, sesame oil and soy sauce.  Toss until well combined.  Cook until noodles are hot and snow peas are just tender.

Serve.


Monday, October 5, 2015

Char Siu Beef and Vegetable Kebabs


It was definitely BBQ weather tonight so we had our first official House of Murray Summer 2015/2016.

On the menu was Char Siu Beef and Vegetable Kebabs and I decided to team these with a nice healthy serve of Sesame and Soy Stir Fried Vegetable Noodles.

Kebabs can be so much fun. To be honest anything you can eat fork free is fun, right? When I say kebabs can be fun I mean that it just starts as a plain bamboo skewer and you can put anything on it, marinate it, pop them on the BBQ  and voila you have an instant meal on a stick!!

Noel was in charge of the marinating of these bad boy kebabs and they were, as always, delish.  The marinade itself was Asian inspired hence why I felt the need to serve with some noodles.  A Char Siu Sauce base with undertones of garlic, ginger and chilli made the beef and vegetables dance on my tastebuds with every mouthful.


Char Siu Beef and Vegetable Kebabs

Serves: 4

8 bamboo skewers
1/2 cup Char Siu Sauce
1/4 cup dry white wine
1 teaspoon crushed garlic
1 teaspoon grated ginger
1 teaspoon sambal oelek
800 grams beef, cut into 2 cm cubes
1 red capsicum, cut into 2 cm pieces
1 green capsicum, cut into 2 cm pieces
1 onion, cut into 2 cm pieces


Soak bamboo skewers in water for 30 minutes.  Remove skewers from water.

In a medium jug mix together the Char Siu Sauce, wine, garlic, ginger, and sambal oelek.

Starting with a piece of capsicum, thread one piece onto a skewer, then a piece of onion, followed by the beef.  Repeat process 3 times or until skewer is full.  Continue with all 8 skewers.

Place in a shallow baking dish.  Pour over marinade, turning to ensure that the skewers are coated.  Allow to marinade for 2 - 3 hours or overnight if time permits.

Heat a BBQ plate or grill plate and cook skewers, turning occasionally, for 5 - 10 minutes or until beef is cooked to your liking.

Serve.


Sunday, October 4, 2015

Boiled Pineapple Fruit Cake

Not many of you may know this quirky fact about me, in fact there are many things I have not disclosed LOL!!!  This fact however was very pivotal my teenage years.  I grew up living on a golf course... yep a golf course.  My parents were caretakers by night, which meant we lived on the golf course and looked after the property outside of business hours.

The golf course itself was an 18 hole public golf course complete with a historic homestead, our house, a golf shop and a cafe.  My mam worked in the cafe which was perfect as she walked out the back gate and into her workplace.

One of the cakes that was baked at Sandringham Golf Course's cafe was a  Pineapple Boiled Fruit Cake and it was always a star in the cake cabinet. No fancy icing or decorations just fruit cake, moist, sweet and delicious and well enjoyed by many a golfer.

I decided to make recreate this cake... I did actually have the original recipe once but it has been misplaced somewhere in my travels so here is my take on what I can remember.


Boiled Pineapple Fruit Cake

Serves: 12 - 16

150 grams butter, coarsely cubed
1 cup brown sugar
440 grams can crushed pineapple
500 grams mixed dried fruit
100 grams candied cherries, chopped
2 tablespoons brandy
2 large eggs, lightly beaten
1 cup flour
1 cup self-raising flour
1/2 teaspoon baking soda
1 teaspoon mixed spice
1 teaspoon ground cinnamon

Preheat oven to 170 degrees Celsius or 150 degrees Celsius fan forced.

Grease a 20 cm round cake tin and line the base with nonstick baking paper.

Place butter, sugar, pineapple and juice in a saucepan, then stir until butter melts and sugar dissolves. Stir in dried fruit and brandy and simmer gently for 3 minutes. Remove to a bowl to completely cool.

Stir in the eggs.

Then stir in the flours, baking soda and spices, sifted together.

Spoon the mixture into the prepared cake tin and smooth the surface.

Bake for 1½ hours or until a skewer inserted in the centre comes out clean.

Cool cake in the tin before turning out.


(Click here for a printable version of this recipe)

Saturday, October 3, 2015

Herbed Honey Mustard Dressing

Summer is around the corner so begins the Alfresco dining season or as we would say here Down Under it's ""Barbie Time....

I must admit though I do get sick of salads in Summer.... when I say I get sick of them I mean that I get sick of eating the same boring salad with the same boring dressing all the time.  So I do try and jazz it up here and there.

It was a beautiful balmy night in fact the weather has been beautiful here in Melbourne for the last days, hopefully showing us that this Summer will be filled with lush weather, nice temperatures and lots of sun.   We went to our friends last night, Bernie's for I guess our first official BBQ of the season.

My mission was to bring a salad.... which not a hard call but automatically got me thinking ok and "now for the dressing????" whilst I was preparing and platting all the salad up.  Something different for sure.

Move over French or Italian Dressing - hold the mayo!!!   I decided on this Herbed Honey Mustard Dressing to give the salad a zing... and that it did.  

A creamy little sweet, little spicy sauce with a hint of oregano....

Success - it was perfect.... I was happy with my salad!!!  LOL!!!


Herbed Honey Mustard Dressing 

Makes: 1 1/2 cups

1 cup low fat mayonnaise
1/4 cup honey
2 tablespoons dijon mustard
1 tablespoon American (yellow) mustard
1 tablespoon dried oregano

In a two cup mixing jug combine all ingredients until mixed through.

Put in fridge and allow to stand for at least 2 hours for flavours to develop if time permits.

Serve. 


(Can be stored in a sealed jar in fridge for up to 1 month, stirring/shaking well before use)