Showing posts with label ww 11 propoints. Show all posts

Tuesday, September 15, 2015

Spicy Pork, Black Bean, Eggplant and Mushroom Hot Pot

We are sneaking in a few meals this week using different ingredients as our daughter is away on holidays in Japan.  Yes we are cooking with foods she's not a fan off.... LOL!!  Generally I will boast that both my kids have very cultured palates but we are still working on a few ingredients that sometimes don't get to be cooked due to dislikes.  Eggplants and mushrooms are two avoided vegetables with her.  Apparently it's a texture thing.

Needless to say I thought this dish was wonderful.  Full of flavour and easy to make.  I was actually surprised that it was prepared in a flash and cooked in the oven.
I am not a fan of premade black bean sauce so I did use salted black beans (which I purchased at an Asian food store) making the black bean flavour a little more subtle and not as harsh in my opinion. 

Teamed with steamed Choy Sum and plain noodles I nearly thought I was in Asian for a moment.


Spicy Pork, Black Bean, Eggplant and Mushroom Hot Pot
(recipe adapted from WW Program Cookbook 2015)

Serves: 4
ProPoints per serve: 11

1 tablespoon olive oil
1 medium eggplant, cut into 2cm pieces
1 red onion, finely chopped
200 grams button mushrooms, sliced
2 garlic cloves, crushed
2 teaspoons finely grated fresh ginger
1 teaspoon dried chilli flakes
500 grams lean pork mince
4 tablespoons drained salted black beans (or 2 tablespoons black bean garlic sauce)
1 cup water
440 gram packet egg noodles
2 bunches choy sum, chopped

Preheat oven to 180 degrees Celsius or 160 degrees Celsius fan forced.

Heat half the oil in a large flameproof casserole dish over high heat.  Cook eggplant, stirring, in batches, for 2 - 3 minutes or until browned.  Transfer to a plate.

Reduce heat to medium.  Add remaining oil to the dish.  Cook onion and mushroom, stirring for 5 minutes or until softened.  Add garlic, ginger and chilli.  Cook for 30 seconds until fragrant.  Add mince and cook, stirring to break up lumps, for 5 minutes or until browned.

Return eggplant to pan with black beans and water.  Bring back to the boil.  Bake, covered, for 30 minutes or until pork mixture is thick and eggplant is very tender.

Cook noodles as per the packet instructions.  Drain and keep warm.

Meanwhile boil, steam or microwave choy sum until tender.  Drain.

Serve hot pot with choy sum and noodles.


Friday, June 12, 2015

Beijing Beef

Everyone who knows me will tell you I am definitely addicted to trying new recipes - especially those that are not known down here in Australia.  I have fallen in love with a food web site, Rasa Malaysia, which has given me some inspiration of late to get back into the kitchen and cook new meals, instead of the same good ol' favourites we love.

There are so many taste tantalizing recipes within the site and Bee, the site's author continues to do an amazing job.  We have already sampled a few and one of our new favourites is Sweet and Sour Pork, it was incredible and has been made several times.  This dish, Beijing Beef, was of an equally high standard.

I am not familiar with the origin of this recipe as it's claimed to be a Panda Express Copycat recipe.  Googling I have found that Panda Express is one of America's largest chain of Chinese takeaway stores, starting with their first store in California opening in 1970 they are now branching out to other countries worldwide including the Middle East - not here in Australia yet but I am guessing we'll just give them some time.

We all loved the dish - the flavours were great and the beef was nice and tender. A little spicy and a little sweet the flavour zinged while eating leaving the taste buds craving more and more.  There are a few elements in this dish but to be honest it's well worth the effort.  Like the Sweet and Sour Pork, this dish now gets cooked on a regular basis.


   Beijing Beef
(recipe adapted from Rasa Malaysia)

Serves: 6
ProPoints per Serve: 11

500 grams steak, rump, porterhouse or skirt, cut against the grain into 1/4 inch slices
4 tablespoons oil
4 cloves garlic, minced
1 onions, sliced
1 medium-sized red capsicum, cut into pieces
1 medium-sized red bell pepper, cut into pieces
1/2 cup cornflour, to dust beef for deep-frying
Salt and sugar to taste

Marinade:
2 egg, beaten
1 teaspoon cornflour
1/2 teaspoon ground white pepper
1 teaspoon salt

Beijing Sauce:
8 tablespoons water
4 tablespoons sugar
3 tablespoons ketchup
6 tablespoons Hoisin sauce
1 tablespoon light soy sauce
2 teaspoons oyster sauce
1 tablespoon sweet chili sauce
1-2 teaspoons crushed chili peppers (taste dependent)
2 tablespoons apple cider vinegar

Prepare the Marinade in a bowl and mix well. Marinate the beef for 15 minutes.

In a seperate bowl, mix all the Beijing Sauce ingredients. Set aside.

Place cornflour in a bag/bowl. Toss marinated beef in cornflour, coat well and set aside in the refrigerator.

Heat up enough oil over high heat. Coat beef slices with cornflour again, making sure the beef slices are well coated. Shake off the excess cornflour from beef slices. Prepare to deep-fry beef (in small batches). Drop in the beef slices and deep-fry for 1-2 minutes or until light golden brown. Dish out, drained on paper towel and set aside.

In a wok, heat up the oil over high heat. Stir-fry the onion and bell pepper until fragrant and slightly charred, add in the garlic and continue to stir-fry for 10 seconds. Remove from wok.

Heat up wok over medium-high heat, pour in the Beijing Sauce seasoning. Bring it to a simmer or until it thickens. You may adjust salt, soy sauce, water, etc., to taste.

Toss in the deep-fried beef and stir-fried onion, bell pepper, and garlic. Stir well for 1 minute or until the beef is completely cooked and the sauce is absorbed.

Dish out and serve with hot steamed rice (add an additional 3ppts per 1/2 cup).


(Click here for a printable version of this recipe)

Monday, December 8, 2014

Spicy Chicken Nachos

We love having people over and there is always something quick and easy we can whip up just to keep everyone's tummies happy while we enjoy the great company.  Mexican is one of those friendly comfort foods that everyone seems to love and I would have to say that Nacho's are high on everyone's favourite food lists.

These Spicy Chicken Nachos are definitely a crowd pleaser served with sour cream and Home Made Guacamole - they were definitely a hit..  So easy to make especially the corn chips being made from tortillas, the mince spicy but not overpowering which can be made with or without the chilli kick.

Please note as we had a houseful I doubled the recipe below.


Spicy Chicken Nachos
(Recipe adapted from Weight Watchers 1 Recipe 3 Ways Cookbook)
 
Serves: 4
ProPoints per Serve: 11
 
4 x 40g extra light flour tortillas
1 tablespoon olive oil
500 grams low fat chicken mince
1 brown onion, finely chopped
1 red capsicum, finely chopped
1 green capsicum, finely chopped
1 carrot, peeled and finely chopped
2 teaspoons ground cumin
1 teadspoon ground coriander
300 gram jar chunky tomato salsa
1 cup water
1 - 2 teaspoons chilli flakes (if desired)
1/3 cup extra light sour cream
1/2 cup fresh coriander leaves

Preheat oven to 200 degress Celsius or 180 degrees Celsius fan-forced.  Line 2 baking trays with baking paper.  Cut each tortilla into 12 wedges.  Place on prepared trays and lightly spray with oil.  Bake for 10 minutes or until crisp and golden.  Cool.
 
Meanwhile, heat half the oil in a large non-stick frying pan over medium-high heat.  Add mince and cook, breaking up any lumps for 3-5 minutes or until browned.  Transfer to a bowl.
 
Heat remaining oil in pan.  Add onion, capsicum and carrot.  Cook strirring for 5 minutes or until softened.  Add cumin and coriander and cook stirring for 1 minute or until fragrant.  Return mince to the pan with salsa, water and chilli flakes if using and bring to the boil.  Reduce heat and simmer, uncovered, for 10 - 12 minutes or until thickened.
 
Place tortilla chips into serving bowls.  Top with mince mixture , sour cream and coriander. 
 
Serve with a 0ppt salad, homemade guacamole and some grated cheese if desired.
 

(Click here for a printable version of this recipe)

Wednesday, October 1, 2014

Southern Fried Chicken

Comfort food doesn't get any better than eating chicken drumsticks with your fingers, except when the chicken is coated in a blend of spices that make your tastebuds dance.  Southern Fried Chicken is just one of those dishes that not only sounds soulful but sounds inviting and comforting.  It's a dish that is hard to resist... at times one piece is just not enough.
 
The American's have made this a well known dish especially in the Southern States.  The most famous version of this dish of course is Kentucky Fried Chicken.  The original version of this dish required deep frying the coated chicken pieces.  I have made a low fat version "Home Made Kentucky Fried Chicken" which was also delish.
 
The secret to Southern Fried Chicken is that the chicken pieces are marinated in chilli tainted buttermilk and then coated in a seasoned flour what could be easier?  A quick fry to seal and then oven baked which reduces the greasiness.  This recipe was very easy and as always devoured by those sat at our dinner table.
 
 
Southern Fried Chicken
(Recipe sourced from WW Dinner with Friends Cookbook)
 
Serves: 4
ProPoints per serve: 11
 
8 x 70 gram skinless chicken drumsticks
1 cup buttermilk
1/2 teaspoon chilli powder
1 cup plain flour
1 teaspoon mild paprika
1 teaspoon cumin
2 tablespoons olive oil
 
Place chicken in a glass or ceramic dish (or large snap lock bag).  Add buttermilk and chilli, and turn to coat.  Cover and place in fridge for 3 hours or longer if time permits.
 
Preheat the oven to 200 degrees Celsius.
 
Combine flour, paprika and cumin in a shall bowl.  Remove chicken, one piece at a time, from marinade. Coat chicken in flour mixture.  Transfer to a plate.  Discard marinade.

Heat oil in a large non stick frying pan over medium-high heat.  Cook chicken, turning, in batches,  8 - 10 minutes or until browned.  Transfer to prepared tray. 

Bake for 15 - 20 minutes or until cooked through. 

Serve with coleslaw mix drizzled with lemon juice (0ppts) and steamed corn on a cob - add 2ppts for 80g corn.  You could also serve with Rosemary and Garlic Potatoes Crispy Potatoes.


(Click here for a printable version of this recipe)


Thursday, May 1, 2014

Penne Boscaiola

Firstly my apologies… so much has happened to the House of Murray since March that have left us very time poor and sadly this has led to no new entries here. A quick overview – a job change for me at the same company (for the better) which now finds me based in one office with no travel at the moment, and of course time has been spent getting into a normal family routine – one where mam is now home every night. Needless to say it has been a big change for the four of us.  I also took two weeks holiday which gave me time to focus on my family and also had a quick camping trip to the incredible Sheepyard Flats (so serene and relaxing) over the Easter period.

As usual I have recipe posts banked up so I will try and get through these really quickly to tempt your tastebuds but in the meantime I will start with this one.......

This old family favourite has definitely gone under the radar as for some unknown reason I have managed to have never blogged it. I have blogged a variation but not the original recipe. Oh well I guess stranger things have happened.

Pasta, as well documented, is a comfort food in our house. If I ever ask the kids what they fancy for dinner I get the same answer time and time again … “PASTA”! 
Penne Boscaiola is the perfect comfort meal – creamy, jam packed with vegetables and bacon laced with hint of cheesy sweet chilli…. mmmmm Heaven in a bowl.  A perfect week night wonder as it’s very easy and quick to prepare and cook not to mention devoured almost instantly.


Penne Boscaiola
(Recipe adapted from WW Heavenly D’Lites Cookbook)

Serves: 6
ProPoints per serve: 11

375 grams penne pasta or GF penne pasta (or pasta of your choice)
cooking spray
1 brown onion, finely chopped
3 teaspoons crushed garlic
150 grams middle bacon, fat trimmed
1 red capsicum, sliced
150 grams button mushrooms, sliced
375 ml can Carnation Light and Creamy Evaporated Skim Milk
 3 tablespoons sweet chilli sauce
150 grams baby spinach leaves
salt
freshly ground black pepper
80 grams finely grated parmesan cheese


Cook pasta in pan of boiling water following packet instructions until just tender.  Drain.

Coat a large frying pan with cooking spray.  Cook the onions, garlic and bacon until onion is soft.  Add capsicum and mushroom and cook for a further 2 - 3 minutes until capsicum begins to soften.

Add the milk and chilli sauce to the pan.  Season with salt and freshly ground black pepper to taste.  Stir through the pasta, spinach and half the parmesan cheese until mix through well and spinach just wilted.

Serve with remaining parmesan cheese.

(Click here for a printable version of this recipe)

(NOTE: 04/03/19 I updated this recipe as we now cook a wide variety of our meals as Gluten Free - no change to any other part of the recipe).

Tuesday, February 25, 2014

Satay Beef Noodles

Having a plate full of noodles placed in front of you is an amazing treat.... especially when enveloped in a rich yet creamy satay sauce.  But even more so when there was no plan to have noodles at all.  I defrosted beef strips without even knowing what I was cooking in the morning and came home fancying noodles.  So noodles it was.....
 
I got the idea for this recipe from one of my favourite cookbooks, Women's Weekly Chinese Cooking Class Cookbook, an oldie but a goodie!!! My book is actually falling apart.
 
With this dish I actually marinated the beef strips first which of course tenderised the meat but also added to the flavour.  Of course then there was a sauce that was added at the end of the cooking process.  A sauce that was actually creamy even though no cream was added.
 
Totally enjoyed by all of us...
 

Satay Beef Noodles
(recipe adapted from Women's Weekly Chinese Cooking Class Cookbook)
 
Serves: 4
ProPoints per Serve: 11
 
1 1/2 teaspoons soy sauce
pepper
2 teaspoons sesame oil
1 teaspoon cornflour
2 tablespoons water
500 grams beef strips, all fat trimmed
440 grams Wokka Singapore Style ready to cook noodles
1 1/2 tablespoons satay sauce
1 tablespoon dry sherry
2 teaspoons curry powder
4 tablespoons water
1 tablespoon soy sauce
1 teaspoon sugar
2 tablespoons peanut oil
1 clove garlic
1 brown onion, diced
1 red capsicum, thinly sliced
1 x 425 gram tin baby corn, drained and rinsed
200 grams snow peas, trimmed

Mix soy sauce, pepper, sesame oil, cornflour, and water together in a large bowl.  Add beef strips, stir well to combine.  Allow to stand for 20 minutes.

Soak noodles as per packet instructions in a large bowl filled with boiling water for 3 - 4 minutes or until softened.  Drain and rinse.

Mix together satay sauce, dry sherry, curry powder, water, soy sauce and sugar.  Set aside.

Heat oil in wok or pan, saute the meat until browned and remove from pan.

To the same wok or pan add onion and garlic, saute over medium heat until onion is softened.  Add capiscum and corn.  Cook for a further 2 - 3 minutes or until softened.  Add sauce mix and stir until boiling.  Return beef to the pan and add snow peas and noodles. Cook tossing, for 1 - 2 minutes, or until sauce covers beef and noodles and are heated through.  Serve immediately.


(click here for a printable version of this recipe)

Friday, December 27, 2013

Baked Fish with Macadamia Herb Crust

Fish seems to be the least eaten ingredient in our house.  We are not lovers of strong fish at all - hubby likes Flake or Gummy Shark and I will venture to Blue Eye and even Rainbow Trout but strangely we both love the majority of seafoods even the very pungent tastes of oysters and mussels.  Fascinates me really how tastebuds work?
 
Saying this I have realised that we do need to eat more fish rather than the odd piece battered and purchased from a Fish and Chip Chop served with a minimum of chips.
 
I had read this recipe earlier this year and had always kept it in mind for a "fish" dinner.  A few grumbles came from the camp when I suggested and then confirmed we were have fish for dinner this particular night.  Anyhow stubbornly I proceeded with my plans.
 
And to be perfectly honest I am so glad that I did.  Not only was this meal devoured but it was even mentioned again today how good it was.  Tipping I had better put this on the menu again.
 
The crunchy topping made using a combination of wholegrain bread, macadamia nuts, parsley, chives and lemon juice was magnificent - a burst of flavours that exploded yet complimented each other.  The oven baked fish was perfect, so flakey but yet still so juicy and tender. 
 
Served with potato galettes, also easy to make, and a quick salad this dinner was definitely a mid week wonder but would also surprise and please guests as a main in a dinner party.


Baked Fish with Marcadamia Herb Crust
(Recipe sourced from WW Magazine April 2013)
 
Serves: 4
ProPoints per Serve: 11
 
600 grams red-skinned potatoes, unpeeled and thinly sliced
cooking spray
2 x 35 gram slices wholegrain bread, torn into pieces
50 grams unsalted macadamia nuts
2 tablespoons chopped fresh flat-leaf parsley
2 tablespoons coarsely chopped fresh chives
1 1/2 tablespoons lemon juice
1 tablespoon olive oil
salt
freshly ground black pepper
4 x 150 grams firm white fish fillets (I used gummy shark)
Lemon wedges, to serve

Preheat oven to 200 degrees Celsius.  Line 2 large baking trays with baking paper.

Arrange the potato slices on 1 tray in 4 rows, slightly overlapping, to make galettes.  Spray with cooking spray.  Bake for 30 - 35 minutes or until crisp and golden.

Meanwhile, process the bread, macadamia nuts, parsley, chives, lemon juice and oil in a food processor until finely chopped.  Season with salt and freshly ground black pepper.

Press a quarter of the crumb mixture onto one side of a fish fillet.  Place fish on the remaining baking tray and lightly spray with oil.  Repeat with remaining crumb mixtur and fish fillets.

Bake for 12 minutes or until fish flakes easily when tested with a fork in the thickest part.

Divide the potato galettes and fish between serving plates.  Serve with lemon wedges and either steamed vegetables or garden salad.

(Click here for a printable version of this recipe)

Tuesday, August 27, 2013

Marsala and Mushroom Pork Cutlets with Creamy Polenta

Two in a row - this is getting exciting and I am feeling how I used to when my blogging was more frequent. 

Tonight's meal is an Italian inspired dish - pork in nice rich and creamy mushroom sauce accompanied by creamy and a little cheesy polenta.  The original recipe called for Veal Cutlets but I quite fancied it with pork instead.
 
 Not only was this dish very easy to put together, the flavour in the sauce was magnificent and very mourish... I could have just actually had a bowl of the sauce... spoon please?  And as with any polenta dish you are guaranteed a good arm workout LOL!


Marsala and Mushroom Pork Cutlets with Creamy Polenta
(recipe adapted from Weight Watcher Magazing August 2013)
 
Serves: 4
ProPoints per Serve: 11
 
1 tablespoon olive oil
4  (500 grams) lean pork cultlets, all possible fat trimmed
salt
freshly ground black pepper
1.125 (4 1/2 cups) chicken stock
1 cup instant polenta
2 tablespoons grated parmesan cheese
1 brown onion, finely sliced
200 grams Swiss Brown mushrooms, quartered
2 tablespoons Marsala
2 tablespoons light thickened cream
2 tablespoons chopped fresh chives

Heat 1 teapsoon of the oil in a large frying pan over medium-high heat.  Season the pork with salt and pepper and cook for 3 minutes each side or until browned and cooked to your liking.  Set aside and cover to keep warm.
 
Reserve 1/4 cup stock.  Bring the remaining stock to the boil in a medium saucepan.  Add the polenta and stir over low heat for 8 minutes or until thick and creamy.  Stir in the parmesan and season with salt and pepper.
 
Heat the remaining oil in the pan over medium-high heat.  Cook the onion and mushroom, stirring, for 5 minutes or until softenend.  Add the reserved stock and the marsala.  Bring to the boil and cook for 2 minutes or until the sauce reduces.  Stir in the cream and boil for 1 minute.  Season with salt and pepper.
 
Serve the creamy polenta with the pork and the sauce.  Top with chives.
 

Tuesday, August 13, 2013

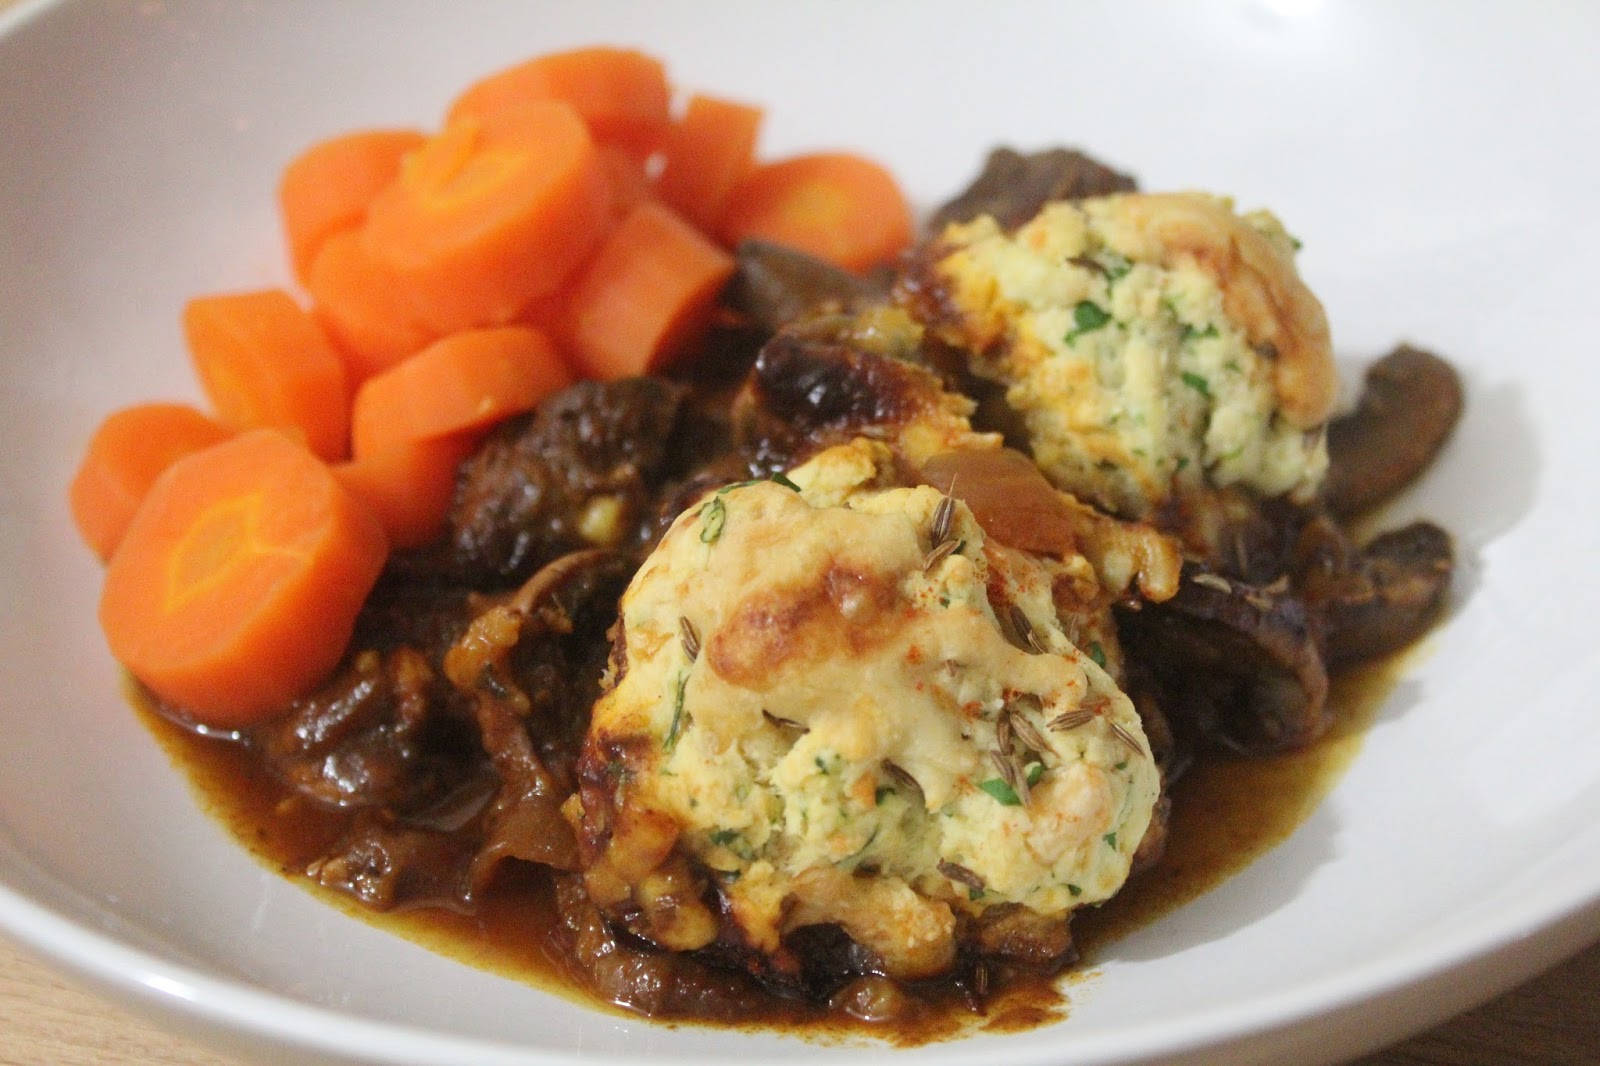
Slow Cooked Beef Stew with Cheese and Caraway Dumplings

Junior football weekly competion has finally but sadly finished for the 2013 season.  I have enjoyed this year even though I overcommitted not only myself but Noel and sacrafice special time with my family.  This year as well as being Treasurer I moonlighted as Registrar decided to be canteen manager and also put our (yes mine and Noel's) hands up to cook Sunday night dinners for 80 - 100 people each week.  14 rounds the Junior football season runs with 4 weeks of finals which this year are at another club.  I officially hung my apron up last Sunday finding myself lost this past weekend with no additional shopping, no mass cooking and no deep frying of chips etc on Sunday morning.  I am definitely a football mam and felt like something was missing on the weekend.

Anyway while that part of me has gone for the rest of this year, I can say I should have time to focus on my blog even though my work commitments remain the same.  I am seriously wondering whether I should blogging about my restaurant meals while I travel especially while I have a massive amount of travel ahead in the next few months.  Thoughts please??  I value your opinions.......

Needless to say I spent time in the kitchen cooking for the Murray family.....  and have thoroughly enjoyed myself.

Tonight's menu consisted of a slow cooked beef stew - very basic in ingredients but full of flavour.  Topped with herb packed cheesy dumplings this meal was a perfect dish for a cold evening.


Slow Cooked Beef Stew with Cheese and Caraway Dumplings
(recipe sourced from WW Magazine August 2013)
 
Serves: 4
ProPoints per Serve: 11
 
200 grams button mushrooms, sliced
550 grams gravy beef, fat trimmed
1 brown onion, finely chopped
2 garlic cloves, crushed
1 dried bay leaf
1 1/2 cups beef stock
1/2 cup red wine
1 tablespoon tomato paste
2/3 cup self raising flour
1/4 cup skim milk
1 1/2 tablespoons olive oil
1 tablespoons finely chopped fresh flat leaf parsley
1/4 cup 50% reduced fat grated tasty cheese
1 teaspoon caraway seeds
pinch smoked paprika, to serve


Preheat oven 180 degrees Celsius. 

Lightly spray a large shallow ovenproof saucepan with oil and heat over high heat.  Cook the mushroom, stirring, for 4 minutes or until golden.  Set aside. 

Lightly spray the pan with oil.  Season the beef with salt and pepper.  Cook the beef, in 2 batches, for 2 minutes or until browned.  Set aside.

Cook the onion, garlic and bay leaf, stirring, for 5 minutes or until softened.

Meanwhile, whisk the stock, wine and tomato paste in a jug until combined.  Return the beef to the pan along with the wine mixture.  Bring to the boil.  Place in the oven and cook, covered, for 1 hour.  Add the mushroom and cook, covered, for 30 minutes or until the beef is tender.

Meanwhile place the four and a pinch of salt in a large bowl.  Combine the milk, oil, parsley and 2 tablepoons of the cheese in a jug.  Stir the cheese mixture through the flour until it forms a sticky dough.

Discard the bay leaf from the stew.  Drop tablespoons of the cheese in the jug.  Sprinkle with caraway seeds and remaining cheese.  Cook, uncovered, for 20 minutes or until the dumplings sre cooked through.

Serve with 0 ProPoints value steamed vegetables.


(click here for a printable version of this recipe)

Thank you all sooooo much for your patience with my spasmotic blogging....... cross fingers for a better last few months of the year xxx

Tuesday, April 9, 2013

Veal Schnitzel with Spicy Pizzaiola Sauce

This dish was filled with an amazing flavour not to mention texture.  The veal is coated in crunchy Panko breadcrumbs served on top of a bed of fresh basil infused tomato pasta. 
 
A slight hint of the chilli was noticable but not overpowering in the pasta sauce which made a perfect bed for the yummy veal schnitzel.
 
Panko breadcrumbs are Japanese breadcrumbs and are available from Asian grocery stores or the Asian section in most supermarkets.


Veal Schnitzel with Spicy Pizzaiola Sauce
(recipe sourced from Weight Watchers Magazine May 2013)
 
Serves: 4
ProPoints per Serve: 11
 
400 gram can diced tomatoes
3 garlic cloves, crushed
1/2 teaspoon dried oregano
1/2 teaspoon dried chilli flakes
salt
freshly ground black pepper
250 grams fettucine or pasta of your choice
4 veal schnitzels, fat trimmed
1 egg white
2 teaspoons water
2/3 cup (50 gram) dried panko breadcrumbs
1 tablespoon olive oil
100 grams baby spinach
1/4 cup coarsely chopped fresh basil leaves
fresh basil leaves, to serve

Blend the tomato until smooth.
 
Lightly spray a small saucepan with oil and heat over medium heat.  Cook the garlic, stirring, for 30 seconds or until fragrant.  Add the tomator, oregano and chilli.  Season with salt and freshly ground black pepper.  Bring to the boil.  Reduce heat and simmer, covered, for 10 minutes.
 
Meanwhile, cook the pasta in a large saucepan of boiling salted water following packet directions or until al dente.  Drain.
 
Meanwhile, season the veal with salt and freshly ground black pepper.  Whisk the egg white and water in a shallow bowl.  Dip the veal in the egg white mixture then dip into the breadcrumbs to coat.
 
Heat the oil in a large non stick frying pan over high heat.  Cook the veal for 1 minute on each side or until gold and cooked through.
 
Stir the pasta, spinach and chopped basil through the sauce to coat well.  Divide the pasta among serving dishes and top with the schnitzel. 
 
Sprinkle with basil leaves to serve.

(Click here for a printable version of this recipe)

Tuesday, March 5, 2013

Beef and Bacon Casserole with Cheese Dumplings

The one great thing about comfort food is that there is no season when you must eat it... comfort food is definitely a year round happening.  This dish is certainly in the comfort food category.

Beef and Bacon Casserole, a  thick tomato gravy laced with tender beef chunks, bacon pieces and vegetables is nice by itself but topped with a couple of fluffy cheese dumplings it was perfect.  The hint of thyme perfectly complimented the mix.

Best of all this recipe was easy to prepare which made it easy to fit into the mid week rush especially as I cheated by putting the casserole in the slow cooker (although the recipe cooks in the oven) and was ready not long after getting home from football training with only the dumplings to prepare.


Beef and Bacon Casserole with Cheese Dumplings
(Recipe sourced from WW Food You'll Love Cookbook)
Serves: 4
ProPoints per serve: 11
cooking spray
125 grams Weight Watchers Bacon, chopped
1 brown onion, finely chopped
2 garlic cloves, crushed
600 grams lean blade steak, fat trimmed cut into 3cm pieces
2 tablespoons plain flour
1/3 cup dry red wine
1 1/2 cups beef stock
400 gram can diced tomatoes
2 carrots, chopped
1 celery stick, chopped
1 tablespoon fresh thyme leaves
200 grams button mushrooms, halved
salt
freshly ground black pepper
1 cup self raising flour
1 tablespoon Weight Watchers Canola Spread
1/4 cup finely grated Parmesan cheese
1/3 cup reduced fat milk

Preheat oven to 160 degrees Celsius or 140 degrees Celsius fan forced. 

Lightly spray a large 1.5 litre (6 cup) flameproof casserole dish with cooking spray and heat over medium-high heat.  Add bacon and onion and cook, stirring, for 5 minutes or until onion has softened.  Add garlic and cook for 1 minute.  Transfer to a bowl.

Lightly spray the same dish with cooking spray and heat over high heat.  Cook beef, in batches, turning, for 5 minutes or until browned.  Return beef and bacon mixture to the pan.  Add plain flour and cook, stirring, for 1 minute.  Gradually stir in the wine and bring to the boil.  Add stock, tomatoes, carrot, celery and thyme. Cover and bring to the boil.  Transfer dish to oven and bake for 1 hour.  Add mushrooms and bake for 30 minutes.  Season with salt and freshly ground black pepper.

Meanwhile, place self raising flour and spread in a large bowl.  Using fingertips, rub spread into flour until mixture resembles breadcrumbs.  Stir in Parmesan.  Make a well in centre of flour mixture and stir in enough milk to create a soft, sticky dough.

Remove dish from oven.  Increase oven to 200 degrees Celsius or 180 degrees Celsius fan forced.  Using floured hands, roll dough into 8 dumplings about the size of a walnut. Arrange dumplings, about 3 cm apart, on top of beef mixture and lightly spray with oil.  Bake, uncovered, for 15 minutes or until dumplings are lightly browned and cooked through.


Note:  I mentioned that I cooked the casserole component in the slow cooker (I love my slow cooker).  Cooked on low for 8 hours after the second step.  Transfer to an oven proof dish when ready to cook dumplings in the oven.

(click here for a printable version of this recipe)

Monday, March 4, 2013

Gnocchi Bolognaise

Bolognaise has to be one of the most versatile sauces not to mention a comfort food.  This version is quite a basic recipe but there was no shortage on taste.  In fact the flavour was very surprising.

Packets of ready made potato gnocchi are available in the chiller section of most supermarkets so that takes the time and effort out of making homemade gnocchi making this dish brilliant for a mid week dinner.


Gnocchi Bolognaise
(Recipe sourced from WW Take Away At Home Cookbook)
 
Serves: 4
ProPoints per serve: 11
 
1 tablespoon olive oil
1 celery stick, finely chopped
1 carrot, finely chopped
1 brown onion, finely chopped
2 garlic cloves, crushed
250 grams lean beef mince
250 grams lean pork mince
3 vine-ripened tomatoes, chopped
500 gram jar tomato and basil pasta sauce
1/4 cup fresh basil leaves, plus extra to garnish
salt
freshly ground black pepper
700 grams 98% fat-free fresh potato gnocchi
2 tablespoons finely grated parmesan cheese

Heat oil in a large saucepan over high heat.  Add celery onion and garlic and cook, stirring, for 5 minutes or until softened.  Add mince and cook, breaking up any lumps, for 10 minutes or until browned.

Add tomatoes and pasta sauce and bring to the boil.  Reduce heat and simmer, uncovered for 15 minutes or until sauce thickens.  Stir in the basil.  Add a little water if the sauce seems too thick.

Meanwhile cook gnocchi in a large saucepan of boiling salted water, following packet directions or until just tender.  Drain.  Stir gnocchi through sauce. 

Serve sprinkled with parmesan and extra basil.


(click here for a printable version of this recipe)

Sunday, February 17, 2013

Smokey Barbecue Chicken Pizza

Another business trip, this time to Tasmania, has seen me not cooking but eating out of hotel rooms or restaurants.  Although it sounds pleasant I can assure you that it is not with the exception of the few dinners I get to out with special friends, catching up on happenings and having many laughs.

Upon my return, as I always do, I want to cook.  Needless to say this trip was no different.  A huge shop to fill the fridge full of fresh fruit and vegetables and other delights which lead to having home made pizzas... full of toppings that we all individually chose.

I normally have a tomato base on my pizza so thought I would try a barbecue base this time for a change.  I have to say I actually surprised myself with the outcome of the taste in each mouthful.


Smokey Barbecue Chicken Pizza

Serves: 2
ProPoints per serve: 11

cooking spray
1 x 200 gram chicken breast fillet, all visible fat removed
1/4 cup smokey barbecue sauce (I used HP Hot and Spicy Sauce)
1 garlic clove, crushed
1 x 100 gram pita bread
100 grams reduced fat grated mozerella
1 small brown onion, halved, thinly sliced
1 small red capsicum, thinly sliced
1 small green capsicum, thinly sliced

Preheat oven to 220°C/200°C fan-forced. Lightly grease 2 large pizza trays.

Spray a non stick frying pan with cooking spray. Slice chicken fillet in half lengthways and cook in pan over medium heat until cooked through, turning once. Remove from pan and allow to cool. Dice.

Combine sauce and garlic in a bowl. Place pizza base on prepared tray.

Spread the base with the sauce mixture. Sprinkle each with 50 grams of cheese. Top with onion, chicken and capsicum. Top with remaining cheese.

Bake for 18 to 20 minutes or until bases are crisp and cheese has melted. Serve.


(click here for a printable version of this recipe)

Saturday, November 10, 2012

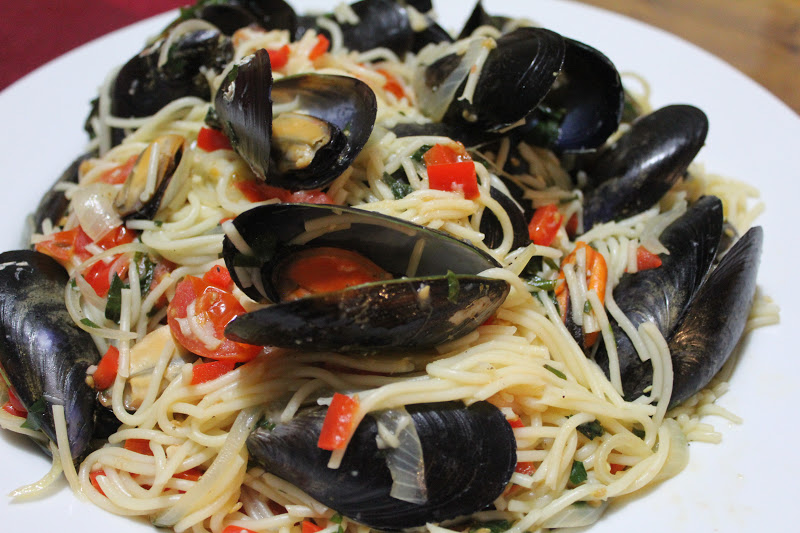
Spaghetti with Mussels, Chilli and White Wine Sauce

As you all know I have a love affair with mussels and am always on the look out for another recipe to try.  When I saw this recipe, which was originally for Vongole (Clams) I just knew it would be perfect with mussels.

This was not only a recipe jam packed with flavour but it was a very simple dish to pull together.  The fresh flavours of the tomatoes, capsicums, garlic along with a hint of chilli make this a perfect italian dish.


Spaghetti with Mussels, Chilli and White Wine Sauce
(recipe adapted from WW Take Away At Home Cookbook)
 
Serves: 4
ProPoints per serve: 11

300 grams spaghetti
1 kgs mussels, debearded, rinsed and drained
1 tablespoon olive oil
250 grams cherry tomatoes, halved
1 brown onion, thinly sliced
1 red capsicum, finely chopped
4 garlic cloves, crushed
1 long fresh red chilli, finely chopped
1/3 cup reduced salt chicken stock
1/2 cup dry white wine
1/4 cup chopped fresh flat leaf parsley leaves
1/4 cup coarsely chopped fresh basil leaves

Cook spaghetti in a large saucepan of boiling salted water, following pack instructions, or until just tender.  Drain.

Meanwhile, place mussels in a large saucepan over high heat.  Cover with a tight fitting lid.  Cook, shaking pan occasionally, for 5 minutes or until mussels open.  Remove mussels from pan with a slotted spoon, discarding any liquied and any mussels that do not open.

Heat oil in a large, deep frying pan over medium high heat.  Add tomatoes, onion, capsicum, garlic and chilli and cook, stirring for 5 - 7 minutes or until capsicum and onion have softened.

Add stock and wine and bring to the boil.  Stir in parsley and basil.  Add pasta and mussels.  Toss gently to combine.  Serve.


(Click here for a printable version of this recipe)

Saturday, November 3, 2012

Salami and Tomato Pizza

Once again I offer up apologies - due to my ever increasing work load lately with some travel required I have become complacent with sharing our culinary adventures with you all.  It's not because I didn't want to as I have missed my blogging and am truly saddened by not being able to partake in my hobby but as per usual that doesn't mean that we haven't been cooking - of course we have!  So now it's going to be catch up time with some meals we have enjoyed recently.

This was a simple pizza.  A tomato and garlic base with low fat hot salami (but you can use mild if you prefer), cherry tomatoes and a few other vegetables.... voila - mouthfuls of flavour that were not only very fresh but also very tasty.  Better than a take away pizza that's for sure.....


Salami and Tomato Pizza

Serves: 2
ProPoints per Serve: 11
 
cooking spray
1 large wholemeal pita bread (100g)
2 tablespoon tomato paste
1 teaspoon crushed garlic
1 teaspoon dried oregano
50 grams Don 50% less fat Hot or Mild Salami, halved
100 grams button mushrooms, sliced
1/2 brown onion, sliced
1/2 green capsicum, sliced
150 grams cherry tomatoes, halved
8 baby bocconcini balls, halved
8 black pitted olives, halved lengthwise

Preheat oven to 200 degrees Celsius.

Spray a pizza tray with cooking spray and place pita bread on the tray.

In a small bowl mix together the tomato paste, garlic and oregano.  Spread over pizza base (pita bread).

Layer with toppings - the salami, mushrooms, onions, capsicum, tomatoes, bocconcini and olives.

Place in oven and cook for 15 - 20 minutes or until cooked through and cheese has melted.

(Click here for a printable version of this recipe)

Tuesday, August 28, 2012

Dixie Chicken

Yes I have been travelling with work and busy again.... apologies as normal but all is back to normal in the House of Murray for a few weeks at least.  Junior football is nearly finished for the year also so we will have some more free time on the weekends shortly.

This dish is perfect for a mid week wonder as it was very easy to make and for a recipe with very few ingredients the flavour was amazing.  The sauce, even though made from soup, was creamy and enveloped the flavours of the vegetables and the thyme while the chicken remained tender and juicy.


Dixie Chicken
(recipe adapted from Taste.com)
 
Serves: 4
ProPoints per serve: 11
 
750 grams (8) chicken thigh cutlets, skin removed
salt
freshly ground black pepper
1 red capsicum, diced
1 green capsicum, diced
cooking spray
250 gram button mushrooms, sliced
125 grams Weight Watchers bacon, roughly chopped
420 gram can cream of mushroom soup
1/3 cup light thickened cream
2 tablespoons fresh thyme leaves, roughly chopped

Preheat oven to 200 degrees Celsius.

Place chicken into an 8-cup capacity oven proof dish in a single layer. Season with salt and pepper.  Place capsicum on chicken.

Cover a large frying pan with cooking spray and heat over medium heat until sizzling. Add mushrooms and bacon. Cook, stirring, for 3 to 4 minutes or until tender. Add soup and cream. Stir until well combined. Bring to the boil. Remove from heat. Stir in thyme. Pour over chicken.

Bake, uncovered, for 30 minutes or until cooked through.


(Click here for a printable version of this recipe)

Monday, July 23, 2012

Chicken and Prawn Pad Thai

Once again it seems like forever since I have blogged.  Firstly with recent Victorian school holidays (the first 2 weeks of July) we had Mam down to help with the children and she was responsible for some evening meals.  Looking back I didn't cook a great deal during the school holidays.  Mam took the kids away for the weekend to visit my uncle and aunt so Noel and I took advantage of the freedom relaxing on the Friday with a pizza and then going out for dinner on the Saturday evening.

Then last week I travelled with work so needless to say no cooking there either.

So with things getting back to normal at home and me back from my travels it's good to get back into the kitchen.  Tonight we had Chicken and Prawn Pad Thai - a favourite of mine but I have never cooked it at home.  I adapted a simple yet tasty Weight Watchers recipe and it was exotic. 

All loved the flavours of the lime and spice while enjoying the textures of the soft noodles and crisply cooked vegetables.


Chicken and Prawn Pad Thai
(recipe adapted from Weight Watchers Australia)

Serves: 6
ProPoints per serve: 11
250 grams dry rice noodles
500 grams lean chicken breast, cut into 2 cm cubes
1/4 cup fish sauce
1 bunch broccolini, cut into 3cms pieces
2 medium carrots, peeled and finely sliced
1/4 cup fresh lime juice
3 tablespoons water
3 tablespoons soft brown sugar
1 1/2 teaspoon fresh ginger, finely chopped
1 tablespoon peanut oil
250 grams raw king prawns, peeled and tails intact
1 clove fresh garlic, crushed
1 1/2 cups bean sprouts
1/2 cups roasted unsalted peanuts, choppped roughly
1/2 cup fresh coriander, roughly chopped
1/2 cup fresh mint leaves, roughly chopped
2 tablespoons crushed chilli flakes (optional)

Soak noodles in cold water for 1 hour.

Place chicken in a small bowl and cover with 1 tbsp of fish sauce. Set aside.

Steam broccolini and carrot for approximately 5 minutes, or until tender crisp. Immediately immerse in cold water. Drain and set aside.

Meanwhile, in another small bowl, combine remaining 3 tablespoons of fish sauce, 3 tablespoons lime juice, water, sugar and ginger. Mix well to combine then set aside.

Heat 2 teaspoons oil in a wok over high heat. Add chicken and cook, stirring for 5 minutes, or until chicken is cooked through. Remove chicken from wok and set aside. To the same pan quickly cook prawns until pink and remove from heat.

Drain noodles thoroughly.

Heat 2 teaspoons oil in wok over high heat. Add garlic and cook for 30 seconds. Add noodles and fish sauce. Cook stirring for 3 minutes, or until sauce is mostly absorbed. Stir in chicken and half the peanuts and remove from heat. Add remaining lime juice, bean sprouts and half of the coriander and the mint. Toss through broccoli and carrot just before serving.

Place on serving platter and sprinkle with remaining coriander, mint, peanuts and crushed chilled flakes if desired.


(Click here for a printable version of this recipe)

Thursday, July 5, 2012

Spicy Prawns and Vegetables

I wasn't sure what to cook but knew it had to be spicy and yummy definitely using prawns as the main ingredient.  My mam also loves prawns - I would put money on saying that her favourite dish is garlic prawns.

Another favourite family dish is Nice Chicken and having not cooked this either in a while I decided it would be great to have a little play around recreating a prawn dish based on the same flavourings.

This dish has a delightful spicy yet sweet sauce - spicy from the cayenne pepper, salty from the soy and sweetness from the hoisin sauce.  A beautiful combination with the tender prawns.


Spicy Prawns with Vegetables

Serves: 4
ProPoints per serve: 11

1 egg
30 grams cornflour
500 grams peeled and deveined large raw prawns, rinsed
1/4 cup oil for deepfrying
200 grams mushrooms, sliced
1 red capsicum, thinly sliced
4 spring onions, sliced
1 x 225 gram can sliced water chestnuts, drained and rinsed
1 cup hoisin sauce
1/3 cup soy sauce
1 teaspoon cayenne pepper (or to taste)

In a bowl mix egg and cornflour together into a smoot batter. Add prawn to the bowl and mix to combine.

Heat oil in a large wok or frying pan. Cook prawns in batches until almost golden but not fully cooked. Drain on a plate lined with paper towel. Discard oil

Spray wok or frying pan with cooking spray. Add mushrooms and capsicum to the wok and stirfry for 2 minutes. Add water chestnuts and spring onions, stir fry for another 1 - 2 minutes. Return prawns to pan and cook for a further 2 minutes.

Combine the hoisin sauce, soy sauce and cayenne pepper. Add combined sauce to wok and toss for another 2 minutes or until chicken is well coated with sauce.

Serve immediately.


(click here for a printable version of this recipe)

Wednesday, May 23, 2012

Middle Eastern Beef Meatballs

I love Middle Eastern food and really don't eat that much of it.  I love the simplicity, the use of different spices and its, at times, unusuallness of their dishes.  Not to mention the smells that waffled from the kitchen when cooking.... cinnamon, cumin, harissa all combined filling the air with comfort.

These meatballs, small in size, were all of the above.... plus not mention easy to make.  Cooked in a sauce packed with vegetables with a hint of spice they really pleased the Murray household.


Middle Eastern Beef Meatballs
(recipe sourced from WW The Complete Meal Cookbook)

Serves: 4
ProPoints per Serve: 11

cooking spray
2 brown onions, finely chopped
2 garlic cloves, crushed
500 grams lean beef mince
1 teaspoon ground cumin
1/2 teaspoon ground cinnamon
1/2 teaspoon allspice
2 tablespoons fresh flat leaf parsley, chopped
1 tablespoon olive oil
2 teaspoons harissa powder (or 1 1/2 tablespoons harissa paste)
400 gram can chopped tomatoes
1 cup beef stock
2 carrots, grated
2 zucchini, grated
1/2 cup tabouli
2 cups baby rocket leaves
1 tablespoon pine nuts, toasted
1/4 cup low fat Greek style natural yoghurt
2 x 80 gram rounds wholemeal Lebanese bread, torn

Lightly spray a medium non-stick frying pan with oil and heat over medium high heat.  Add half the onion and half the garlic and cook, stirring, for 3 - 4 minutes or until onion has softened.  Remove from heat and cool for 5 minutes.

Place mince, onion mixture, cumin, cinnamon, allspice and parsley in a bowl.  Mix to combine.  Roll tablespoons of mixture into meatballs.  Refrigerate for 10 minutes.

Meanwhile heat oil in a saucepan over medium heat.  Add remaining onion and garlic and cook, stirring, for 5 minutes or until onion has softened.  Stir in harissa, tomatoes and stock and bring to the boil.  Boil for 2 minutes.

Add carrot, zucchini and meatballs.  Reduce heat to low and simmer, covered, for 15 - 20 minutes or until meatballs are cooked through and sauce has thickened.

Place tabouli and rocket in a large bowl and toss to combine.  Divide meatball mixture among plates and top with pine nuts and yoghurt.  Serve with tabouli salad and bread.


(Click here for a printable version of this recipe)

Wednesday, April 4, 2012

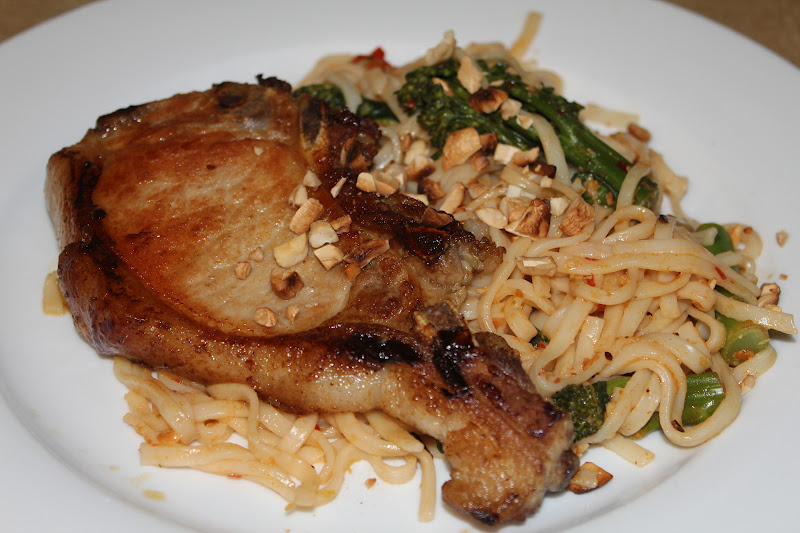
Pork with Chilli Lime Noodles and Cashews

For a quick and weasy mid week meal this dish was amazing.  The flavours were vibrant and the meal itself was very comforting.

Another meal with a Thai influence, although I change the recipe a little, it was delicious. The original dish was more like a noodle salad using pork fillet but having only pork cutlets at home the switch was acceptable.

The lime had a strong character while the chilli wasn't overpowering - a great combination topped with the crunchiness of the cashews.


Pork with Chilli Lime Noodles and Cashews 
(recipe adapted from Weight Watchers Australia)

 
Serves: 4
ProPoints per serve: 11

40 grams raw cashews, unsalted
4 x pork cutlets, 200 grams each, fat trimmed
1 1/2 tablespoon sesame oil
200 grams fresh egg noodles
1 medium fresh lime, rind finely grated, juiced
1 1/2 tablespoons soy sauce
2 teaspoons sambal oelek
1 bunch broccolini, cut into 5cm lengths

Preheat oven to 200 degrees Celsius.

Place cashews on a lined baking tray.  Roast in oven until slightly golden and toasted, approximately 5 - 7 minutes.  Remove and chop roughly.  Set aside.

Brush pork with ½ teaspoon of the sesame oil. Season with salt and pepper. Spray a large frying pan with cooking spray add pork and cook over high heat  for 2-3 minutes each side or until just cooked through. Transfer to a plate. Cover loosely with foil and set aside for 5 minutes to rest.

Meanwhile, bring a large saucepan of water to the boil. Cook the noodles according to packet instructions.  During the last 1-2 minutes of cooking add broccolini to the noodles and cook until bright green and tender.  Drain noodles and broccolini and return to pan.  Add the remaining oil, rind and juice, soy sauce and sambal oelek. Toss to combine. Taste and season with salt.

Divide noodles among serving bowls or plate, top with pork and sprinkle with cashews. Serve.