Thursday, September 13, 2012

Butter Chicken and Vegetables

Butter chicken is a favourite indian dish - all of us like it.  But it is always so rich and heavy not to mention fattening.  Needless to say I don't cook it that often but am always on the lookout for a healthier version so loved the fact that the new Weight Watchers cookbook, Take Away At Home, had this recipe.

This version was delish - a smooth, creamy and delicately balanced sauce coupled with the sweetness of the sweet potato and the crunch of the green beans.  Having the vegetables made it very filling I didn't even feel the need to have rice with my serve.

A different butter chicken but it was enjoyed and would recommend that you give it a go.


Butter Chicken and Vegetables
(recipe sourced from Weight Watchers Take Away At Home Cookbook)
 
Serves: 4
ProPoints per Serve: 10
 
1/3 cup (50 grams) raw unsalted cashews
2 teaspoons sunflower or canola oil
600 grams lean chicken breast fillets, fat trimmed, cut into 3 cms pieces
1 brown onion, thinly sliced
2 tablespoons tandoori paste
1 tablespoons finely grated fresh ginger
700 grams tomatoes, chopped
1/2 cup chicken stock
400 grams sweet potato (kumara), thinly sliced
400 gram can chickpeas, rinsed, drained
100 grams green beans, cut into 3cm lengths
1/3 cup low fat natural yoghurt

Place cashews in a food processor.  Process until finely ground.

Heat half the oil in a large saucepan over medium-high heat.  Cook chicken, in batches, for 3 - 5 minutes or until browned.  Transfer to a plate.

Heat remaining oil in pan.  Add onion and cook, stirring, for 5 minutes or until softened.  Add tandoori paste and ginger and with tomatoes, stock, sweet potato and ground cashews and bring to the boil.  Reduce heat and simmer, covered, for 20 - 25 minutes or until sweet potato is tender.  Add chickpeas and beans for the last 10 minutes of cooking.

Stir yoghurt into butter chicken.  Serve.

Serve with steamed rice - add 3 propoints value per serve for 1/2 cup steamed rice.


(click here for a printable version of this recipe)

Monday, September 10, 2012

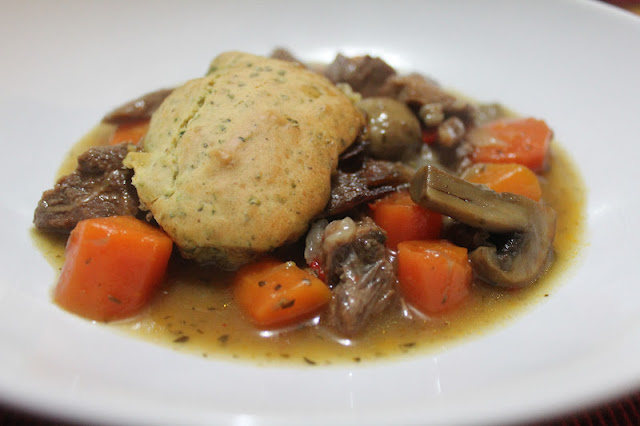
Lamb and Vegetable Hot Pot with Herb Dumplings

Following an enjoyable Roast Lamb dinner on Sunday evening there is always the big question of what to do with the left over lamb.  I am not a lover of having roast two nights in a row.  Call me fussy but it never tastes the same the second night in my opinion.  It normally gets turned into a hearty Lamb Stew but this time I was determined to do something different.

I had been spying this recipe for awhile now but had steered clear as I know Noel is not a lover of dumplings from the last time I cooked them many many years ago - I haven't been game to broach the topic of dumplings again.

I left the recipe on the bench overnight and told the family this was my plan.  They all agreed to give it a go dumplings or no dumplings!

I was running late from work tonight and to my surprise my wonderful husband took the challenge of not only cooking the recipe but adapting it to suit cooked meat instead of the raw meat as called for.

This dish was amazing..... and I must add cooked to perfection.


Lamb and Vegetable Hot Pot with Herb Dumplings
(recipe adapted from Weight Watchers Cook Hearty Cookbook)

Serves: 4
ProPoints per Serve: 13

1 tablespoon olive oil
700 grams lean lamb leg steaks or cooked roast lamb, cut into 3cm pieces
1 brown onion, diced
2 carrots, chopped
200 grams button mushrooms, halved
1 tablesppon finely chopped fresh thyme leaves
1 tablespoon plaing flour
1 tablespoon Worcestershire sauce
2 cups chicken stock
1 cup self raising flour
50 grams Weight Watchers Canola Spread
1 egg, lightly beaten
2 tablespoons chopped fresh flat leaf parsley leaves
1 tablespoons finely chopped fresh rosemary
1/3 cup skim milk

Preheat oven to 180 degrees Celsius.

Heat oil in a 2 litre capacity shallow flameproof casserole dish over high heat.  Cook lamb, in batched, turning, for 2 - 3 minutes or until browned.  If using cooked meat just fry in oil for 1 - 2 minutes.

Add onion, carrot, mushrooms and thyme to dish and cook stirring for 5 - 7 minutes or until vegetables are softened.  Add plain flour and stir to coar.  Combine Worcestershire sauce and stock in a jub.  Gradually add stock mixture to vegetable mixture in dish, stirring until combined.  Cover and bring to the boil.  Transfer dish to oven and bake for 1 hour and 10 minutes.

Meanwhile, place self raising flour and spread in a large bowl.  Using fingertips, rub spread into flour until mixture resembles breadcrumbs.  Stir in egg, parsley, rosemary and enough of the milk to make a soft, sticky dough.  Add a little more milk if needed.

Remove dish from oven.  Increase oven temperature to 220 degrees Celsius.  Drop heaped teaspoons of dough, about 3 cms apart, on top of the hot pot and lightly spray with oil.  Bake, uncovered, for 15 - 20 minutes or until dumplings are lightly browned and cooked through.  Serve.


(click here for a printable version of this recipe)

Sunday, September 9, 2012

Bacon Mushroom and Tomato Medley

As with every year by the time the football season is over we are over egg and bacon for breakfast on a Sunday.  Today is the first Sunday since April we have our Sunday's back.  Don't get me wrong we love junior football but it takes the whole day with games, helping out and presentations on a Sunday evening.  It's for a good cause though - the kids.

This morning I decided to use a punnet of mixed tomatoes along with some mushrooms and bacon to create a lighter yet filling brunch.  Such a mixture of vegetables, some herbs, a little bacon all served on a toasted slice of Pane di Case - YUM!!

To be perfectly honest this would make a lovely pasta topping or as a side dish with a meat.


Bacon Mushroom and Tomato Medley
 
Serves: 4
ProPoints per serve: 1
 
cooking spray
1 red onion, diced
125 gram packet Weight Watchers Bacon, thickly sliced
200 grams buttom mushrooms, quartered
1/2 bunch fresh thyme sprigs, leaves removed
400 gram punnet Mixed Baby Tomatoes
freshly ground black pepper
fresh basil leaves to serve

Heat a large frying pan over high heat, spray with cooking spray.  Add onion and bacon cook, stirring, for 2 - 3 minutes or until onion has softened.  Add mushrooms, stirring, for a further 5 minutes.

Add thyme and tomatoes, season with freshly ground black pepper to taste.  Reduce heat to low, cover and simmer for a further 5 - 8 minutes or until tomatoes have softened.

Serve sprinkled with fresh basil.


(Click here for a printable version of this recipe)

Saturday, September 8, 2012

Sticky Pork

There are so many version of this Thai favourite.  We recently cooked this version of Slow Cooked Sticky Pork which was delish. I have purchased a new cook book so I am trying out another recipe.  The new cookbook is Takeaway At Home available from Weight Watchers.

This is not the meal that I had menu planned for tonight but as I couldn't find any Gummy Shark that meal will have to wait for another night. I wanted something quick, simple but jam packed with flavour.  Not to mentiom dished up in lettuce leaves finger dinner never tasted so good.

While the meal itself was nice both Noel and I found it very sweet not having all the usual qualities of a Thai dish.  The acutal sweetness overpowered the chilli component and the lime flavour.  We will cook again as it was pleasing to eat but add some kaffir lime leaves and fresh red chilli to the mix.


Sticky Pork
(recipe sourced from WW Takeaway At Home Cook Book)
 
Serves: 4
ProPoints per Serve: 8
 
2 teaspoons sesame oil
4 green shallots, thinly sliced
1 green capsicum, finely chopped
500 grams lean pork mince
1/4 cup lime juice
227 gram can sliced water chestnuts, drained, finely chopped
1/3 cup sweet chilli sauce
2 tablespoons soy sauce
1 tablespoon hoisin sauce
2 small carrots, grated
1 celery stick, finely sliced
280 grams baby cos lettuce leaves

Heat a wok over high heat.  Add oil and heat for 5 seconds.  Add shallots and capsicum and stir fry for 2 - 3 minutes or until sofetened.  Add pork and stir fry, breaking up any lumps, for 5 minutes or until browned.

Add juice, water chestnuts and sweet chilli, soy and hoisin sauces and stir fry for 2 minutes or until heated through.  Stir in carrot and celery.  Spoon pork mixture into lettuce leaves. Serve.

Serve with: Brown Rice: Add 3 ProPoints values per serve for 1/2 cup steamed rice.


(Click here for a printable version of this recipe)
Wednesday, September 5, 2012

Creamy Chicken Casserole

Dinner tonight - courtesy of my hubby Noel cooking it while I was working late.  The house has a yummy aroma the moment I opened the front door.

This dish was really yummy - a nice thick sauce full of vegetables and tender chicken who could ask for more?  Me - I could have eaten seconds and thirds.

The flavour was impressive - the meatiness of the chicken, the vegetables and the tarragon all in every mouthful brought back memories of food my mother used to cook.... mmmmm!

Served with crunchy bread this was a perfect mid week dinner that was enjoyed by all.


Creamy Chicken Casserole
(recipe sourced from WW Food You'll Love Cookbook)
 
Serves: 4
ProPoints per Serve: 9
 
1 tablespoon olive oil
2 tablespoons plain flour
2 teaspoons mustard powder
500 grams lean chicken thigh fillets, fat trimmed, thickly sliced
1 leek, thinly sliced
125 grams Weight Watchers Bacon, thinly sliced
2 garlic cloves, crushed
3 carrots, thickly sliced
600 grams potatoes, cut into 2 cm pieces
1 tablespoon finely chopped fresh tarragon leaves
3 cups chicken stock
2 tablespoons reduced fat thickened cream
2 cups baby spinach leaves

Heat half the oil in a laege heavy-based saucepan over medium heat.  Combine flour and mustard powder in a small bowl.  Add chicken to the flour mixture and toss to coat, shaking off the ecess.  Cook chicken, in batches, turning, for 5 minutes or until browned.  Transfer to a plate.

Heat remaining oil in the same pan.  Add leek and bacon and cook, stirring, for 5 minutes or until leek has softened.  Add garlic and cook, stirring for 1 minute or until fragrant.

Return chicken to the pan with carrot, potato, tarragon and stock and bring to the boil.  Reduce heat and simmer, uncovered, for 45 - 50 minutes or until vegetables are tender and chicken is cooked through. 

Add cream and spinach and cook, stirring, for 2 minutes or until spinach is just wilted.  Serve.


(Click here for a printable version of this recipe)

Tuesday, September 4, 2012

BBQ Glazed Beef and Pork Mini Meatloaves

Being back into routine and in my kitchen, which I love, I had menu planned good ol' Meatloaf for dinner. I got home from work excited to cook my easy quick meatloaf for dinner only to hear "meatloaf is fine with me but child who I won't name doesn't want it!" from Noel. The other child states that they will eat anything.

So to try something different I jazzed up my usual meatloaf recipe.  I decided to do away with the usual service style of meatloaf slices in rolls with cheese and sauce (a favourite from way back) and decided to make individual mini meatloaves hoping to win over the crowd.  I have recently read many sites/recipes for the individual portions so it was a no-brainer really.

Flavoured with bbq sauce, a hint of sweet chilli and mustard plus jammed packed with hidden grated vegetables these were an easy dinner to prepare and could also be great for lunches and picnics.  Plus they are freezable not that we had any left.


BBQ Glazed Beef and Pork Mini Meatloaves
 
Serves: 6 (2 meatloaves each)
ProPoints per serve: 10
 
1 medium zucchini, grated
500 grams pork mince
500 grams extra lean beef mince
1 small brown onion, finely chopped
2 garlic cloves, crushed
1 medium carrot, peeled, grated
1 1/4 cups fresh breadcrumbs
1/2 cup bbq sauce 
3 tablespoons sweet chilli sauce
3 tablespoons American mustard
salt
freshly ground black pepper

Preheat oven to 180 degrees Celsius.

Grease an 12 hole, 1/2 cup-capacity mini loaf pan or texas muffin pan.

Squeeze excess liquid from zucchini. Combine zucchini, mince, onion, garlic, carrot, breadcrumbs, half the bbq sasuce, sweet chilli sauce and mustard in a bowl. Season with salt and pepper. Press mixture into prepared pan holes.

Place meatloaves in oven and bake for 20 to 25 minutes or until meatloaves are just cooked through. Remove meatloaves from oven.

Carefully transfer meatloaves to a greased baking tray. Using a pastry brush, brush with remaining steak sauce. Bake for 10 minutes or until browned and cooked through.


(Click here for a printable version of this recipe)

Monday, September 3, 2012

Ginger and Teriyaki Beef Stir Fry

 I found myself fancying vegetables tonight so thought a stir fry would hit the right spot. 

This was a very quick and easy dish to prepare, cook and eat.  Love the freshness of the crisp vegetables and I have to admit that teriyaki would also be one of my favourtie sauces to use.  I has a sweetness yet saltiness that I enjoy and it can be used with all meats.

Everyone enjoyed dinner, there was some left over which has beccome lunch for tomorrow so that was a good sign too.


Ginger and Teriyaki Beef Stir Fry
(recipe adapted from WW Eat & Enjoy cookbook)
 
Serve: 4
ProPoints per serve: 10
 
500 grams lean beef strips
1 tablespoon finely grated fresh ginger
3/4 cup teriyaki sauce
200 gram Mr Changs Egg Noodles
cooking spray
1 onion, sliced
2 carrots, cut into matchsticks
2 tablespoons water
1 red capsicum, thinly sliced
1 bunch broccolini, cut into 4 cm lengths
200 grams baby corn, halved
200 grams snow peas, trimmed
3 green shallots, thinly sliced for garnish

Place beef, ginger and 1/4 cup of teriyaki sauce in a bowl.  Turn to coat and allow to stand for 30 minutes.

Cook noodles as per packet instructions, drain and set aside.

Heat wok over high heat, spray with cooking spray.  Stir fry beef in batches for 1 - 2 minutes or until browned.  Transfer to a plate.

Reheat wok over high heat and respray with cooking spray.  Add onion, carrots and water and stir fry for 1 - 2 minutes or until softened.  Add the capsicum and corn and stir fry for a further 2 minutes.  Add broccolini and snow peas.  Stir fry for a further 2 to 3 minutes until vegetables are tender.

Return beef to wok with remaining teriyaki sauce and white parts of shallots.  Stir fry for 2 minutes or until heated through. 

Place noodles on serving tray, top with beef stir fry.  Sprinkle with remaining shallots and serve.


(click here for a printable version of this recipe)

My other good news is that I am now the proud owner of Heston's DVD - How To Cook Like Heston.  I actually won this from a competion which was run by Lorraine over at Not Quite Nigella.


Thank you Lorraine... as usual your blog posts are amazing and for anyone that hasn't been to the Not Quite Nigella website please do - your taste buds will thank you.