Monday, August 21, 2017

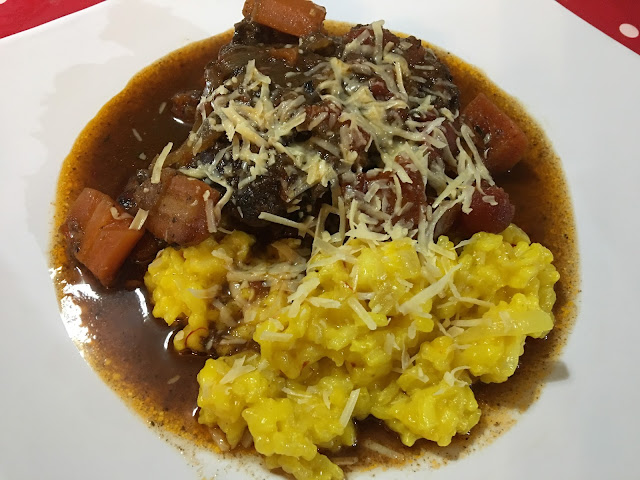
Beef Cheeks with Thyme, Chilli and Ginger Beer with Saffron Risotto

And now for something completely different - LOL!! 
 
As always I am constantly on the hunt for a "different" recipe, dish or really anything to cook.  It's somewhat looked upon as an obsession, an illness perhaps but to be perfectly honest I don't care.  I enjoy what I do, it makes me happy and I take great pride in introducing my family to different foods, flavours, textures experimenting to find their likes and dislikes. 
 
I have mentioned before that this was the way I was raised by my parents - I was taught never to fear food but to taste and decided if I liked it or not.  Nothing was left far from the imagination - we always had food made from little or many ingredients and from many countries or regions.  My parents enjoyed their relationship with food and this was passed on to me - I believe everyone should have a good understanding of foods especially those void of all the added chemicals, additives and preservatives evident in many foods of today's world.
 
My kids have embraced the love of food - although there have been many times over the years that there have been pleas of "can we please have normal food for a change" and many nights where beans, eggs and chips have been served at our table.  However saying this I absolutely adore being at a restaurant and listening to my kids order their meals.  To my delight they often try something other than Parma and Chips.  I remember my daughter as an 8 year old sitting in the local Chinese restaurant boldly asking for Chicken and Sweet Corn Soup followed by Peking Duck.  The waitress was amazed and yelled to the chef telling him of her order.  I still chuckle when I think of that moment.
 
We have a new member in our household, our son's girlfriend.  She has been with us for several months now and I am impressed with her willingness to embrace our lifestyle and our food.  To date she has tried everything put before her and yes there are things that she wasn't a fan of but has had the openness and honestly to speak her thoughts.  I am very proud of her - she definitely belongs in our family.
 
Saying this, beef cheeks were on the menu last night and of course, I would not have done them justice if I had just slow cooked them in red wine.  Research completed and several recipes morphed together plus a few little twists of my own saw this creation - Beef Cheeks with Thyme Chilli and Ginger Beer served with Saffron Risotto.  This recipe is loosely based on a recipe that appeared in the August/September 2008 issue of Gourmet Traveller WINE but as usual I had to change ingredients and put the House Of Murray twist on things.
 
Beef cheeks must be slow cooked - there is no other way to cook them so don't even consider it.  Low and slow either in the oven or a slow cooker.  A quick fry is NOT an option of cooking these meat pieces - they will be tough.

A word of warning also - beef cheeks are a rick meat to start with and most recipes are served with a rich red wine jus or sauce in which they are cooked.    I wanted something different as much as love a good full bodied red wine sauce there was the need to experiment.  So I substituted half the red wine with white wine and also added a bottle of sugar free ginger beer.  The result was fantastic - although still a little rich which I did expect it wasn't as heavy as it would normally be.  Also added the subtly of fresh thyme and a little heat from chilli flakes. 

Overall, a truly hearty dish which served also side a Saffron Risotto was filling and well received at the table.

 
Beef Cheeks with Thyme, Chilli and Ginger Beer
(Recipe adapted from August/September 2008 issue of Gourmet Traveller WINE)
 
Serves: 4 - 6

1 litre beef stock
4 - 6 beef cheeks (approx. 250 grams each), trimmed
salt
freshly ground black pepper
3 large carrot, cut into large chunks
1 onion, diced
3 garlic cloves, roughly chopped
1 bunch fresh thyme
2 cups dry red wine
2 cups dry white wine
750 ml bottle sugar free ginger beer
2 teaspoons dried chilli flakes
2 tablespoons extra-virgin olive oil
600 ml chicken stock
80 ml extra-virgin olive oil
200 grams risotto rice
1 brown onion, finely diced
2 garlic cloves, finely chopped
2 teaspoons saffron threads
150 ml dry white wine
80 grams butter

Place beef stock in a saucepan over medium heat and cook until the liquid reduces by half, or for about 30 minutes.

Season beef cheeks with sea salt and freshly ground black pepper.

In a large jug combine red wine, white wine, ginger beer and chilli.
 
Place beef cheeks in a large bowl and pour over wine mixture. Cover with cling film and marinate in the refrigerator overnight.

Remove from refrigerator and separate beef cheeks and marinade.

Heat olive oil in a large frying pan over medium heat and cook beef cheeks for about 5 minutes or until browned. Transfer to a plate.

Add vegetables to the pan and sauté for 5-7 minutes until softened. Transfer to a bowl.

Place stock and marinating liquid in a saucepan over medium heat, bring to the boil then remove from heat.

Place beef cheeks and vegetables in a roasting dish and cover with stock mixture. Cover tightly with foil and cook in a preheated oven at 150C for 3- 4 hours or until tender.

 
Meanwhile heat the chicken stock in a saucepan over low heat.

Heat oil in a large saucepan over medium heat, add rice and cook, stirring continuously, for 2 minutes. Add shallots, garlic and saffron and cook for another 2 minutes.

Add white wine and shake pot occasionally until wine begins to reduce or for about 3-5 minutes. Add stock a ladle at a time until stock just covers the rice, making sure it continues to just cover the rice. After rice has been cooking for 10 minutes, stir for 2-3 minutes.

Check rice is al dente, remove from heat, stir in butter and season to taste with sea salt and freshly ground black pepper.

 
Serve risotto immediately with beef cheeks, vegetables and sauce.


(Click here for a printable version of this recipe)

Saturday, August 19, 2017

Chicken and Bacon Ranch Casserole

Now once I saw this recipe I knew my kids would love it... of course they would considering it was pasta - cheesy pasta with chicken and bacon.  Little did they know that it would also contain salad dressing, Ranch Dressing, when they were enjoying every mouthful.
 
Yes you read correctly - Ranch Dressing.  One of the most loved salad dressing can actually be used in cooking and it compliments this pasta dish amazingly.  The smooth combination of the garlic, the herbs and the creaminess of the mayonnaise and sour cream added noticeable flavours to the marinated chicken and of course the goodness of bacon. 
 
It was so good the kids pretty much ate the whole casserole dish full in one sitting.


Chicken and Bacon Ranch Casserole
(Adapted from Top Quick Recipes)
 
Serves - 6
 
2 tablespoons olive oil
1/2 tablespoon of chilli sauce of your choice
1 teaspoon pepper
salt to taste
1/2 teaspoon of fresh parsley
500 grams boneless, skinless chicken breasts, diced
500 grams bacon, chopped
1 medium onion, diced
500 grams pasta of your choice
1 cup Homemade Ranch Dressing or store brought Ranch Dressing
1/2 cup light thickened cream
1/2 cup Cheddar cheese, shredded
1 1/2 cups Mozzarella cheese, shredded

Preheat oven to 180 degrees Celsius.

In a large bowl place olive oil, chilli sauce, pepper, salt and parsley.  Mix until well combined.  Add chicken and toss to evenly coat.  Cover and set aside.

In a large frying pan, over medium heat, cook bacon until crisp.  Remove from pan and drain on a paper towel.
 
To the same frying pan add the marinated chicken and diced onion and cook until no longer pink in the center. Set aside.

Bring a large saucepan of water to boil and cook pasta as per the packet directions.  When al dente drain well.
 
Add the chicken, bacon, ranch dressing and cream to the cooked pasta and toss until well coated.

Spray a large casserole dish with cooked spray Add ranch covered pasta to the greased baking dish

Sprinkle both cheeses and bake until cooked through and the cheese is completely melted, about 20 - 25 minutes.


(Click here for a printable version of this recipe)
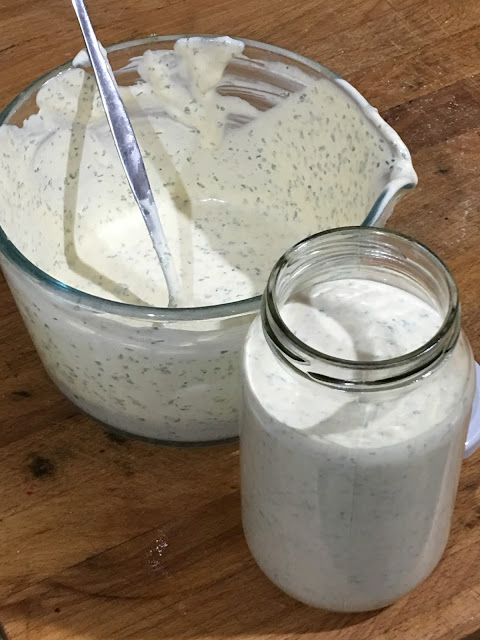
Homemade Ranch Dressing

Another preservative and additive free salad dressing!  I have made this several times for a special occasion but this time I actually made it to put in a pasta dish, Chicken and Bacon Ranch Casserole, that I had decided to make for dinner.  But to be perfectly honest it was a welcomed opportunity to make it again.

One jar, a few measuring spoons and this salad dressing is done.  Simple measure and shake.  Put in the fridge until required.  However it does not last as long as store brought Ranch Dressing so only make it when you need it.

You will be amazed with the taste of this Ranch Dressing - the texture, the fresh herbs and the clean flavours.


Homemade Ranch Dressing
(Recipe Adapted from Foodiecrush)

Makes: 1 cup approximately

6 tablespoons mayonnaise
4 tablespoons milk or buttermilk
4 tablespoons sour cream
2 teaspoon champagne or white wine vinegar
2 clove garlic, pressed or finely minced
2 tablespoon chopped chives
2 tablespoon Italian parsley, minced
2 teaspoon kosher salt
1 teaspoon freshly ground black pepper
1/2 teaspoon onion powder
Pinch of cayenne pepper

Mix all of the ingredients together in a small bowl. Add more milk for desired consistency.

Refrigerate until ready to serve.


(Click here for a printable version of this recipe).

Thursday, August 3, 2017

Homemade Ricotta

Nothing beats being self sufficient and making your own food. It's quite therapeutic if you are into that sort of thing. I love it. To me experimenting with food to make other food is quite like a hobby. One follows a recipe and other times one doesn't. I honestly believe that if you are enjoying yourself and the outcome is good well it's a win-win situation.

Recently Noel and I participated in a cheese and bread making course. It was an all day event hosted by Tamara from Boatshed Cheese down in Dromana, on our beautiful Mornington Peninsula.  Tamara runs a variety of cooking classes which are homely, comfortable and as there are only a small amount of participants per class they are very easy to follow and you have a opportunity to be hands-on during the classes.  If you can get in you should do yourself a favour and book a class.
 
Fresh ricotta is a magnificently easy and quick cheese to make as far as cheeses go - the longest part of the process is actually boiling the milk.  You will require to have a food grade thermometer to ensure temperature accuracy. Once the milk starts to reach heat the temperature moves fast.
 
What ever you do please do not buy fancy vinegar.  This recipe requires good old plain white vinegar so don't go all out there flavoured or imported vinegar. Cheap white vinegar is best because it has a high acidity level.  It's not added for flavor - it's added to simply acidify the milk and will do nothing to the actual taste of your cheese.


Homemade Ricotta

Makes: 1.5 kilograms approx.
 
10 litres cows milk (full cream or low fat) or goats milk
1 - 2 tablespoons salt
200 - 250 millilitres plain white vinegar


Heat the milk to 60 degrees Celsius over high heat, stirring constantly

When milk has reached 60 degrees Celsius add salt and stir well.

Continue stirring while heating until the milk reaches 90 degrees Celsius or 85 degrees Celsius is you are using goat milk.

As the milk edges past 9 degrees Celsius (or 85 degrees Celsius if using goats milk) add the vinegar and stir until flecks begin to appear on the surface.

Remove from the heat and continue stirring for a few seconds until the liquid turns a clear almost greenish tinge and the coagulated curds are clearly visible.

Allow to sit undisturbed for 5 minutes so that curds can rise to the surface.

Using a slotted spoon, scoop curds into ricotta baskets or cheese moulds or even a colander and drain over the sink for 30 minutes then transfer to a bowl or container and refrigerate until ready to use.

Store in an airtight container for up to 7 days in the refrigerator.


(Click here for a printable version of this recipe)

Wednesday, August 2, 2017

Thai Style Chicken Satay Skewers with Peanut Sauce

I have been cooking the same Satay Sauce since I was a kid... it's the same one my mam cooks.  It comes from a old Women's Weekly Cookbook titled Chinese Cooking Class Cookbook.  Many of you would have seen this cookbook whether it was when it was first published, then republished or more likely on the shelf at an Opportunity Shop.  However saying this I thought it was time to try a different Satay Sauce to accompany some chicken skewers. 
 
Have you ever google a recipe and been amazed by how many different results you get?  Makes me wonder how big Google is or then again how big the world really is! I think I could have read about Satay Sauce for days.  Instead of the Chinese style sauce this time I thought I would be adventurous and try a recipe from another style of cooking, Thai.  While both hubby and I enjoy eating Thai foods we rarely cook it at home for a reason I can not produce.  I guess it's a style that we just haven't really experimented with - yet!

The marinade should taste sweet, spicy, and salty. It doesn't have to be the spiciest but the stronger more vibrant flavours should be sweet and salty. If you need to adjust the taste add more sugar or more fish sauce to adjust the taste. However if you would want it to be spicier you also can add more chilli.

Now for the sauce.  No peanut butter in sight as this authentic recipe for Thai peanut sauce is made with real peanuts! This part of the meal was quick and easy to make.  While this sauce is meant to have be smooth, but if you prefer it with a bit of crunch when processing the nuts leave some smaller pieces to the side. Adding more fish sauce (or soy sauce) if not salty enough, or more cayenne if not spicy enough. If too salty, add a squeeze of fresh lime juice. If you'd prefer it sweeter, add a little more sugar.

Overall this wasn't one of the easiest recipes to make but well worth the effort.

 
Thai Style Chicken Satay Skewers with Satay Sauce
(Recipe adapted from The Spruce)
 
Serves: 6
 
1/4 cup minced lemongrass, fresh or frozen
2 shallots
4 cloves garlic
1 to 2 fresh red chillies, sliced
1 thumb-size piece galangal or ginger, thinly sliced
1/2 teaspoon turmeric
2 tablespoons ground coriander
2 teaspoons cumin
3 tablespoons dark soy sauce (available at Asian food stores)
3 tablespoons fish sauce
6 tablespoons brown sugar (you need all of this)
2 tablespoons vegetable oil
18 chicken tenderloins or 1 kilogram chicken breast fillets, sliced thinly
1 cup fresh-tasting dry roasted peanuts, unsalted
1/3 cup water
2 cloves garlic, minced
1/2 teaspoon dark soy sauce
2 teaspoons sesame oil
1 - 2 tablespoons brown sugar, to taste
2 - 2 1/2 tablespoons fish sauce
2 tablespoons lime juice
1/2 teaspoon cayenne pepper
1/3 cup coconut milk
18 wooden skewers

Make the marinade by placing the lemongrass, shallots, garlic, chiles, galangal or ginger, turmeric, coriander, cumin, soy sauce, fish sauce, brown sugar, and oil in a food processor or chopper. Process well.


Place chicken in a bowl and pour the marinade over. Stir well to combine. Cover and allow to marinating for at least 2 hours but overnight if time permits.


Soak skewers in hot water for 30 minutes.

Meanwhile place remaining ingredients in a blender or food processor. Blend or process until sauce is smooth. If you prefer a runnier peanut sauce, add a little more water or coconut milk.  Place in a bowl.
 
 
Thread chicken onto the skewers leaving a quarter of the skewer empty to act as a handle when grilling or frying.

Grill or fry the satay, basting the first time you turn it with a little of the leftover marinade from the bowl. Depending on how thin your meat is, the satay should be done in 10 to 20 minutes.

 
Place satay sauce in the microwave on high for 1 - 2 minutes or until warmed through.

Serve with Thai jasmine rice and Thai peanut sauce for dipping.
 
Note:  This sauce tends to thicken as it sits so just add a little water or coconut milk to thin it out, as needed. Otherwise, it stores well if kept covered in the refrigerator for up to 2 weeks or you can place in the freezer.

Tuesday, August 1, 2017

Tatws A Chig yn y Popty (Meat and Potatoes in the Oven)

Many of you know that I was actually born in Wales many moons ago.  Our journey to Australia was born from a dream my parents had for a better life for them and their family.  And like other family members before us they embarked on the epic long journey across the waters to start a new life long adventure.

While I have grown most of my life in Australia, I am very passionate with my cooking especially when cooking recipes from my heritage and my childhood.  Tatws A Chig yn y Popty, translated to Meat and Potatoes in the oven, is one of my naughty all time favourites. I say naughty as there really isn't a low calorie version of this recipe and nor should there be as it would really take away the tradition from this dish.

Unlike most roast meat dishes there is not a gravy as such to accompany this meal - more like a rich broth that has envelope all the flavours into a juice that tantalizes the mouth and comforts the belly.  As this roast is cooked low and slow the meat is very tender and practically falls away from the bone.  Traditionally this dish uses lamb shoulder or the lamb flaps (ribs) but I guess it would be just as nice with any cut of meat.

With the vegetables placed under the meat while cooking they too take on the flavour of the meat juices and are a combination of tender and crispy depending on their placement within the roasting dish.


Tatws A Chig yn y Popty (Meat and Potatoes in the Oven)

Serves: 6 - 8
 
2kg shoulder lamb
1/4 cup oil
salt
freshly ground black pepper
2 cups water
1 kilogram potatoes, peeled and halved
1 kilogram carrots, peeled and cut in to large chunks
brown onions, peeled and quartered
 

Preheat oven to 150 degrees Celsius.

Season lamb with oil, salt and freshly ground black pepper ensuring that the lamb is completely covered. 

Place the lamb in a roasting tin and add the water.

Cover with foil and roast for 1 hour.

Remove from oven and place the meat on a plate. Add the potatoes, carrots and onions to the baking dish, mixing to ensure all are covered with remaining juices.  Place the lamb on top of vegetables, cover with foil and cook for a further 1½ - 2 hours, or until meat is tender.

Remove foil and cook for a further 30 minutes at 200 degress Celsius to crisp up the lamb and the top of the vegetables.

Serve the lamb sliced, with the potatoes, carrots and onions accompanied with steamed vegetables and crusty bread to mop up the juices.

(Click here for a printable version of this recipe)