Monday, May 21, 2012

Slow-cooked Sticky Pork

This dish was very easy to make and was more than flavoursome.  In fact the pork was so tender almost melting in your mouth and the Oriental overtones tantalised the taste buds.

The overall spiciness from the sweet chilli sauce and ginger was evident but it was not too spicy, mind you saying this Alexandria thought it was too spicy for her.

Served with steamed bok choy and rice this mean was delicious and very filling.


Slow-cooked Sticky Pork
(recipe sourced from WW The Complete Meal)

Serves: 4
ProPoints per Serve: 8

2 tsp sesame oil
500 grams pork scotch fillet or neck, fat trimmed, cut into 3cm pieces
2 medium red onions, thinly sliced
3 medium carrots, thickly sliced
1 medium red capsicum, (cut into 3cm pieces)
1/4 cup soy sauce
2 cloves fresh garlic, sliced
1 tablespoon fresh ginger, grated
1/2 cup chicken stock
1/4 cup sweet chilli sauce
1/4 cup hoisin sauce
1 cup water

Heat oil in a large non-stick saucepan over medium-high heat. Add pork and cook, turning, for 5 minutes or until browned. Add onion and cook, stirring, for 5 minutes or until softened. Add carrot, capsicum, soy, garlic, ginger, stock, chilli sauce, hoisin sauce and water. Stir to combine. Bring to the boil.

 Reduce heat to low and simmer, covered, for 1 hour, stirring occasionally, uncovering for the last 30 minutes of cooking, or until pork is tender and sauce has thickened. Serve.

Serving suggestion: Serve with 0 ProPoints value steamed Asian greens such as gai lan (Chinese broccoli), choy sum or bok choy, plus steamed jasmine rice. Add 3 ProPoints values per serve for ½ cup rice.

(Click here for a printable version of this recipe)

Sunday, May 20, 2012

Bacon and Corn Polenta Muffins

Something quick to make and oh so very very tasty.  These will fit the bill for a lunchbox treat if you can manage to stop others from eating them when they come straight out of the oven.

The combination of the bacon and corn, always a wonderful combination on their own, partnered with cheese and polenta makes a satisfying flavour hit that are delicious whether they are served hot or cold.

Only 2ppts each but very morish - I could eat quite a few.  Freezable so you can control how many you have for lunch :)


Bacon and Corn Polenta Muffins
(recipe adapted from WW The Complete Meal)

Serves: 24
ProPoints per Serve: 2

cooking spray
1/2 cup (80 grams) yellow polenta
2/3 cups (160 mls) skim milk
80 grams Weight Watchers Bacon, finely chopped
4 green shallots, finely chopped
1 1/2 cups (220 grams) self raising flour
2 x 125 gram cans corn kernels, rinsed, drained
2 x 125 gram cans creamed corn
1/2 cup (60 grams) extra light grated tasty cheese
100 grams Weight Watchers Canola Spread, melted
2 eggs, lightly beaten

Preheat oven to 200 degrees Celsius.

Line two 12 hole mini muffin tins with paper cases.  Spray with cooking spray if needed.

Combine polenta and milk in a bowl.  Set aside for 15 minutes.

Meanwhile lightly spray a small non stick frying pan with cooking spray and heat over medium-high heat.  Cook bacon, stirring, for 2 minutes.  Add shallots and cook, stirring, for 2 minutes or until bacon is crisp.  Remove pan from heat.  Cool for 5 minutes.

Sift flour into a large bowl. Add corn kernels, creamed corn, cheese and bacon mixture and stir until combined.  Add spread, egg and polenta mixture and mix until combined.

Spoon 2 tablespoons of batter into each paper case.   Bake for 15 - 18 minutes or until cooked when tested with a skewer.  Cool muffins in tins for 5 minutes before turning out onto a wire rack.  Serve warm or cold.


Note: for a mini muffin this mixture can make 48 muffins by using small paper cases and 1 tablespoon of mixture per case - the ProPoints value per muffin would then be 1 ppts each.

Friday, May 18, 2012

Ham, Cheese, Tomato and Avocado Toastie

I rarely blog a breakfast or a lunch but I do realise that this blog cannot just be about mains, it does need to cover other meals that we cook and eat.

Coming home from work early due to Alex being sick all night (long story) I wanted to ensure that I made myself something for lunch that fit into the ProPoints plan and was quick.  I decided on a "toastie".. or as many know the dish - a toasted sandwich.

I love a good toastie.. and any filling normally hits the spot.  Today I went for something basic... a combination of ham, cheese, tomato and tomato and I really enjoyed it.


Ham Cheese Tomato and Avocado Toastie

Serves: 1
ProPoints per serve: 8


2 slices wholegrain bread
1/8 medium avocado, sliced thinly
1 small tomato sliced
30 grams sliced ham
1 slice reduced fat cheese slice
cooking spray

Preheat a sandwich press or similar.

Assemble sandwich on work area having a slice of bread, avocado slices, tomato slices, ham and cheese.  Top with second slice of bread.

Spray hot plates of sandwich press with cooking spray, add sandwich and close lid.

Cook until golden and cooked through.

(click here for a printable version of this recipe)

Tuesday, May 8, 2012

Spicy Beef, Vegetable and Rigatoni Bake

Needing another quick mid week meal and the kids wanting lasagne I decided that I would make a pasta bake.  One I didn't have to stand there layering the dish and two it was full of vegetables.

As with all pasta bakes, once all the ingredients are prepared it's just a matter of popping it in the oven and waiting for it to finish cooking itself.

This is quite spicy with the chilli flakes - should you wish to reduce the heat either reduce the amount of chilli flakes or omit completely.


Spicy Beef, Vegetable and Rigatoni Bake

Serves: 8
ProPoints per serve: 10

500 grams rigatoni or pasta of your choice
cooking spray
1 brown onion, chopped
2 cloves garlic,  crushed
2 teaspoons red chilli flakes
1 red capsicum, sliced
1 green capsicum, sliced
2 zucchini, chopped
125 gram corn kernels, drained
500 grams extra lean beef mince
2 cans 400g diced tomatoes
salt
freshly ground black pepper
1/4 cup fresh basil leaves
150 grams reduced fat grated tasty cheese

Preheat oven to 180 degrees Celsius.

Bring a large pan of salted water to boil, add pasta and cook as per instructions on packet until almost tender.  Drain and set aside.

Meanwhile, spray a large frying pan with cooking spray.  Heat on medium high heat.  Add onions, garlic and chilli, cook, stirring, for 5 minutes or until onions are tender.  Add capsicum and cook, stirring, for a further 5 minutes.  Add zucchini and corn, cooking for a further 2 - 3 minutes or until zucchini softens.  

Add beef, breaking up with wooden spoon, and cook until browned.  Add tomatoes and season to taste with salt and freshly ground.

Add meat sauce and basil to pasta, stir to combine.  

Coat a large baking dish with cooking spray.  Spread pasta mixture over dish.  Sprinkle with cheese.

Bake in oven for 25 minutes or until cheese is melted and golden. 


(Click here for a printable version of this recipe)

Monday, May 7, 2012

Hainanese Chicken

After a huge day at work, mentally more than physically, I really wanted to cook something with minimal effort but wanted something with maximum flavours.

This easy version of a Singapore specialty, similar to a soup, was magnificent. Tender poached chicken served with vegetables and rice in a fragrant broth was really what I wanted tonight.


Hainanese Chicken
(recipe sourced from WW Cook It Quick)

Serves: 4
ProPoints per serve: 8

2 cups chicken stock
1 whole star anise
1 cinnamon stick
2 tablespoons soy sauce
1 tablespoon shaoxing wine
1 cup boiling water
600 grams lean chicken breast fillets, fat trimmed
1 tablespoon peanut oil
3 green shallots, thinly sliced
1 cup bean sprouts
2 long fresh red chillies, deseeded, thinly sliced
3 baby bok choy, trimmed and separated
2 cups steamed rice

Combine stock, star anise, cinnamon, soy sauce, wine and 1 cup boiling water in a large saucepan.  Bring to the boil.  Reduce heat to low and simmer for 5 minutes.  Add chicken and simmer for 5 minutes. Remove from heat.  Cover and set aside for 10 minutes.  Remove chicken and thinly slice. Reserve stock.

Meanwhile, heat a wok or large frying pan over high heat.  Add half the oil and heat for 30 seconds.  Add shallots, bean sprouts and chilli.  Stir fry for 1 minute.  Transfer to a bowl.  Reheat wok over high heat.  Add remaining oil and heat for 30 seconds.  Add bok choy and stir fry for 2 minutes or until stems are tender and leaves have just wilted.

Divide rice among serving dishes.  Top with bok choy, chicken and bean sprout mixture.  Ladle over some stock.  Serve.

(Click here for a printable version of this recipe)

Sunday, May 6, 2012

Gambas ~ Garlic and Chorizo Prawns

Tapas is becoming very popular here in Melbourne especially in restaurants.  Tapas is a wide variety of smaller dishes, similar to appetizers, in Spanish cuisine.  Either hot or cold combinations of flavours plated up to make a full meal.

Called Gambas in Spanish, prawns team up with spicy sausage for this tapas-style dish was not only very tasty but  absolutely moreish.

After a busy day at the junior football this was an easy dinner dish, quick enough to prepare and sit down and enjoy while getting ready for the working week ahead.


Gambas ~ Garlic and Chorizo Prawns
(recipe adapted from Taste.com)

Serves: 4
ProPoints per serve: 7


  • 1 chorizo sausage (125 grams), thinly sliced
  • cooking spray
  • 3 garlic cloves, crushed
  • 500 grams raw tiger prawns, peeled
  • 1/4 cup chopped fresh coriander
  • 2 teaspoons dry sherry
  • lemon wedges, to serve

  • Heat a large non-stick frying pan over high heat. Add the chorizo and cook, stirring occasionally, for 4-5 minutes or until golden and crisp. Use a slotted spoon to transfer the chorizo to a plate lined with paper towel.  Wipe oil out of pan with paper towel.

  • Reduce heat to low. Spray the pan with cooking spray, add garlic to the pan and cook, stirring, for 1 minute or until aromatic. Add the prawns and cook, stirring occasionally, for 4-5 minutes or until the prawns curl and change colour. Add the chorizo, coriander and sherry to the pan and stir to combine.

  • Place on serving platter and serve with lemon wedges.


Saturday, May 5, 2012

"Quickie" Nachos

Back from a week away in Tasmania for work - entirely eating out for the whole time.  Saturday after shopping and football I thought I would make an early afternoon snack for the crew prior to cooking dinner. I called on a favourite of ours, "Quickie" Nachos!

These, while not traditional, are very easy to make and always a crowd pleaser - here is my quick version that never fails.

No sooner are the nachos out from under the grill they are gone - serve these with guacamole or sour cream but be quick especially in our house!!


"Quickie" Nachos

Serves: 8
ProPoints per serve: 4

cooking spray
175 grams Natural Corn Chips, Salted
375 grams tomato salsa
100 grams low fat grated tasty cheese

Preheat grill on high heat.

Spray a quiche dish or microwavable shallow dish with cooking spray.  Cover with half the corn chips.  Top with half the salsa.  Repeat layers finishing by sprinkling cheese over top of final layer of salsa.

Microwave on high heat for 2 - 3 minutes or until cheese starts to melt.

Place under grill for 2 - 3 minutes or until cheese is bubbling.

(Click here for a printable version of this recipe)

Thursday, April 26, 2012

Curried Chicken Pies

Although we had Indian during the week to celebrate Noel's birthday I had menu planned a quick and easy Curried Chicken Pie to ensure we ate at a normal time.

I have never used coconut milk powder before (which can be found in the Asian/International section of the supermarket near the tinned coconut milk).  Even though it was a curry pie the curry sauce was creamy like a asian style curry not an indian. The fact that there was no vegetable chopping to be done was an added bonus also.

This dish reminded me of a chicken curry my mam used to cook using curry powder and a can of Cream of Celery Condensed Soup.... it was delish and very comforting.  The crisp and crunchy filo pastry topped this pie off in a way that other pastry wouldn't.  To be honest I believe that any other thick pastry would not have had the same outcome on this dish.

For a dish that only has 9 ingredients it was not only very tasty, but it was so quick and easy. Result:  "You mean we cannot have seconds - please cook again?"


Curried Chicken Pies
(recipe adapted from Weight Watchers Cook It Quick)

Serves: 4
ProPoints per Serve: 10

cooking spray
1 tablespoon olive oil
600 grams chicken breast fillet strips
1 tablespoon curry powder
2 teaspoons cornflour
2 tablespoons coconut milk powder
1 cup chicken stock
2 cups (240 grams) frozen vegetable mix, thawed
6 sheets fresh filo pastry

Preheat oven to 200 degrees Celsius.

Lightly spray 4 x 1.5 cup ramekins or pie dishes.

Heat oil in a large non stick frying pan over medium-high heat.  Add chicken and cook, stirring, in batches, for 2 - 3 minutes or until browned.  Stir in curry powder and cook, stirring for a further 1 minute.  Combine cornflour, coconut milk powder and stock in a jug.  Add to pan and bring to the boil.  Reduce heat to medium and simmer for 3-4 minutes or until sauce thickens slightly.

Remove from heat.  Stir in vegetables.  Spoon mixture evenly into each ramekin or pie dish.

Cut filo pastry sheets in half.  Scrunch up 1 piece of filo at a time and place on top of chicken curry mixture, using 3 pieces of filo per serve.  Spray with cooking spray.

Bake in oven for 12 -15 minutes or until pastry is crisp and golden.  Serve.


(click here for a printable version of this recipe)

Wednesday, April 25, 2012

Pork, Mushroom and Sage Lasagne

My blogging has fallen victim to lack of time once again.  With school holiday recently occurring, a camping getaway which we as a family thoroughly enjoyed and then of course I have gone on a few road trips from work we seem to fall back into cooking quick and easy favourites, most that have already been blogged.

Today is Anzac Day so a mid week day off to remember the soldiers, past and present, their efforts fighting for world peace and their continuing protection of not only our country but many other countries.

Being home from work meant I could put a little more effort into preparing a Wednesday night meal.  I spotted a version of lasagne in a magazine recently, Women's Weekly Food for Friends, which I instantly knew I wanted to cook.  But also knew that it had to be modified to make it ProPoint friendly.

It took a little manipulating but it has been reduced to 14ppts per serve which is quite good for a rich lasagne. Strangely I didn't miss the tomato flavour of normal lasagne.  Infact this had such a unique flavour I am guessing not only from the sage but from the chorizo sausage as well.  The mushroom and white sauce mixture layered throughout the lasagne added moistness and creaminess.

I have to say like most lasagne this was quite fiddly getting all the elements sorted before putting all together but well worth it in the end.


Pork, Mushroom and Sage Lasagne
(recipe adapted from Women's Weekly Food for Friends)


Serves: 8
ProPoints per Serve: 14

cooking spray
1 small brown onion, diced finely
2 cloves garlic, crushed
1 Chorizo sausage (125grams), finely chopped
500 grams pork mince
500 grams veal mince
1/4 cup marsala
1 cup chicken stock
freshly ground black pepper
6 fresh lasagne sheets (Latina)
100 grams grated reduced fat tasty cheese
12 fresh sage leaves
mushroom mixture
cooking spray
1 small brown onion, diced finely
1 clove garlic, crushed
200 grams button mushrooms, finely sliced
1 tablespoon coarsely shredded fresh sage leaves
salt
freshly ground black pepper
white sauce
30 grams reduced fat butter or margarine
4 tablespoons plain flour
5 cups skim milk
1 teaspoon dijon mustard

Heat a large frying pan coated with cooking spray, add onion, garlic and chorizo,.  Cook, stirring, until onion softens.  Add minces, cook stirring until browned.  Add marsala and stock, bring to the boil.  Reduce heat, simmer, uncovered, until reduced by about a third.

Meanwhile make:

Mushroom mixture: Spray a medium saucepan with cooking spray, add onion and garlic, stirring, until onion softens.  Add mushrooms, cook stirring until mushrooms are browned.  Add sage, season to taste.  Remove from heat.

White Sauce: Melt butter in a non stick saucepan.  Add the flour, cook stirring, until mixture bubbles.  Gradually stir in the milk, cook stirring until mixture boils and thickens.  Stir through dijon mustard and simmer for 2 minutes.

Preheat oven to 180 degrees Celsius.

Spray a large ovenproof dish.

Mix 2 cups of white sauce with mushroom mixture.

Place 1/3 meat mixture in base of dish.  Top with 1/2 of the mushroom mixture.  Top with 2 sheets of lasagne. Repeat using another third of meat mixture and remaining mushroom mixture.  Top with 2 sheets of lasagne.  Spread remaining meat mixture and top with third layer of lasagne sheets.

Spread white sauce over lasagne sheets.  top with sage and sprinkle with cheese.

Bake, uncovered, about 40 minutes or until browned lightly.  Stand for 5 minutes before serving.


(Click here for a printable version of this recipe)

Saturday, April 7, 2012

Boston Baked Beans with Sausages

We recently spent some time camping with good friends of ours at Blue Pools, Briagolong State Forest.

While we were away though I did manage to capture some camp cooking.  I have to say cooking on on open fire in the middle of the bush is sometimes a challenge. The hardest thing was controlling the heat of the fire.. lol!!  So there was some improvising done.  Cooking on a stove top would have been a lot easier but probably not as much fun.

Saying this, cooking Boston Baked Beans with Sausages was interesting - but producing such a comforting meal made it all worthwhile.  I know the kids will want this again for breakfast when we return to civilisation.


Boston Baked Beans with Sausages

Serves: 8
ProPoints per serve: 5

cooking spray
600 grams extra lean beef chipolata sausages
2 brown onions, finely chopped
1 garlic clove, crushed
1 red capsicum, diced
1 tablespoon sweet paprika
1 tablespoon dried oregano
2 x 400 gram tins baked beans
2 x 400 gram tins diced tomatoes
salt
freshly ground black pepper

Spray a camp oven or heavy based saucepan with cooking spray.  Add sausages, onions and garlic and cook over a hot part of the fire (or high heat) until sausages are sealed and onions start to soften.  Add capsicum, paprika and oregano and cook for a further 2 minutes.

Stir in the beans and tomatoes.  Move to a cooler part of fire (or lower heat) and simmer for 10 minutes, stirring occasionally.  Season with salt and freshly ground black pepper.

Serve with toast if desired.


(click here for a printable version of this recipe)

Wednesday, April 4, 2012

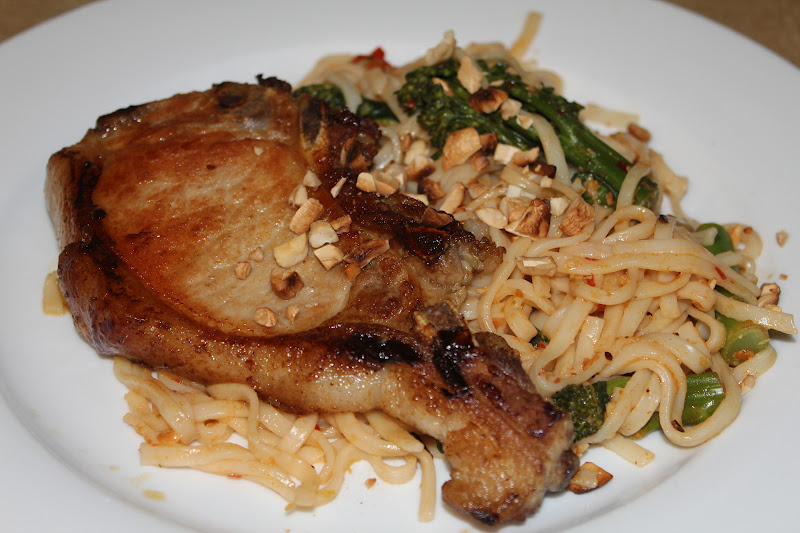
Pork with Chilli Lime Noodles and Cashews

For a quick and weasy mid week meal this dish was amazing.  The flavours were vibrant and the meal itself was very comforting.

Another meal with a Thai influence, although I change the recipe a little, it was delicious. The original dish was more like a noodle salad using pork fillet but having only pork cutlets at home the switch was acceptable.

The lime had a strong character while the chilli wasn't overpowering - a great combination topped with the crunchiness of the cashews.


Pork with Chilli Lime Noodles and Cashews 
(recipe adapted from Weight Watchers Australia)

 
Serves: 4
ProPoints per serve: 11

40 grams raw cashews, unsalted
4 x pork cutlets, 200 grams each, fat trimmed
1 1/2 tablespoon sesame oil
200 grams fresh egg noodles
1 medium fresh lime, rind finely grated, juiced
1 1/2 tablespoons soy sauce
2 teaspoons sambal oelek
1 bunch broccolini, cut into 5cm lengths

Preheat oven to 200 degrees Celsius.

Place cashews on a lined baking tray.  Roast in oven until slightly golden and toasted, approximately 5 - 7 minutes.  Remove and chop roughly.  Set aside.

Brush pork with ½ teaspoon of the sesame oil. Season with salt and pepper. Spray a large frying pan with cooking spray add pork and cook over high heat  for 2-3 minutes each side or until just cooked through. Transfer to a plate. Cover loosely with foil and set aside for 5 minutes to rest.

Meanwhile, bring a large saucepan of water to the boil. Cook the noodles according to packet instructions.  During the last 1-2 minutes of cooking add broccolini to the noodles and cook until bright green and tender.  Drain noodles and broccolini and return to pan.  Add the remaining oil, rind and juice, soy sauce and sambal oelek. Toss to combine. Taste and season with salt.

Divide noodles among serving bowls or plate, top with pork and sprinkle with cashews. Serve.

Monday, April 2, 2012

Lemongrass, Coconut and Chilli Mussels

We are home from camping for 3 days before returning for the Easter long weekend.  I love getting away and this weekend was no execption especially when with great friends.  It was relaxing sitting around the camp fire and cooking with the camp ovens etc.  But I do miss my kitchen!!

Walking through the supermarket to get supplies to last us the next few nights I spied mussels in the fish section of the deli... knew we had to have some as they are so easy to prepare and cook - definitely on the quick list also.

We have also been experimenting with Thai flavours so I thought I would try out another Thai inspired dish.  I don't normally use a lot of coconut milk in cooking but the combination of the milk, the lemongrass and the chilli was balanced and smooth.  Needless to say both Noel and I enjoyed.


Lemongrass, Coconut and Chilli Mussels

Serves: 4
ProPoints per serve: 8

1 kilogram mussels
1 teaspoon olive oil
2 lemongrass stalks, white only, finely chopped
6 kaffir lime leaves, finely sliced
4 red bullet chillies, finely sliced
2 cloves garlic, crushed
1 tablespoon fish sauce
1 tablespoon oyster sauce
1/4 cup white wine
1/2 bunch coriander, roughly chopped
375 ml Lite Coconut Milk
extra kaffir lime leaves, chilli and coriander for garnish

Rinse mussels and remove beards.  Disregard any open shlls that do not close when tapped on the bench.

Heat oil in a wok or a large pan.  Add lemongrass, lime, chilli and garlic.  Stir fry for 1 - 2 minutes until fragrant.  Add fish sauce, oyster sauce and wine.  Add mussels and coriander, toss to combine.  Cover with a lid and steam for 5 mins, stirring once.

Remove from heat and stir through coconut milk.  Return to heat and bring broth to a simmer.

Serve scattered with additional lime, chilli and coriander.  Crusty bread is also an optioanl extra.


Sunday, March 25, 2012

Szechuan Chilli Prawn Pizza

Loving Crust Gourmet Pizza at the moment but of course they are not the best thing for the waistline no matter how delicious they are.  So I decided to attempt making my version of one of my favourites, Szechuan Chilli Prawn Pizza.

We are no strangers to home made pizzas as you probably all know by now but we do love experimenting.  My take on this pizza was flavoursome and overall I was happy with the outcome.


Szechuan Chilli Prawn Pizza

Serves: 2
ProPoints per serve: 8

200 grams raw king prawns
1 teaspoon chilli flakes
1/2 teaspoon freshly ground black pepper
1 zucchini, thinly sliced lengthwise
1 lebanese bread, 100g
1 tablespoon tomato paste
1/2 red capsicum, sliced
8 cherry tomatoes, halved
8 button mushrooms, sliced 
2 shallots, sliced diagonally
4 baby bocconcini, quartered
1/4 cup sweet chilli sauce

Preheat oven to 180 degrees Celsius.

Rinse prawns and pat dry.  Mix together chilli flakes and pepper.  Sprinkle over prawns and toss to coat.  Set aside.

Preheat grill, place zucchini on a flat layer on a baking tray.  Grill until golden. Set aside.

Place lebanese bread on a pizza tray,  cover with tomato paste.  Layer zucchini, mushrooms and capsicum on base.  Top with prawns and bocconcini.  Sprinkle with shallots.

Bake in oven for 10 - 15 minutes until prawns are cooked through and cheese is melted.

Drizzle with sweet chilli sauce.


(Click here for a printable version of this recipe)

Thursday, March 22, 2012

Red Curry Beef and Vegetable Parcels

I was chasing something tasty for dinner and for some reason Thai keeps popping into my mind.  The kids didn't want a curry so I had to think about making something kid friendly as I really didn't want to cook two meals just to satisfy everyone's wishes.

Knowing I had my favourite Antoniou Fillo pastry in the fridge I set about cooking a parcel with red curry beef and vegetables enclosed.  Win - win... we all love filo parcels and I got to settle my craving for Thai food.

Easy to make as I used a premade red curry paste.  Lots of vegetables in the mix and a thick sauce ensured  that this parcel was filling, tasty yet delicate.  In fact the family were upset that I had only made 4!!


Red Curry Beef and Vegetable Parcels

Serves: 4
ProPoints per serve: 11

cooking spray
500 grams lean beef strips
1 onion, thinly sliced
3 medium carrots, cut into thin batons
1 red capsicum, thinly sliced
1 green capsicum, thinly sliced
1 bunch brocolini, trimmed and halved
3 tablespoons Thai Red Curry paste
1 x 375ml Carnation Light and Creamy Coconut Flavoured Evaporated Milk
1 tablespoon cornflour
1 tablespoon water
8 sheets Antoniou Fillo pastry

Preheat oven to 180 degrees Celsius.

Spray a large frying pan or wok with cooking spray.  Cook beef strips in batches until browned but not overcooked.  Remove from pan to a plate.  Repeat with remaining batches.

Respray pan and cook carrots and onions over medium for 3 - 5 minutes or until tender.  Add a little water to the pan to assist in cooking not burning.  Add capsicums and cook for a further 5 minutes.  Add broccolini and cook for a further 2 minutes.  Stir in the red curry paste and the evaporated milk ensuring all is combined.  Mix together the cornflour and water.  Add to pan and stir until slightly thickened.  Remove from heat and allow to cool.

Once mixture has cooled slightly drain of some of the sauce to keep for later.

Using one sheet of pastry at a time.  Lay one sheet on a bench or pastry board and spray with cooking spray.  Top with a second sheet of pastry.  Place one quarter of mixture towards one end of the pastry, fold ends over to enclose, spray edges with cooking spray and roll up to form a parcel.  Repeat with remaining pastry and mixture.

Place on a foil lined baking tray and spray all over with cooking spray.  Cook in oven for 20 - 25 minutes until golden and cooked through.

Warm remaining sauce and serve with parcels.

Tuesday, March 20, 2012

Pork with Caramalised Pear and Blue Cheese

Honestly I love blue cheese even though I know I shouldn't so the chance to serve it as a component of a dinner meal was too hard to resist especially as we had some Roquefort in the house.  I have refrained from eating it straight from the fridge so at least I had a little will power I guess.

Beurre Bosc pears are also becoming a favourite of mine especially when roasted. The soft buttery sweetness of roasted pears compliment pork beautifully.  These served pan fried pork and a simple green leaf salad scattered with crumbled blue cheese was a delicious and quick mid week dinner.


Pork with Caramalised Pear and Blue Cheese
(recipe adapted for www.Taste.com)

Serves: 4
ProPoints per serve: 10
cooking spray
4 Beurre Bosc pears, quartered
800 grams pork scotch fillet, sliced
green salad leaves
200 grams roquefort blue cheese or similar

Preheat oven to 180 degrees Celsius.

Line a baking tray with foil and spray with cooking spray.  Place pears on tray and spray with cooking spray.  Bake in oven for 20 - 25 minutes, turning once, until caramalized and tender.  Remove and keep warm.

Meanwhile spray a frying pan with cooking spray.  Cook pork steaks for 3 - 5 minutes on each side or until cooked to your liking.  Remove from heat and allow to rest for 5 minutes.

Divide salad pears and pork amongst serving plates and sprinkle with crumbled blue cheese. Drizzle pork with pan juices if desired.

(Click here for a printable version of this recipe)

Wednesday, March 14, 2012

Sweet and Spicy Fish

I purchased some beautiful looking gummy shark pieces last night and didn't want to do it an injustice by just crumbing and frying them.  I wanted something light but flavoursome yet not overpowering as to spoil the flavour of the fish itself.

I had spied a chicken recipe quite a while ago which I had kept in my mind for a rainy day but knew that the ingredients were exactly the flavours I was looking for to compliment the fish fillets.

Sweet from the honey and spicy from the subtle mix of mustard, coriander and chilli made for a wonderful flavour combination.  Not an overly heavy thick sauce either to smoother the meal rather a light jus which complimented and topped off the whole meal.

And another added bonus was the quickness in which this meal came together -  a  brilliant weeknight wonder with dinner on the table in around 30 minutes.


Sweet and Spicy Fish
(Recipe adapted from Woman's Weekly 70 Family Meals for Under $10)

Serves: 4
ProPoints per serve: 10

1 kilogram shark fillets or other firm fish fillet, cut into 8 equal size portions
1/4 cup fresh lime juice
 2 tablespoons honey
1 tablespoon soy sauce
1 tablespoon wholegrain mustard
1 tablespoon fresh coriander, chopped
1 individual spring onion, finely chopped
2 clove fresh garlic, crushed
1 fresh red chilli, deseeded and chopped finely
1/2 cup basmati Rice

 Preheat oven to 180 degrees Celsius.

Line an oven tray with baking paper and arrange flake on prepared tray.

In a jug combine lime juice, honey, soy sauce, mustard, coriander, spring onion, garlic and chilli.  Brush half over fish fillets.  Place in oven and bake for 10 minutes.

Meanwhile cook rice as per packet instructions, drain and keep warm.

Turn fish fillets and baste with remaining sauce mixture.  Bake for a further 10 minutes.

Serve on a bed of rice and steamed vegetables of choice.  Drizzle pan juices over fish and rice.


(click here for a printable version of this recipe)

Monday, March 5, 2012

Beef and Capsicum Enchiladas

It came to that moment where I knew I wanted Mexican influenced food for dinner tonight no matter what I had menu planned.  Needless to say the stirfry beef dish was tossed and helloooooo enchiladas!!

To be honest I haven't cooked much Mexican foods from scratch, I have mastered a pretty good salsa!  El Paso has always taken up residence in our pantry as it's a quick and easy take on such a flavoursome cuisine.  I have read many recipes  for enchiladas and couldn't find one that completely took my fancy so tonight's dinner was born from a combination of about 10 or so recipes.

This dish was awesome - full of flavour along with a hint of chilli leaving a tingle on the tastebuds.  Definitely filling, one enchilada was enough for me served with salad.


Beef and Capsicum Enchiladas

Serves: 8
ProPoints per serve: 7

cooking spray
2 medium red onions, finely diced
1 teaspoon crushed chilli
2 garlic cloves, crushed
2 teaspoons ground cumin
1 1/2 tablespoons dried oregano leaves
2 x 400 gram cans diced tomatoes
1 cup water
salt
freshly ground black pepper
500 grams beef strips
2 teaspoons sweet paprika
1 green capsicum, thinly sliced
1 red capsicum, thinly sliced
8 low fat tortillas
150 grams low fat grated tasty cheese
1 spring onion, finely sliced

Preheat oven to 180 degrees Celsius.

Spray a large frying pan with cooking spray and heat over medium.  Add onion, chilli and garlic.  Cook for 5 minutes or until onion is softened.  Add cumin, cook stirring for 1 minute. Add tomatoes, water and 1 tablespoon oregano, season with salt and pepper, bring to the boil.  Reduce heat and simmer for 15 minutes or until slightly thickened.

Spray a 10 cup casserole dish with cooking spray.  Spread 1 cup of sauce mixture over base of dish.

In a bowl combine beef, sweet paprika and remainer of oregano.  Spray another frying pan with cooking spray and cook beef in batches, quickly until browned.  Do not cook through.  Remove from heat. 

Respray pan with cooking spray and cook capsicums for 2 minutes, stirring, or until softened.  Remove from heat.

Cook tortillas in microwave for 1 minute.  Place tortillas on the bench.  Top with 1/8th of beef strips and 1/89th of capsicum mixture.  Top with 2 tablespoons of sauce mixture.  Roll up to enclose filling.  Place in casserole dish seam side down.

Top enchiladas with remaining sauce mixture and sprinkle with cheese.

Bake for 25 minutes or until golden and heated through.  Sprinkle with spring onion and serve with salad and sour cream (optional).


(click here for a printable version of this recipe)

Saturday, March 3, 2012

Apple Pork with Cashews

I came accross this recipe while drooling my way through Taste.com which is a cooking website I have to say I spend way to much time on.  But my time spent is always well worth it in my opinion!!

With an amazing combination of apple, soy and ginger the pork was cooked perfectly - still tender and succulent.    The sauce was amazing, a combination of apple and orange, neither overpowering the other.  I loved the crunchiness of the cashews which just finalised the dish.

Served with Braised Potatoes and steamed vegetables I was completely satisfied.


Apple Pork with Cashews
(recipe adapted from Taste.com)

Serves: 4
ProPoints per serve: 11

1/2 cup plain flour
salt
freshly ground black pepper
4 large pork cutlets, fat removed 
cooking spray
40 grams reduced fat butter
1 cup orange juice
1 tablespoon soy sauce
2 tablespoon brown sugar
1 teaspoon ground ginger
3 apples, sliced into rounds
1/2 cup raw cashews

Preheat oven to 180 degrees Celsius.

Place flour, salt and pepper into a plastic bag. Add cutlets, a few at a time, and toss until coated in flour. Shake off excess flour.

Heat oil and butter in a heavy-based flameproof casserole dish over high heat. Cook cutlets, in batches, for 3 minutes on each side or until golden. Remove to a plate.

Add juice, soy, sugar, ginger, salt and pepper to the dish. Bring to the boil, then remove from heat. Place cutlets into dish. Top casserole with apples and sprinkle with cashews. Cover.

Bake for 35 minutes. Remove lid and cook for 20 minutes.


(click here for a printable version of this recipe)

Friday, March 2, 2012

Braised Potatoes

Another different potato side dish - if you haven't guessed I am a little bored with mashed, baked, boiled or steamed potatoes at the moment... LOL!!

These are easy to make and cook and I think you will actually be surprised by the outcome.


Braised Potatoes

Serves: 8
ProPoints per serve: 3

cooking spray
8 medium potatoes, peeled
2 teaspoons chicken stock powder
2 cups water
salt
freshly ground black pepper
1 teaspoon ground paprika
2 tablespoons reduced fat butter

Preheat oven to 180 degrees Celsius.

Spray a shallow casserole dish with cooking spray.

Slice potatoes thinly and all the way through.  Keep slices together.  Place in casserole dishes keeping the potatoes in shape.

In a large jug mix together the chicken stock and water, seasoning with salt and pepper.  Pour over potatoes.  Sprinkle potatoes with paprika.  Cover casserole dish with foil and bake in oven for 40 minutes.

Remove foil, place dobs of butter on each potato.  Return to oven and bake for a further 15 - 20 minutes or until sauce is thickened a little and the potatoes are cooked through.


(click here for a printable version of this recipe)

Thursday, March 1, 2012

Slow Cooked Italian Beef with Pasta

~*~ HAPPY ST. DAVID'S DAY ~*~
~*~ HAPUS DYDD GWYL DEWI ~*~

No traditional Welsh food for this little Welsh Lass this year as I knew it was going to be another long day at work as I was spending the day in Kilmore - a good 2 hour drive each way from home so I decided to let our beloved slow cooker work it's magic.  And once again it did.

This recipe had such a lovely flavour starting with a herbed tomato base with a hint of spice.  Jam packed with vegetables and served simply with pasta there was definitely no complaints in the Murray house.


Slow Cooked Italian Beef with Pasta

Serves: 8
ProPoints per serve: 12

1 kilogram lean beef, cut into 3cm cubes
4 medium carrots, peeled and thickly sliced
2 medium green capsicum, large dice 
2 medium red capsicum, large dice
2 medium onion, large dice
1/4 cup dried oregano leaves
2 220 gram tins diced tomatoes 
1 tablespoon beef stock powder
2 cups hot water
1/4 cup(s) tomato paste
2 clove(s) fresh garlic, crushed
2 Tbsp ground sweet paprika
1 Tbsp brown sugar
salt
freshly ground black pepper
500 g pasta, tagliatelle
2 Tbsp arrowroot flour
1/4 cup water, extra

Place beef, carrots, capsicum and onions in slow cooker vessel.  Sprinkle with oregano leaves.  Pour diced tomatoes over meat and vegetables.

In a large jug or bowl combine together stock powder and water.  Mix well.  Add tomato paste, garlic, paprika and sugar.  Combine well.  Pour mixture over meat and vegetables in slow cooker vessel.  Season with salt and freshly ground black pepper.  Mix to combine.

Cook on low for 8 hours.

During the last hour of cooking mix together arrowroot and extra water to form a smooth paste.  Gently stir through casserole.

Cook pasta as per packet instructions, drain and keep warm.

Place pasta in serving bowls and serve with Slow Cooked Italian Beef.

Note: You could easily cook this in a large casserole dish in an oven.  Heat oven to 180 degrees and cook covered for 1½ hrs. Add arrowroot mixture and continue to cook for a further 30 minutes. Cook pasta as per packet directions and serve in individual bowls with the beef.

(Click here for a printable version of this recipe)