Our latest feast

Tuesday, March 12, 2013

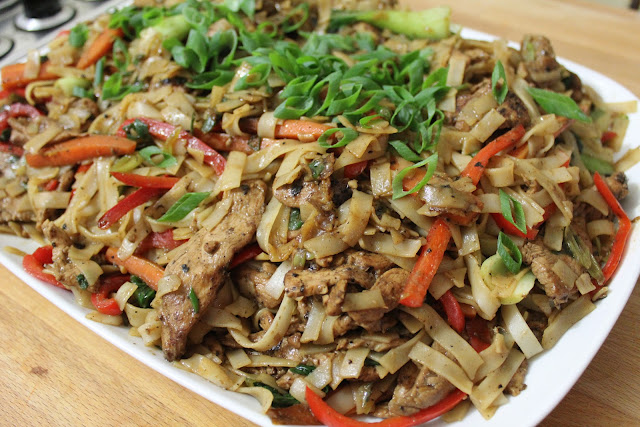
Sweet Chilli Chicken and Cashew Stir Fry

Noodles are always a big hit at our house especially when enveloped with a nice sauce and plenty of meat and vegetables.  They are also a great way to get the kids to eat their vegetables.

The sweet chilli flavour isn't over powering in this dish it is detectable as is the lime.  The cashews added an extra crunch and as always this dish was enjoyed by all.

Another quick mid week dinner that will tempt everyone's tastebuds....


Sweet Chilli Chicken and Cashew Stir Fry
(Recipe adapted from WW Family Favourites 2013 Cookbook)
 
Serves: 6
ProPoints per Serve: 9
 
500 grams lean chicken breast fillets, fat trimmed and thinly sliced
1/2 cup sweet chilli sauce
3 garlic cloves crushed
2 tablespoons lime juice
440 gram Wokka Thin Egg Noodles
1 tablespoon canola oil
4 green shallots, thinly sliced
1 red capsicum, sliced
200 green beans, diagonally sliced
175 gram broccolini, cut into 5cm lengths
2 tablespoons water
1/2 cup chopped fresh coriander leaves
1/2 cup unsalted roasted cashew nuts, chopped

Place chicken and combined sweet chilli sauce, garlic and lime juice in a glass or ceramic dish.  Toss to coat and allow to stand for 30 minutes.

Prepare noodles in a large bowl of hot water as per packet instructions. Drain and set aside.

Drain chicken reserving marinade.

Heat a wok over high heat.  Add half the oil and heat for 30 seconds.  Stir fry chicken mixture, in batches, for 1-2 minutes or until browned.  Transfer to a plate.  Wipe wok clean with paper towel.

Reheat wok over medium-high heat.  Add remaining oil and heat for 30 seconds. Add shallots, capsicum, beans, broccolini and water.  Stir fry for 2-3 minutes or until vegetables are tender.

Return chicken mixture to the wokong with reserved marinade and noodles.  Stir fry for 2 minutes or until heated through.

Serve sprinkled with coriander and cashews.


(Click here for a printable version of this recipe)

Monday, March 11, 2013

Easy Mango Chilli Prawn Salad

Relaxing on Labour Day, a public holiday here in Melbourne I decided to make a quick and easy lunch for Noel and myself - a prawn salad with a Mango Chilli Dressing.  Took no time at all really and made a nice change to the boring but healthy salads we had been eating.
 
The dressing of course, was store brought and not homemade but it is quite a flavoursome and diet friendly one produced by Coles.  Simply Less Mango Chilli Dressing is one of the new flavours in dressing that Coles have recently released.

 
Easy Mango Chilli Prawn Salad
 
Serves: 2
ProPoints per serve: 4
 
16 cooked king prawns, peeled
2 cups of mixed salad leaves
1/2 red capsicum, thinly sliced
1 lebanese cucumber, finely diced
1/2 red onion, finely sliced
1/2 bunch fresh coriander leaves
4 tablespoons Coles Simply Less Mango Chilli Dressing

Rinse prawns and pat dry with paper towel.
 
Divide the salad leaves amongst two serving plates or bowls.
 
Top with capsicum, cucumber and red onion.  Add prawns to each dish.  Sprinkle with the coriander leaves.

Drizzle 2 tablespoons of dressing over each salad and serve.
 

Wednesday, March 6, 2013

Chicken and Mushroom Baked Crepes

Tonight's dinner surprised me on two levels - firstly I didn't think my kids would eat savoury crepes and secondly I didn't think my husband would appreciate "pancakes" for dinner!  I was wrong on both counts and stand corrected.

In fact tonight is the first time ever I have cooked savoury crepes and the first time I have ever served pancakes as a main course.  This recipe was very tasty. 
 
The soft crepe enveloping the creamy chicken and mushroom filling was absolutely delightful and delicate.  Although the filling ingredients sound "plain" as such in fact the delicate thick creamy sauce was perfect - you could taste every element right down to the pinch of nutmeg. 

Needless to say nothing left......


Chicken and Mushrooms Baked Crepes
(Recipe sourced from WW Cook Hearty Cookbook)

Serves: 4
ProPoints per Serve: 12

cooking spray
1/2 brown onion, finely chopped
400 grams lean chicken breast fillet, fat trimmed, cut into 1 cm pieces
400 grams button mushrooms, sliced
2 tablespoons water
salt
freshly ground black pepper
2 tablespoons Weight Watchers Canola Spread
2 tablespoons plain flour
1/2 cup skim milk
1/2 cup chicken stock
pinch ground nutmeg
2 tablespoons fresh flat leaf parsley, chopped
8 French-style frozen crepes, just thawed
1/3 cup finely grated parmesan cheese
2 tablespoons finely chopped fresh chives

Preheat oven to 200 degrees Celsius or 180 degrees Celsius fan-forced.  Spray a 28cm x 20cm x 3cm ovenproof dish with cooking spray.
 
Lightly spray a large non-stick frying pan with cooking spray and heat over medium-high heat.  Add onion and cook, stirring, for 5 minutes or until softened.  Add chicken and cook, stirring, for 5 minutes or until browned.  Add mushrooms and 2 tablespoons water and cook, stirring, for 2 minutes or until mushrooms have softened.
 
Heat spread in a saucepan over medium heat.  Add flour and cook, stirring, for 1 minute. Combine milk, stock and nutmeg in a jug.  Gradually add milk mixture to the folour mixture and stir until  smooth.  Bring to the boil.  Reduce heat to low and simmer, uncovered, for 2 - 3 minutes or until sauce has thickened.  Stir in chicken mixture and parsley.
 
Reserve 1/2 cup of the chicken mixture.  Lay crepes on a flat work surface.  Divide remaining chicken mixture among crepes and spread evenly along 1 edge.  Roll crepes to enclose filling and place, seam side down, in prepared dish.  Spoon reserved filling along centre of crepes.  Sprinkle with parmesan cheese and bake for 10 minutes or until cheese is melted.
 
Served sprinkled with chives. 
 

Tuesday, March 5, 2013

Ham, Zucchini and Caramelised Onion Lasagne

As intriguing as this dish sounds was exactly how it tasted.  My tastebuds were intrigued with every mouthful and every mouthful was enjoyed. I have tried so many lasagne recipes but this one really surprised me. For a different lasagne you should really give this a go.

The flavours were amazing yet so different.  The sweetness of the carmalised onion complemented the chargrilled zucchini perfectly. In fact I would have never thought of this flavour combination. 

There is no thick Bechamel Sauce with this dish either but to be honest it doesn't need it.  It has a fresh flavour and is nice and light for either lunch or dinner.


Ham, Zucchini and Caramelised Onion Lasagne
(Recipe adapted from WW 1 Recipe 3 Ways Cookbook)
 
Serves: 8
ProPoints per serve: 8
 
cooking spray
1 tablespoon olive oil
6 brown onions, thinly slice
1 tablespoon brown sugar
1 tablespoon balsamic vinegar
1 kilogram small zucchini, thinly sliced lengthways
2 2/3 cups (660ml) tomato pasta sauce
2 tablespoons dried oregano
6 x 47 gram fresh lasange sheets
300 grams shaved ham, fat trimmed and chopped
1 1/2 cups Bega So Extra Light grated Tasty Cheese
4 tablespoons finely grated parmesan cheese

Preheat oven to 200 degrees Celsius or 180 degrees Celsius fan-forced.  Lightly spray a large lasagne or baking dish with cooking spray.

Heat oil in a large non-stick frying pan over medium heat.  Add onion and cook, stirring occasionally, for 15 minutes or until golden.  Add sugar and vinegar and cook, stirring, for 3 - 4 minutes or until sugar has dissolved and onions have caramelised.  Transfer to a bowl.  Cool.

Meanwhile, preheat a chargrill or barbecue over high heat.  Lightly spray zucchini with cooking spray.  Cook zucchini in batches for 1 minute each side or until charred and tender.  Transfer to a plate.

Spread 2/3 cup pasta sauce over base of prepared dish.  Top with 1 layer (2 sheets) of lasagne, cutting sheets to fit. Top with half the zucchini, caramelised onion and ham.  Top with 2/3 cup pasta sauce.  Sprinkle over 1 tablespoon of oregano.  Top with another layer of lasagne sheets.  Repeat layer of zucchini, onion, ham, pasta sauce and oregano.  Finsh layering with the remaining sheets and sauce.  Sprinkle with combined cheeses.

Bake for 30 - 35 minutes or until pasta is tender and top is golden. 

Serve with a ProPoint free salad.


(Click here for a printable version of this recipe)

Beef and Bacon Casserole with Cheese Dumplings

The one great thing about comfort food is that there is no season when you must eat it... comfort food is definitely a year round happening.  This dish is certainly in the comfort food category.

Beef and Bacon Casserole, a  thick tomato gravy laced with tender beef chunks, bacon pieces and vegetables is nice by itself but topped with a couple of fluffy cheese dumplings it was perfect.  The hint of thyme perfectly complimented the mix.

Best of all this recipe was easy to prepare which made it easy to fit into the mid week rush especially as I cheated by putting the casserole in the slow cooker (although the recipe cooks in the oven) and was ready not long after getting home from football training with only the dumplings to prepare.


Beef and Bacon Casserole with Cheese Dumplings
(Recipe sourced from WW Food You'll Love Cookbook)
Serves: 4
ProPoints per serve: 11
cooking spray
125 grams Weight Watchers Bacon, chopped
1 brown onion, finely chopped
2 garlic cloves, crushed
600 grams lean blade steak, fat trimmed cut into 3cm pieces
2 tablespoons plain flour
1/3 cup dry red wine
1 1/2 cups beef stock
400 gram can diced tomatoes
2 carrots, chopped
1 celery stick, chopped
1 tablespoon fresh thyme leaves
200 grams button mushrooms, halved
salt
freshly ground black pepper
1 cup self raising flour
1 tablespoon Weight Watchers Canola Spread
1/4 cup finely grated Parmesan cheese
1/3 cup reduced fat milk

Preheat oven to 160 degrees Celsius or 140 degrees Celsius fan forced. 

Lightly spray a large 1.5 litre (6 cup) flameproof casserole dish with cooking spray and heat over medium-high heat.  Add bacon and onion and cook, stirring, for 5 minutes or until onion has softened.  Add garlic and cook for 1 minute.  Transfer to a bowl.

Lightly spray the same dish with cooking spray and heat over high heat.  Cook beef, in batches, turning, for 5 minutes or until browned.  Return beef and bacon mixture to the pan.  Add plain flour and cook, stirring, for 1 minute.  Gradually stir in the wine and bring to the boil.  Add stock, tomatoes, carrot, celery and thyme. Cover and bring to the boil.  Transfer dish to oven and bake for 1 hour.  Add mushrooms and bake for 30 minutes.  Season with salt and freshly ground black pepper.

Meanwhile, place self raising flour and spread in a large bowl.  Using fingertips, rub spread into flour until mixture resembles breadcrumbs.  Stir in Parmesan.  Make a well in centre of flour mixture and stir in enough milk to create a soft, sticky dough.

Remove dish from oven.  Increase oven to 200 degrees Celsius or 180 degrees Celsius fan forced.  Using floured hands, roll dough into 8 dumplings about the size of a walnut. Arrange dumplings, about 3 cm apart, on top of beef mixture and lightly spray with oil.  Bake, uncovered, for 15 minutes or until dumplings are lightly browned and cooked through.


Note:  I mentioned that I cooked the casserole component in the slow cooker (I love my slow cooker).  Cooked on low for 8 hours after the second step.  Transfer to an oven proof dish when ready to cook dumplings in the oven.

(click here for a printable version of this recipe)

Monday, March 4, 2013

Gnocchi Bolognaise

Bolognaise has to be one of the most versatile sauces not to mention a comfort food.  This version is quite a basic recipe but there was no shortage on taste.  In fact the flavour was very surprising.

Packets of ready made potato gnocchi are available in the chiller section of most supermarkets so that takes the time and effort out of making homemade gnocchi making this dish brilliant for a mid week dinner.


Gnocchi Bolognaise
(Recipe sourced from WW Take Away At Home Cookbook)
 
Serves: 4
ProPoints per serve: 11
 
1 tablespoon olive oil
1 celery stick, finely chopped
1 carrot, finely chopped
1 brown onion, finely chopped
2 garlic cloves, crushed
250 grams lean beef mince
250 grams lean pork mince
3 vine-ripened tomatoes, chopped
500 gram jar tomato and basil pasta sauce
1/4 cup fresh basil leaves, plus extra to garnish
salt
freshly ground black pepper
700 grams 98% fat-free fresh potato gnocchi
2 tablespoons finely grated parmesan cheese

Heat oil in a large saucepan over high heat.  Add celery onion and garlic and cook, stirring, for 5 minutes or until softened.  Add mince and cook, breaking up any lumps, for 10 minutes or until browned.

Add tomatoes and pasta sauce and bring to the boil.  Reduce heat and simmer, uncovered for 15 minutes or until sauce thickens.  Stir in the basil.  Add a little water if the sauce seems too thick.

Meanwhile cook gnocchi in a large saucepan of boiling salted water, following packet directions or until just tender.  Drain.  Stir gnocchi through sauce. 

Serve sprinkled with parmesan and extra basil.


(click here for a printable version of this recipe)

Five Spice Chicken with Noodles

Chinese Five Spice is definitely an interesting flavouring used often in Asian recipes.  Some people like it others don't.  Thankfully we do and all really enjoyed this easy noodle dish for dinner.

The chicken is marinated for several hours which allows the flavours to develop.  With this taken care of early it's only a matter of preparing the vegetables, noodles and actually cooking the dish.

The flavour itself was somewhat sweet and salty combined with the underlying incredible flavour that Chinese Five Spice provides. Chinese Five Spice powder is a ground spice blend of cinnamn, star anise, cloves, fennel seeds and pepper.  Needless to say it definitely tantalised the tastebuds while eating this noodle dish.


Five Spice Chicken with Noodles
(Recipe Sourced from WW The Complete Kitchen Cookbook)
 
Serves: 4
ProPoints per serve: 10
 
2 tablespoons kecap manis (sweet soy sauce)
2 tablespoons soy sauce
2 teaspoons cornflour
1 teaspoon Chinese Five Spice powder
1 teaspoon finely grated fresh ginger
1 garlic clove, cruushed
600 grams lean chicken breast fillets, fat trimmed, thinly sliced
200 grams rice stick noodles
1 tablespoon canola oil
1 carrot, cut into matchsticks
1 red capsicum, thinly sliced
2 green shallots, thinly sliced
1 bunch baby bok choy, cut into 5cm lengths

Combine kecap manis, soy sauce, cornflour, five spice, ginger and garlic in a large glass or ceramic bowl.  Add chicken and turn to coat.  Cover and refrigerate for 3 hours.

Prepare noodles following packet instructions or until just tender.  Drain.  Using scissors, cut noodles into 5cm lengths.

Drain chicken, reserving marinade.  Heat a wok over high heat.  Add half the oil and heat for 5 seconds.  Stir fry chicken, in batches, for 5 minutes or until browned.  Transfer to a bowl.  Reheat wok over high heat.  Add remaining oil and heat for 5 seconds.  Stir fry carrot and capsicum for 2 minutes or until just softened.  Add 3/4 shallots and bok choy and stir fry for 3 - 4 minutes or until vegetables are tender.

Return chicken to wok with noodles and reserved marinade.  Stir fry until heated through.

Serve sprinkled with remaining shallots as garnish.


(click here for a printable version of this recipe)

Lemon and Saffron Chicken

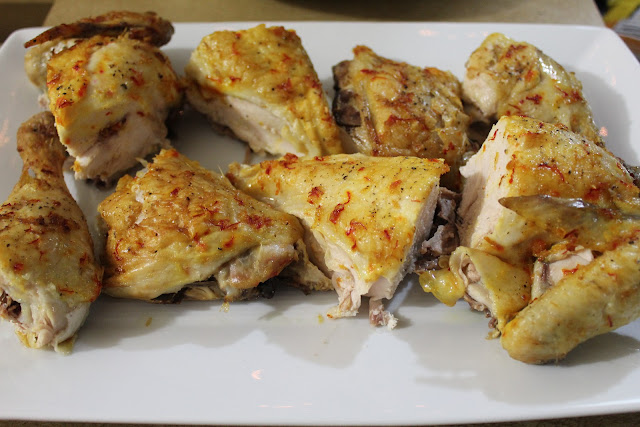
I don't cook Roast Chicken very often.  Why?  I really don't know.  I guess using the same stuffing and roasting is just boring.  Plus I have always associated Roast Chicken as being a "fatty" roast.  But when I saw this recipe I knew that we had to put in on the menu for dinner.  The kids thoroughly enjoyed it and to be honest they are still talking about it. 
 
A very easy roast chicken to prepare and cook.  The flavours were noticable but not overpowering and it was easy on the eye also.  The sauce, unlike a normal thick fatty gravy was zesty and complemented the chicken perfectly.
 
A little high ProPoint wise but served with steamed ProPoint free vegetables it was definitely a perfect Sunday roast.
 

Lemon and Saffron Chicken
(recipe adapted from WW 1 Recipe 3 Ways Cookbook)
 
Serves: 4
ProPoints per Serve: 13
 
cooking spray
1.4kg whole chicken
1/4 teaspoon saffron threads
2 teaspooons finely grated lemon rind
1 teaspoon sea salt flakes
2 teaspoons olive oil
freshly ground black pepper
500 grams chat (baby) potatoes
4 carrots, peeled and sliced
1/2 cup frozen peas 
1/2 cup frozen corn kernels
1 cup verjuice
3 teaspoons cornflour

Preaheat oven to 180 degrees Celsius or 160 degrees Celsius fan forced.

Lightly spray a large flameproof baking dish with cooking spray. 

Using kitchen scissors, cut along each side of the chicken's backbone.  Remove and discard backbone.  Place chicken, breast-side up, in prepared dish.  Using the heel of your hand, press firmly on breastbone to flatten chicken.  Trim and discard excess fat around neck and legs.

Combine saffron, rind, sea alt and oil in a small bowl.  Set aside for 5 minutes.  Rub saffron mixture all over chicken.  Season with freshly ground black pepper.  Bake for 1 hour 10 minutes or until skin is crisp and chicken is cooked through.  (The chicken is ooked if juices run clear when thigh is pierced with a skewer.) Transfer to a plate.  Cover chicken with foil and set aside to rest for 10 minutes before cutting into portions.

Meanwhile, boil, steam or microwave potatoes until tender.  Cook carrots and peas seperately, drain.

Whisk 1/4 cup verjuice and cornflour in a jug.  Drain and discard fat from baking dish.  Place dish over medium heat and add cornflour mixture and remaining verjuce.  Cook stirring for 2 - 3 minutes or until sauce has thickened.

Serve chicken with sauce and vegetables.


(click here for a printable version of this recipe)


Balsamic and Garlic Lamb Cutlets

I am definitely playing catch up once again with blogging.  Please forgive me for my lack of recipe sharing it saddens me but aat this point in time it has been totally unavoidable with our life just being so full on and I have to say I do not have much idle time anymore.  Many of you know that my work load has increased, I have been travelling with work, we had a well earned family camping trip and are planning one for the Easter break not to mention school (Miss 11 started high school this year) and football season is starting up again with training currently 3 nights per week.

BUT..... Life is so busy but not busy enough to not cook good food!!
I do hope you enjoy what we have been cooking.....

Lamb cutlets are always devoured at the House of Murray - to be honest they are inhaled by everyone rather than chewed delicately but at least they are always enjoyed.

We always tend to marinate our lamb cutlets as its a meat that is complimented by many flavours.  Tonight we tried something new by using balsamic vinegar where we usually would use red wine as a marinade base. I have to say I have used balsamic vinegar before in one of my favourite meals, Chicken with Balsamic Glaze and a few steak recipes so tonight was a new experience.

A very nice experience I have to admit.  The combination of the balsamic vinegar, fresh garlic and oregano made a delicate yet noticeable in taste.

Please note:  I actually doubled the recipe as we had visitors for dinner.


Balsamic and Garlic Lamb Cutlets
(recipe adapted from WW 1 Recipe 3 Ways Cookbook)

Serves: 4
ProPoints per Serve: 8

2 tablespoons balsamic vinegar
2 garlic cloves, crushed
1 tablespoon dried oregano
1 tablespoon olive oil
salt
freshly ground black pepper
8 x 50 gram French lamb cutlets, fat trimmed
cooking spray
500 grams chat (baby) potatoes, halved
200 grams baby spinach leaves
2 truss tomatoes, chopped
1 small red onion, finely sliced
1 tablespoon white wine vinegar

Combine vinegar, garlic, oregano and half the oil in a large glass or ceramic bowl.   Add lamb and turn to coat.  Cover and refrigerate for 3 hours.
Preheat oven to 200 degrees Celsius.
Place potatoes on a prepared cooking tray.  Spray with cooking spray.  Cook in oven for 40 - 45 minutes or until crisp and golden.
Preheat a chargrill or barbecue over medium high heat.  Lightly spray both sides of lamb with oil.  Cook for 3 - 4 minutes each side or until cooked to your liking.
Meanwhile place spinach leaves on a plate, top with tomatoes and scatter over onion.  Whisk white wine vinegar and reamining oil in a small jub.  Drizzle over salad.  Serve lamb with potatoes and salad.


(click here for a printable version of this recipe)