Our latest feast

Tuesday, September 28, 2010

Chicken Pomodoro Parcels

This is a recipe that I knew I was going to cook - you know the recipe that from the minute you turn the page of the cookbook and look at the picture you have been tempted.

Not only do we love using filo pastry but the combination of ingredients to make the parcel filling was enticing, of course it was it has spinach!

This was an easy meal to make and with very few ingredients to the outcome was amazing not to mention that they are quite filling.


Chicken Pomodoro Parcels
(recipe adapted from Symply Too Good To Be True #6)

Serves: 4
Points per serve: 5.5

2 x 240 gram skinless chicken breast fillets
1 cup baby spinach leaves
6 x 97% fat-free cheese slices
100 grams 97% reduced fact semi sundried tomatoes
8 sheets filo pastry
cooking spray
1 teaspoon sesame seeds (optional)

Preheat oven to 180 degrees Celsius.

Flatten each chicken breast until double in size. Spread spinach leaves over each breast evenly. Cut each cheese slice in half then lay 6 halves along the centre of each chicken breast. Arrange tomatoes over the top of the cheese. Carefully lift widest edge of the chicken breast over the filling tightly making sure filling is secure inside the chicken breast roll. Cut each breast in half to give 4 seperate rolls.

Lay 1 sheet of filo on the bench with the narrow side facing you. Spray with cooking spray then place a second sheet of filo on top. Re-spray top with cooking spray then place 1 chicken roll on the pastry about a quarter of the way down the sheet, then roll the pastry over the top of the chicken so it is just covered. Fold the left and right side of the pastry over the chicken breast and spray with cooking spray. Continue rolling to form a parcel. Repeat to make 3 more parcels. Spray tops of each parcel with cooking spary and sprinkle with sesame seeds if using.

Place onto a large lined baking tray and bake for 30 minutes.


(click here for a printable version of this recipe)

Sunday, September 26, 2010

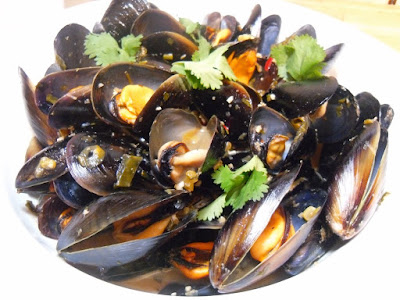
Red Curry Mussels

I find it funny when the foods that you have turned your nose up to in the past now become one of your favourites and that's exactly what is happening with me and mussels! Until a few months ago I wouldn't dream of eating one and now I am cooking them when the opportunity arises.

Today we had a kilogram of mussels which we brought from Springvale on yesterday's shopping trip amongst other wonderful items of seafood for last night's feast - a seafood platter for our wedding anniversary.

The vibrant flavours of last night's seafood platter meant I needed to make a dish today that was full of flavour.... red curry was the first thing that popped into mind. So red curry it was.....


Red Curry Mussels


Serves: 4
Points per serve: 4

1 kilogram fresh mussels
cooking spray
3 tablespoon red curry paste
1 tablespoon fish sauce
1/2 cup white wine
3 karffir lime leaves
juice of half a lime
1/2 cup chopped fresh coriander
1/2 cup coconut flavoured light evaporated milk
additional coriander for garnish
1/2 lime cut into wedges for garnish

Wash and debeard mussels - discarging any that are open or those that when tapped on a bench do not close.

Spray a wok or a large frying pan with cooking spray. Heat over medium heat and add red curry paste. Gently stirfry for 3 - 5 minutes or until heated through and fragrant. Add fish sauce, wine, lime leaves and lime juice. Bring to the boil, stirring constantly.

Add mussels and toss to combine in sauce. Add lime juice and cover with a lid steaming mussels for 5 minutes.

Remove lid and add coriander and evaporated milk. Stir to combine. Bring to the boil and remove from heat.

Using tongs or a slotted spoon place mussels in a large serving bowl. Cover with juice in pan. Sprinkle with additonal coriander and garnish with lime wedges.

(click here for a printable version of this recipe)

Spicy Lamb Flat Bread Pizza

Homemade pizzas are always a hit at our place especially when we make one that we haven't had before it's always a treat.

When I read this recipe on Taste.com I knew we would all enjoy the taste and the fact that once again this was another easy recipe was a bonus.

I was a little concerned that this pizza didn't actually have cheese but to be perfectly honest it was not missed at all.


Spicy Lamb Flat Bread Pizza
(recipe adapted from Good Taste Magazine - July 2009)

Serves: 4
Points per serve: 5


cooking spray
1 red onion, halved, thinly sliced
1 red capsicum, halved, deseeded, thinly sliced
300g lean lamb mince
1 tsp ground cumin
1 tsp ground paprika
1 tsp ground coriander
2 tbs currants
2 tbs chopped fresh continental parsley
2 tablespoons tomato paste
2 pieces wholemeal Lebanese bread
130g (1/2 cup) low-fat natural yoghurt
addtional parsely to garnish


Preheat oven to 220°C.

Heat a large non-stick frying pan over medium heat. Spray with cooking spray. Add the onion and capsicum. Cook, stirring occasionally, for 4-5 minutes or until soft. Increase heat to high and add the mince. Cook, stirring with a wooden spoon to break up any lumps, for 4-5 minutes or until the mince changes colour. Add the cumin, paprika and coriander. Cook, stirring, for 1-2 minutes or until aromatic. Remove from heat. Stir in the currants and parsley.

Coat 2 pizza trays with cooking spray and place a lebanese bread on each one. Spread each lebanese bread with tomato paste and divide mince mixture between both breads.

Bake for 8-10 minutes or until bases are crisp.

Cut each pizza into quarters. Serve with the yoghurt and additional parsley if desired.

(click here for a printable version of this recipe)

Wednesday, September 22, 2010

Springtime Lamb Casserole

I cannot take credit for being the first in my family to cook this as it's actually a recipe that my mam used to make when I was younger. I do however take credit for borrowing the cookbook containing the recipe and for some reason never giving it back!! As a child that has had a long battle with my weight my mam was very supportive when it came to helping me to lose weight. She purchased the Australia Women's Weekly Best Ever Slimmers Recipes Cookbook, along with others, in a bid to help me on my journey and I must say it's one of those cookbooks that we have actually cooked many meals from.

This casserole is very simple to make but has a full bodied flavour. It makes a wonderful mid week dinner no matter what season it is.


Springtime Lamb Casserole
(Recipe adapted from Australia Women's Weekly Best Ever Slimmers Recipes Cookbook)

Serves: 6
Points per serve: 6

900 grams lean lamb, cut into large dice
1 1/2 tablespoons paprika
900 grams potatoes, peeled and quartered
4 large carrots, peeled and thickly sliced
1 large red capsicum, large dice
1 large green capsicum, large dice
1 x 35g packet Spring Vegetable Soup (I used Continental)
1 cup dry white wine
3 cups water
2 cloves garlic, crushed
2 tablespoons chopped fresh parsley
pinch salt
freshly ground black pepper
2 tablespoons cornflour
1/4 cup water, extra
Preheat oven to 180 degrees Celsius.

Place diced lamb and paprika in a bag, seal and shake until all meat is coated in the paprika.

In a large casserole dish place lamb, potatoes, carrots and capsicum.

Combine dry soup with wine, water, garlic and parsley. Pour over lamb and vegetables.

Cover and cook for about 1 hour or until lamb and vegetables are tender.

Blend cornflour with extra water, add to lamb mixture ensuring well mixed through. Return to the oven for 15 - 20 minutes or until mixture boils and thickens.


(click here for a printable version of this recipe)

Tuesday, September 21, 2010

Crunchy Nut Chicken

This is such a simple yet wonderfully tasting way to crumb chicken. Not only is it a crunchy topping but it is loved by everyone in our house. The kids love it as it tastes like the cereal, Crunchy Nut Cornflake made by Kellogs, which they have in the morning - I like it because it tastes nice and is once again a recipe that falls under a few of my favourite categories - quick, easy, and weeknight wonder

This meal can be served with a salad or like we have done with roasted cherry tomatoes and Cauliflower Au Gratin (Cauliflower Cheese). But in my opinion although this is such an easy recipe I am sure that if served at a dinner party it would definitelymake an impression on your dinner guests.


Crunchy Nut Chicken
(Recipe adapted from Symply To Good To Be True # 2)

Serves: 4
ProPoints per serve: 9
Points per serve: 4.5


4 x 125 gram chicken breasts, skin removed
2 cups cornflakes
1/3 cup macadamia nuts, finely chopped
1/2 teaspoon chicken stock powder
1 egg
1/4 cup skim milk
cooking spray
Preheat oven to 180 degrees Celsius.

Place each chicken fillet between baking paper and using a meat mallet flatten chicken breast until an even thickness.

Place cornflakes in a plastic bag and using a rolling pin crush finely. Add nuts and stock powder into the bag and shake to combine. Pour out onto a plate.

In a bowl mix together egg and milk until well combined.

Dip flattened breats in egg mixture and then coat in the crumb mixture.

Place on a baking tray that has been lined and coated with cooking spray. Coat the chicken fillets with cooking spary and bake for 25 - 30 minutes or until cooked and coating is golden.

(click here for a printable version of this recipe)

Sunday, September 19, 2010

Puff Dogs

Both of my children love a frozen product called Puff Dogs. Now while they are easy to cook as they are ready to cook but I have to say I don't see the facination as they taste terrible. This of course has led me to do what I love doing the most.... trying to make them myself!!

With that in mind, I set myself the hard task of wrapping puff pastry around skinless cocktail frankfurts! Not hard at all..... in fact a task that is very basic and surprisingly they work out cheaper to make than purchase!

Alex helped out today and I should be totally honest she took the reigns and these are her Puff Dogs!!

Puff Dogs

Serves: 18
Points per serve: 2


2 sheets Pampas Reduced Fat Puff Pastry
18 skinless cocktail frankfurts
1 tablespoon skim milk

Preheat oven to 200 degrees Celsius.

Allow pastry to defrost. Cut each sheet into 9 even squares.

Roll pastry square around cocktail frankfurt.

Place on baking tray lined with baking paper.

Brush with milk and cook for 20 - 25 minutes or until pastry is golden.

(click here for a printable version of this recipe)

But what did the kids think????


Spinach, Thyme and Parmesan Muffins

I love trying new recipes especially when they are recommended by a fellow Weight Watcher on our Food Forum on the Weight Watchers website. And with not much planned this afternoon the temptation of baking had already entered my head.

I am not a sweet tooth so when I saw the recipe for a savoury muffin I had to try it. Especially with it containing my favourite ingredient, spinach. The original recipe didn't call for any herbs but I fancied added some to give some more flavour. Thyme was a brilliant addition but I would imagine any herb would work well whether it be oregano, basil or even rosemary.

These are freezable and will make a nice partner with a bowl of low point soup for lunch.

Spinach, Thyme and Parmesan Muffins
ProPoints per serve: 4
200 grams baby spinach
cooking spray
250 grams plain white flour
1 tablespoon baking powder
1 teaspoon salt
1 teaspoon caster sugar
25 grams grated parmesan cheese
1 whole whole egg
1 cup skim milk
1/3 cup vegetable oil
1 teaspoon dried thyme


Preheat the oven to 190 degrees Celsius.

Put spinach in a large bowl, cover with plastic wrap and microwave for 2 - 3 minutes or until wilted. Allow to cool and press out the excess water from the cooked spinach with your hands or use the back of a spoon. Chop roughly.

Grease a 12-hole muffin pan with oil. Line with squares of baking paper or muffin cases.

Sift the flour, salt and baking powder into a large mixing bowl. Stir in the sugar, cheese and spinach.

Break the egg into a jug and beat in the milk. Add the oil and stir well.

Pour the egg mixture into the flour mixture. Using a metal spoon, stir until the ingredients are just combined. You must not beat this mixture or stir it too much. (It should be quite lumpy, but there should be no traces of dry flour.)

Spoon the mixture into the muffin cases. Bake for 20 - 25 minutes until risen and golden. Serve whilst warm.


(click here for a printable version of this recipe)

Classic B.L.T (Bacon, Lettuce and Tomato) Sandwich

After a huge party night last night celebrating two of our friends 40th birthdays this morning called for something fresh, clean and tasty. While others had bacon and egg sandwiches I fancied a classic BLT especially as we had made the effort to go to the bakery and buy fresh bread.

This is such an easy sandwich to make and I am sure everyone has made one or at least eaten one... I thoroughly enjoyed mine this morning.


Classic B.L.T (Bacon, Lettuce & Tomato) Sandwich

Serves: 1
Points per serve: 5

3 rashers 97% fat free Short Cut Bacon
cooking spray
2 slices bread
1 tomato, sliced
2 lettuce leaves, roughly chopped
1 tablespoon reduced fat mayonnaise
salt
freshly ground pepper
Spray a non stick frying pan with cooking spray and cook bacon until slightly crispy (or to your liking).

On one slice of bread place bacon and top with sliced tomato.

Season with salt and pepper.

Drizzle with mayonnaise. Top with lettuce and place the second slice of bread on top to complete sandwich.

(click here for a printable version of this recipe)

Thursday, September 16, 2010

Pork Canneloni

Normally you either have a beef canneloni or a spinach and ricotta one, but deciding on our weekly menu last week I remembered a recipe that I use to make years ago that I actually adapted and used pork mince as it's main ingredient.

I find using pork mince makes it a lighter style canneloni compared to using beef. It was very simple in taste yet full of flavour. And of course like most pasta dishes, this was not only filling but was also very mourish with both kids eating another half serve each.


Pork Canneloni
(Recipe adapted from Weight Watchers Quick Start Cookbook)

Serves: 6
Points per serve: 6

cooking spray
500 grams lean minced pork
1 tablespoon garlic, crushed
1 onion, finely diced
2 slices multigrain/wholemeal bread, made into crumbs
850 mililitres unsweetened tomato juice
1/4 cup chopped fresh parsley
2 teaspoons prepared horseradish
freshly ground black pepper
pinch of salt, to taste
200 grams instant cannelloni tubes
1 teaspoon dried oregano
1 teaspoon dried basil
60 grams grated reduced fat tasty cheese
60 grams grated reduced fat mozzarella cheese

Preheat oven to 180 degrees Celsius.

Spray a nonstick frying pan with cooking spray and cook pork, garlice and half the onion until browned all over and cooked through. Remove from heat and allow to cool slightly. Add breadcrumbs, 1 cup of tomato juice, parsley, horseradish, pepper and salt. Mix well.

Fill a wide nozzle piping bag with pork mixture and fill each canneloni tube. Coat a large casserole dish with cooking spray and arrange stuffed tubes in a flat line.

Using the frying pan or a saucepan sprayed with cooking spray, gently cook remaining onion until translucent. Add remaining tomato juice, oregano, basil and season to taste with salt and pepper. Cook, stirring constantly, until mixture comes to the boil. Pour juice mixture over the stuffed canneloni tubes.

Combine both tasty and mozzarella cheeses in a small bowl and sprinkle evenly over the top of the stuffed canneloni tubes.

Bake in oven for 30 minutes or until cooked through and the cheese is golden and bubbling.


Quick Beef Pho (Vietnamese Beef and Noodle Soup)

There is something about a good soup that lets you eat and enjoy it any time of the year. From the heartiest to the lightest nothing compares to home made soup.

This recipe is definitely no exception. I love the way the Asians combine noodles, vegetables and meat with a broth mix, add herbs to taste and voila - a soup that is literally a meal!

When I first read this recipe I didn't think it would work especially as I have previously made Chicken Pho, which was a tasty but challenging recipe. Unlike the Chicken Pho recipe this dish was on the table in under 30 minutes and tasted amazing.

The aroma that filled the house was mouth watering but it was the way the beef cooked in the broth that stole the show and left us all wanting more. This recipe is a definite keeper and will be on our menu again in the near future that's for sure..


Quick Beef Pho (Vietnamese Beef and Noodle Soup)
(recipe adapted from Delicious Magazine August 2009)

Serves: 6
Points per serve: 5

8 cups salt-reduced beef stock
2 cups water
2 thick slices ginger
1 onion, thinly sliced
2 garlic cloves, sliced
3 star anise
1 cinnamon quills, lightly bruised
2 tablespoons caster sugar
2 tablespoons fish sauce
freshly ground black pepper
250 grams flat rice noodles
200 grams snow peas
2 tomatoes, quartered
500g beef eye fillet, very thinly sliced
100 grams bean sprouts
1 long red chilli, seeds removed, thinly sliced
1/2 bunch fresh coriander
1/2 bunch fresh mint
1/2 bunch fresh basil
2 limes, quartered

Place stock and water in a saucepan with ginger, onion, garlic, star anise, cinnamon, sugar and fish sauce. Bring to the boil, then reduce heat to low. Cover and simmer for 20 minutes. Strain over another saucepan, discard the solids and then return soup to the stove. Cover and return to the boil.

Meanwhile, prepare noodles according to packet instructions. Drain well.

Divide the noodles, top with snow peas and tomatoes. Top with the sliced beef fillet. Pour over the hot soup mixture (the heat will gently cook the meat) and top with the bean sprouts. Serve garnished with chilli, limes and fresh herbs.

Wednesday, September 15, 2010

Tandoori Chicken Parcels

Last night I had planned Apricot and Ginger Chicken Stirfry but both kids turned their nose up at that decision and and after the busy day I had at work there was no way I was going to be cooking two seperate meals. So driving home I was thinking what is something that we would all enjoy and then "bingo" - pies! But not a plain jane pie I wanted to make something different, of course!

Knowing that I had all the right ingredients to make a 'cheats' tandoori chicken and that I also had filo pastry in the fridge I decided on these Tandoori Chicken Parcels and they were a hit! Not only did they taste great but they were very easy to make. I didn't precook the filling as I didn't want it to dry out too much and thankfully the filling was very most and full flavoured.

Served with a light salad, some mint raita and some mango chutney the room silenced as we ate!


Tandoori Chicken Parcels

Serves: 4
Points per serve: 7

200 grams low fat natural yoghurt
2 tablespoons tandoori paste
500 grams chicken breast fillet, diced
12 sheets Filo Pastry
cooking spray
2 tablespoons sesame seeds

In a large bowl mix together the yoghurt and tandoori paste until smooth. Add the chicken, stirring to mix well. Allow to marinate for at least 30 minutes or longer if time permits.

Preheat oven to 180 degrees Celsius.

Lay one sheet of pastry on a large chopping board or bench and coat with cooking spray. Lay a second sheet on top and spray again with the cooking spray. Lay a third sheet on the other layers. Place a quarter of the tandoori chicken mixture towards one end of the pastry. Fold over end and two sides to desired shape, respray edges and fold to enclose. Place on a lined baking tray. Repeat until all four parcels have been made.

Spray all four parcels with cooking spray and sprinkle with sesame seeds. Cook in the oven for 25 - 30 mintures or until pastry is golden and chicken is cooked through.

Monday, September 13, 2010

Thai Mussels

Firstly I need to apologize for a huge gap in our food blog. I spent the whole of last week in Brisbane on a training session, which was busy and I didn't cook a thing for the whole week. The weekend just gone wasn't any quieter I must say also. We had our football club Annual General Meeting and Presentation. The last week has been a whirlwind of food not to mention alcohol. I have to say that we both fancied something easy and tasty.

Saying this I did have a kilogram of fresh mussels which I brought on a whim on Saturday so we turned our focus on them. Noel and I have only ever cooked mussels once before and then I overdid the chilli so it was decided it was Noel's turn to attempt to create a meal for us and that he did.

Flavoured with lime, chilli, garlic and ginger in a fantastic light sauce these mussels were brilliant and made a great dinner for the two of us. Saying that you could easily serve this to four or 6 as an entree.


Thai Mussels

Serves: 2
Points per serve: 3

1 kilogram fresh mussels in shells
juice of 1 1/2 limes
juice of 1/2 lemon
1 teaspoon fish sauce
1/4 cup dry white wine
1 teaspoon soy sauce
1 tablespoon brown sugar
2 teaspoons crushed garlic
2 teapsoons crushed ginger
pinch of salt
1 tablespoon olive oil
2 spring onions, finely sliced
1/2 bunch fresh coriander, roughly chopped
3 red bullet chillies, deseeded and chopped
coriander leaves for garnish

Clean and scrub mussels, disgarding any broken or open ones that do not close when tapped on the bench.

In a large jug mix together lime juice, lemon juice, fish sauce, white wine, soy sauce, brown sugar, garlic, ginger and salt. Mix well ensuring sugar is dissolved.

Heat oil in a large wok or frying pan that has a lid. Carefully pour in sauce mixture, add spring onions, coriander and chillies. Mix well and bring to a boil.

Add mussels to the wok and toss until coated. Reduce heat to medium, cover with a lid and allow to steam for approximately 5 minutes. Remove from heat and toss through the sauce.

Place in a large serving bowl, garnish with coriander and serve immediately.

Thursday, September 2, 2010

Beef and Spinach Rissoles with Tomato and Corn Relish

We haven't had these for so long... I must admit when I came accross this recipe while we were living in Sydney we did have them over and over again so it became a bit of overkill on the dish. Needless to say when I suggested having these Noel got a little excited exclaiming "we haven't had those for years!!"

The rissoles themselves are very easy to make and besides having my favourite ingredient, spinach, the use of cajun seasoning gives them a little kick but this is complemented by the sweet tomato and corn relish, which is also not complicated to make.

Overall the whole meal takes less than an hour to make and I served with mashed potato and steamed vegetables to make a complete meal but in summer a nice green salad and even some crunchy rolls would go down a treat.


Beef and Spinach Rissoles with Tomato and Corn Relish
(recipe adapted from WW Recipe Collection 2001)

Serves: 4
Points per serve: 5.5

For the beef and spinach rissoles:
250 grams baby spinach leaves
500 grams extra lean beef mince
1 small brown onion, finely chopped
1 teaspoon crushed garlic
1 tablespoon cajun seasoning
cooking spray

For the tomato and corn relish:
2 teaspoons olive oil
1 small brown onion, finely chopped
1 x 420 gram can diced tomatoes
100 grams frozen corn kernals, defrosted
2 tablespoons brown sugar
1/4 cup white vinegar

Microwave the spinach until just wilted. Drain and allow to cool slightly. Squeeze the extra liquid from the spinach and chop roughly.

In a large bowl combine the spinach, mince, onion, garlic and cajun season. Mix well and form into 12 rissoles. Place on a plate and refrigerate for 30 minutes.

Meanwhile start the relish. Heat the oil in a small pan on medium heat and cook the onion until soft. Add the tomatoes, corn, sugar and vinegar. Cook, stirring, over low heat until sugar dissolves.

Bring to the boil and then simmer uncovered for 25 minutes or until relish thickens. Keep warm.

Coat a large frying pan with cooking spray and cook the rissoles until browned on both sides and cooked through. Serve with relish.

(click here for a printable version of this recipe)

Wednesday, September 1, 2010

Sweet Chilli and Hoisin Pork Stir Fry

We have been so busy of late with football club finals, socialising and then me with my work which has had me trapsing all over country Victoria this last two weeks that I am not only not spending any time in the kitchen but I am exhausted. So something quick, easy and tasty was my request last night for dinner and when I came accross this recipe on Taste.com.au (a site I often busy for inspiration) I knew that was what we were having for dinner.

While we often have pork stir fries I normally use precut pork strips and normally find the pork slightly tough and on the dry side. Instead I used pork fillet and could not believe the difference. The pork fillet was tender and juicy - I will be using pork fillet from now on also.

With the addition of some extra vegetables to bulk it up due to me having a vegetable craving I have to say that I was really pleased with the result and everyone loved it !!


Sweet Chilli and Hoisin Pork Stirfry
(recipe adapted from
Taste.com.au)

Serves: 6
Points per serve: 5


1 x 440 gram pkt hokkien noodles
1/4 cup hoisin sauce
1 1/2 tablespoons sweet chilli sauce
1 1/2 tablespoons water
cooking spray
400 grams pork fillet, visible fat removed and thinly sliced
1 brown onion, halved, thinly sliced
1 garlic clove, crushed
1 carrot, peeled and cut into thin matchsticks
1/2 red capsicum, cut into thin matchsticks
200g snow peas, trimmed, halved diagonally
250 grams bean sprouts
fresh coriander, chopped to garnish
1 long fresh red chilli (optional), halved, thinly sliced

Prepare the noodles following packet directions. Combine the hoisin sauce, sweet chilli sauce and water in a small jug.

Heat a wok or large frying pan over high heat. Cover with cooking spray and heat until just smoking. Add half the pork and stir-fry for 1-2 minutes or until browned. Transfer to a bowl. Repeat with the remaining pork, reheating and spraying the wok between batches.

Respray the wok. Add the onion and garlic, and stir-fry for 2 minutes or until the onion starts to soften. Add the carrots and capsicum, stir fry for 3 minutes or until carrots have softened slightly. Add the snow peas and bean sprouts, and stir-fry for 2 minutes. Stir in the hoisin sauce mixture, pork and noodles. Stir-fry for 3 minutes or until the vegetables are tender and the noodles are heated through.

Served garnished with coriander and sprinkle with the chilli, if desired, to serve.

(click here for a printable version of this recipe)