Our latest feast

Wednesday, September 30, 2009

Pork and Vegetable Cannelloni

Before I start talking Cannelloni, I have to say that yesterday's Bacon and Mushroom Risotto could not have been at all bad ~ both of my children requested it for breakfast this morning!! LOL!!!

Armed with 500 grams of pork mince, which wasn’t used on Pork Stuffed Capsicums the night before and the kids weren’t fussed on having them tonight I had to find something else to cook. Pasta is always a huge hit in our house and I could have made Spaghetti with Meatballs with Tomato Sauce but I actually fancied something different. I came across a box of cannelloni tubes in the pantry so the decision was then easily made.

Pork and Vegetable Cannelloni is quite easy to make and a great change from the usual Spinach and Ricotta Cannelloni that I make. Ensure the filling has cooled before filling the tubes or they will crack from the heat. Filling the tubes is a little fiddlier due to the crumbly texture of the meat (I used a teaspoon to push the mixture into the tubes) and it was a little time consuming but I must say the flavour was well worth the effort once all cooked.

Pork and Vegetable Cannelloni

Serves: 6
Points per serve: 6.5

cooking spray
500 grams pork mince
½ large brown onion, finely diced
1 teaspoon garlic, crushed
½ green capsicum, finely diced
½ red capsicum, finely diced
1 carrot, peeled and grated
1 teaspoon prepared horseradish
¼ cup fresh parsley, chopped
1 cup tomato juice
freshly ground black pepper
12 cannelloni tubes
½ large brown onion, finely diced
1 teaspoon garlic, crushed
2 teaspoons dried oregano
2 cups tomato juice
freshly ground black pepper
120 grams tasty cheese, grated

Coat a large frying pan with cooking spray and heat over high heat. Add pork, onion, garlic and cook for 5 minutes or until pork has brown and onion softened. Add capsicums and carrots and cook for a further 5 minutes, stirring. Add horseradish, parsley and tomato juice. Stir to combine and continue to cook until heated through. Remove from heat, season with pepper to taste and allow to cool.

Meanwhile, make the sauce. Spray a smaller frying pan or saucepan with cooking spray and heat over a medium heat. Add onion and garlic and cook, stirring for 5 minutes or until onion is soft. Add oregano, tomato juice and season with pepper to taste. Bring to the boil, reduce heat and simmer for 5 minutes. Remove from heat.

Preheat oven to 180 deg Celsius.

Once filling has cooled, fill each cannelloni tube tightly. Spray a large casserole dish with cooking spray and place cannelloni in a single layer into it. Cover with tomato sauce. Sprinkle cheese over tubes evenly. Place in the oven and cook for 30 minutes or until cooked through and cheese is golden.

(click here for a printable version of this recipe)

Tuesday, September 29, 2009

Bacon and Mushroom Risotto

Noel worked late again tonight as he is not a lover of risotto I made use of my opportunity and made myself some for dinner. I say myself as the kids both wanted homemade meat pies which was fine and they had but then they too tried my creation.

I wanted to make a creamy style risotto, which are my favourites, but of course without using any cream and at the same time I was trying to keep the points value down. Add more point free vegetables to bulk it up such as baby spinach, zucchini or even asparagus and of course you could omit the bacon.

Although this dish is quite time consuming and demands all your attention, it was well worth it taste wise.


Bacon and Mushroom Risotto
Serves: 4
Points per serve: 6

1 litre (4 cups) water
1 tablespoon chicken stock powder
1 tablespoon reduced fat spread
1 brown onion, finely chopped
2 rashers middle bacon, rind and visible fat removed
2 garlic cloves, crushed
1 1/2 cups (325 grams) arborio rice
1/2 cup dry white wine, such as chardonnay
200 grams button mushrooms, finely sliced
2 teaspoons fresh flat leaf parsley, finely chopped
25 grams (1/2 cup) fresh parmesan, finely grated
freshly ground black pepper

In a small saucepan mix together the water and stock powder. Heat stock and keep simmering over a low heat.

In a large heavy based saucepan heat reduced fat spread over a medium heat. Add onion, bacon and garlic. Cook, stirring, for 5 minutes or until golden

Add the rice into the onion mixture. Cook, stirring, until completely combined. Add the wine and cook, stirring for 3 minutes or until the liquid has reduced by half.

Using a ladle add the stock, one ladle at a time. Stirring continuously after each addition until all the liquid is absorbed, this should take approximately 20 minutes.

Stir in mushrooms. Cook, stirring, for 3 - 4 minutes or until mushrooms are tender and liquid absorbed.

Remove from heat and stir in the parmesan. Season with freshly ground black pepper.

(click here for a printable version of this recipe)

Sunday, September 27, 2009

Oysters with Champagne and Wasabi

As our oyster festival continued in our house tonight I decided that one at least had to have champagne as an ingredient purely because they say that foods such as oysters are the food of lovers. And in my opinion lovers like champagne too...

Go easy on the wasabi unless you and your partner really like it.. a dot is definitely enough.


Oysters with Champagne and Wasabi
Serves: 4
Points per serve: 2.5

250 ml champagne or sparkling white wine
12 natural oysters, in the half shell
1/4 red capsicum, very thinly sliced and halved
wasabi to taste

Clean and rinse oysters and shells. Place oysters back into shells. Fill shells with champagne. Top with a few capsicum slices and a dot of wasabi paste.


Oysters with Ginger, Garlic and Chilli

These oysters are one of Noel's flavour bursts and they surely packed a kick! Fresh ginger and garlic are always quite strong which was the intensity that Noel was after coupled with a hint of Kaffir Lime was very unique but it was the after taste of the chilli was the hidden surprise.


Oysters with Ginger, Garlic and Chilli

Serves: 4
Points per serve: 1.5
12 natural oysters, in the half shell
2" piece of ginger, peeled and chopped
4 garlic cloves, peeled and chopped
4 kaffir lime leaves, thinly sliced
1 tablespoon chilli oil
Preheat grill.
Place oysters on an oven proof plate or a patty tin.
Top each oyster with ginger, garlic and lime leaves. Place approx 1/3 teaspoon of chilli oil on each oyster.
Place under the grill and cook for 3 - 5 minutes or until topping is starting to brown.
Serve immediately.


(click here for a printable version of this recipe)

Mediterranean Oysters

These oysters were somewhat of a creative urge I had. I spent the afternoon reading oyster recipes and after a while, unfortunately, they all started to sound the same! I am sure you all understand where I am coming from when I say that. But at the same time I think that is flare and creativity is born....

Hot oysters are a little different and take on the flavour of the topping therefore the topping needs to be intense enough to infiltrate the oyster but not overpower it. This recipe is very similar to Oysters Kilpatrick.


Mediterranean Oysters

Serves: 4
Points per serve: 1

12 natural oysters, in the half shell
1 small truss tomato, chopped
1 slice prosciutto (50g), chopped
1 clove garlic, peeled and thinly sliced
8 -10 basil leaves, thinly sliced
2 tablespoons balsamic vinegar

Preheat grill.

Place oysters on an oven proof plate or a patty tin.

Top each oyster with tomato, prosciutto, garlic and basil. Place approx 1/2 teaspoon of balsamic vinegar on each oyster.

Place under the grill and cook for 3 - 5 minutes or until topping is starting to brown.

Serve immediately.

The Oyster Festival...

No don't get excited there wasn't actually an Oyster Festival in our area as such. Noel came home with 2 dozen oysters. Yep 2 dozen. We haven't had oysters for awhile so it was a nice surprise!! And worthy of being the entree to a feast!!

Oysters are not the most attractive creatures that man chooses to eat so besides serving them ala natural they always bring the creative side of us out and these were our "Oyster Festival" dishes.....

(starting from top, clockwise ~ Oysters with Vietnamese Dressing, Oysters with Champagne and Wasabi, Mediterranean Oysters, Oysters with Ginger, Garlic and Chilli)


Although oysters are an easy entree to serve either hot or cold they are somewhat an acquired taste. To be totally honest, I used to turn my nose up at them. Especially served cold I could bare the thought of putting one in my mouth but as time and taste has taken it's toll on me, thankfully I really enjoy them now and cannot imagine not wanting to eat one......

Thursday, September 24, 2009

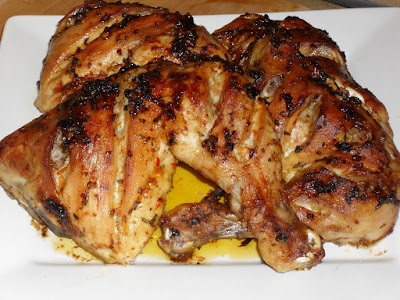
Peri Peri Chicken

Watch out Nando's - we now have our own recipe for Peri Peri and it was delish! It wasn't as fiery as what I was expecting but it would only take some adjustment in the spices to give it the kick I was looking for but for a first attempt at Peri Peri made from scratch it was really nice. So nice I think the kids would eat it with no complaints!!

Although tonight this was cooked in the oven, it would make an idea bbq meal and would look very exotic with the chargrilled markings. This marinade would suit other meats especially kebabs. For a more intense flavour allow meat to marinate for longer especially overnight. I decided to use chicken maryland tonight, skin removed, but I think I will use the thigh fillets next time or even just chicken pieces.


Peri Peri Chicken

Serves: 4
Points per serve: 7.5

2 tablespoons lemon juice
1 tablespoon olive oil
6 fresh small red Thai chillies, chopped finely
2 teaspoons brown sugar
1 teaspoon sweet paprika
2 cloves garlic, crushed
2 teaspoons finely chopped fresh rosemary
2 teaspoons sea salt
4 chicken maryland pieces, skin removed

Preheat oven to 200 deg Celcius.

Combine lemon juice, olive oil, chilli, sugar, paprika, garlic, rosemary and salt in a large bowl.

Make deep diagonal cuts in the chicken pieces and rub spice mixture all over chicken. Allow to stand for 10 minutes, longer if time permits.

Place chicken on a foiled lined oven tray and bake uncovered for 30 minutes or until chicken is cooked through.

Chunky Salsa Salad

This Chunky Salsa is a very basic yet tasty side dish for any meal, especially with a barbecued piece of chicken or meat. It takes practically no time at all to prepare but will certainly excite your tastebuds.

It is equally as nice if you do not add the fresh avocado to the salsa but a word of advice though don't add the avocado until just prior to serving as they tend to turn brown if left standing for too long.

This was delicious served with our version of Nando's, Peri Peri Chicken. For a really tasty and fresh dip chop these ingredients smaller and serve with cornchips or vegetable sticks.


Chunky Salsa Salad

Serves: 4
Points per serve without avocado: 0.5
Points per serve with avocado: 2.5

4 medium truss tomatoes, chopped coarsely
1 small red onion, chopped coarsely
1 medium green capsicum, chopped coarsely
1 medium red capsicum, chopped coarsely
4 tablespoons fresh coriander, chopped coarsely
1 avocado, peeled, stoned and chopped coarsely
1 tablespoon olive oil
4 tablespoons lime juice
freshly ground black pepper
pinch sea salt flakes


Combine tomatoes, onion, capsicums, avocado (if using), coriander, olive oil and lime juice in a large bowl. Season to taste with salt and pepper. Refrigerate until needed.


(click here for a printable version of this recipe)

Kaeng Paa Moo (Pork Jungle Curry)

Alright I have to agree this curry has a very strange name.... one that definitely caught my attention on a Thai takeaway menu whilst living in Sydney 9 years ago. And I have to admit I was that intrigued that I did order it that night.

Unlike most Thai curries, this curry is simple and robust in flavour. Kaffir line leaves give a distinct flavour, leaving your tastebuds wanting more!! Either green or red curry paste can be used as it base and is in fact quite a hot curry. Coconut milk or cream is never used simply due to the fact that coconuts don't grow in the jungles of northern Thailand.. hence the name Jungle Curry.

Now given the fact that this curry originates from the jungles of northern Thailand, the traditional recipe is usually made with wild meats such as wild boar but is more commonly serve with either pork or chicken. The vegetables can be changed to suit and many versions of this recipe call for carrots, capsicums (peppers), pumpkin and even baby eggplant. This is my take on this exotic recipe and one that we both really enjoyed.

Kaeng Paa Moo (Pork Jungle Curry)

Serves: 4
Points per serve: 5.5

1 tablespoon peanut oil
600g pork scotch (neck), cubed
1 large brown onion, thickly sliced
1 knob galangal or ginger, peeled and finely sliced
1 lemongrass stalk, trimmed, finely chopped
2 tablespoons crushed lemongrass
1/2 cup red curry paste
4 cups chicken stock
4 kaffir lime leaves, torn
2 teaspoon drained green peppercorns in brine, rinsed
6 carrots, peeled and cut into 4cm pieces
1 large red capsicum, cut into 2cm cubes
1 bunch coriander, chopped
2 red bullet chillis, sliced, optional
juice of 1/2 fresh lime
2 cups steamed rice, to serve


Heat oil in a large saucepan over high heat. Cook pork, stirring, for 4 to 5 minutes or until browned. Add onion, galangal and lemongrass. Cook, stirring, for 2 minutes or until onion is lightly browned.

Add curry paste. Cook, stirring, for 30 seconds or until fragrant.

Add stock, lime leaves and peppercorns. Bring to the boil. Reduce heat to medium-low. Simmer, uncovered, for 30 minutes.

Add carrots and capsicum. Cook for 20 minutes or until pork and carrots are tender. Stir through 3/4 of chopped coriander and sliced chilli, if using.

Top with remainding coriander and drizzle with lime juice. Serve with steamed rice.


(click here for a printable version of this recipe)

Tuesday, September 22, 2009

Chargrilled Vegetable Stack

I thought we would try something a little different especially with the kids being at their Nana and Grandad's this week. This recipe caught my eye in the current Woolworths Good Taste Magazine. While both Noel and I adore meat, I decided it would be nice to have a vegetarian meal other than a meat free pasta - you know be a little adventurous and a tad exotic?

The reason this caught my eye is because it has two of my favourite vegetables - eggplant and sweet potato!! And it also gave me a good excuse to use my chargrill cast iron plate!! Not to mention the recipe called for spinach.... mmmmmmm!
To be totally honest I must say I was a little worried that it wouldn't be enjoyed but I couldn't have been any more wrong. It was delicious and very fillilng - one stack was definitely enough each and it will be on the menu again for sure.... I even thought of making smaller stacks to serve as an entree! See that's how much I liked it I am in the process of planning how and when to cook it next!!


Chargrilled Vegetable Stacks
(recipe source Woolworths Good Taste September 2009)

Serves: 4
Points per serve: 2.5


olive oil spray
1 brown onion, finely chopped
1 garlic clove, crushed
1 x 400 gram can no added salt diced tomatoes
1 small eggplant (about 300 grams)
300g sweet potato (kumara), peeled
1 large zucchini, ends trimmed
250g low fat cottage cheese
2 tablespoons fresh basil, chopped
1 teaspoon finely grated lemon rind
75 grams baby spinach leaves
fresh basil leaves, to serve
mixed salad leaves, to serve
Preheat oven to 180 degrees Celcius.

Cut eggplant lengthways into 4 x 1cm thick slices. Cut sweet potato lengthways into 4 x 5mm thick slices. Cut zucchini diagonally into 8 x 5mm thick slices.

Heat a medium frying pan over medium heat. Spray with olive oil spray and add the onion. Cook, stirring occasionally, for 5 minutes or until soft. Add the garlic and cook, stirring , for 1 minute or until aromatic. Add the tomatoes. Bring to the boil, reduce heat to low and simmer for 5 minutes or until mixture thickens.

Meanwhile, preheat a chargrill or bbq on high. Spray the eggplant, sweet potato and zucchini with olive oil spray. Cook the eggplant and sweet potaot on grill in 2 batches for 1 - 2 minutes or until almost tender and lightly charred. Transfer to a plate. Cook the zucchini on grill for 1 - 2 minutes or until almost tender and lightly charred. Transfer to the plate.

Combine the cottage cheese, chopped basil and lemon rind in a bowl. Spread 1/2 cup (125ml) of the tomato mixture over the base of a rectangular 3 litre (12 cup) capacity baking dish. Arrange the eggplant in a single layer on top. Divide half the cottage cheese mixture between the eggplant slices and top with half of the spinach. Next layer the sweet potato on top of the spinach. Spread with the remaining cottage chese and reamining spinach. Top with zucchini.


Top with the remaining tomato mixture and season with pepper. Bake for 15 - 20 minutes or until vegetables are tender.

Divide the vegetable stacks among serving plates and spoon over the tomato mixture from the pan. Sprinkle with the extra basil leaves and serve with mixed salad leaves.


(click here for a printable version of this recipe)

Chilli and Lemongrass Beef with Spinach

Nothing beats a quick stirfry and this was no exception plus I needed a spinach fix.... lol!!

This Thai style stirfry certainly please both Noel and myself. It wasn't a heavy dishes but sure was jammed full of vitamins from not only the beef but from the vegetables as well.

After quickly marinating the beef strips the flavour still wasn't intense but it was noticable. A combination of garlic, ginger, lemongrass and crushed chilli was the base of the marinade and these were also used in the sauce. For a nice change the vegetables were quite simple with only capsicum strips, spring onion, baby spinach and fresh truss tomatoes.


Chilli and Lemongrass Beef with Spinach

Serves: 4
Points per serve: 4

400 grams lean beef strips
1 teaspoon crushed garlic
1 teaspoon crushed ginger
1 teaspoon crushed chilli
2 teapsoon finely chopped lemongrass
2 tablespoons teriyaki sauce
1 tablespoon dry sherry
cooking spray
1 teaspoon crushed garlic
1 teaspoon crushed ginger
2 teaspoon crushed chilli
2 teapsoon finely chopped lemongrass
1/2 red capsicum, sliced
4 spring onions, thickly sliced on diagonal
4 tablespoons teriyaki sauce
1/4 cup water
1 teaspoon beef stock powder
1 teaspoon cornflour
2 truss tomatoes, quatered
1 bunch baby spinach
1 bunch fresh coriander, chopped
juice of 1/4 lime, reserving remainder as slices for garnish

Combine beef, garlic, ginger, chilli, lemongrass, teriyaki sauce and dry sherry in a bowl, mix well and allow to marinate for 30 minutes (longer if time permits).

Heat a wok or large frying pan over high heat and coat generously with cooking spray, cook half the beef strips until browned and sealed completely, remove to plate. Continue with remaining beef.


Respray the same pan with cooking spray, add the additional garlic, ginger, chilli and lemongrass and stir, cooking for 1 - 2 minutes or until aromatic and sizzling. Add the capsicum and spring onions. Stirfry for a further 1 - 2 minutes. Return beef to the pan along with teriyaki sauce and combined water, beef stock and cornflour. Stirfry for 2 minutes. Once sauce has boiled add the tomatoes and spinach, tossing to coat. Squeeze over lime juice and 3/4 of the chopped coriander. Mix through and serve. Garnish with remainding coriander and lime wedges.


Thursday, September 17, 2009

Curried Sausages

I have to admit I don't cook sausages very often. It is not that we don't like sausages, all of us love them, prehaps a little too much. The reason that they are not regularly on our menu is mainly due to the fact that normal sausages are so high in fat they are pretty much a no-no when it comes to dieting. Well that was until recently!

The Peppercorn Food Company have released a range of gluten free, extra lean sausages and I have to say I really like them. Not only are they very low in saturated fat and get the tick from the National Heart Foundation, but they actually taste good too. They have several different flavours available and although they are a little on the pricey side for sausages - you only get what you pay for right?

Curried sausages have to be a classic home style meal, one that gives comfort no matter when you eat them, either served with mashed potato or steamed rice. It is one of those meals your grandma used to make and are certainly one of those recipes that you expect to have handed down through the generations. I do not have a handme down recipe, infact I cannot recall my grandma cooking them nor my mam. However I saw this in a recent Weight Watchers magazine so I just had to try it.

In the beginning I was kind of concerned with using a combination of curry powder and dijon mustard as the sauce flavouring but it worked well. The apple gave the dish a hint of sweetness but didn't make it overpoweringly sweet and more importantly it got the thumbs up from all of us.


Curried Sausages
(recipe sourced from: WW Magazine June 2009)

Serves: 4
Points per serve: 6.0

500 grams lean sausages
cooking spray
1 medium brown onion, thinly sliced
1 medium green apple, peeled, cored and grated
2 tablespoons plain flour
2 teaspoons mild curry powder
2 teaspoons dijon mustard
2 cups chicken stock
1 medium green capsicum, seeded and thinly sliced
1 medium red capsicum, seeded and thinly sliced
2 cups cooked white rice, to serve

Place sausages in a saucepan and cover with cold water. Bring to the boil, reduce heat to low and simmer for 10 minutes. Drain.

Spray a non stick frying pan and heat over high heat. Add sausages and cook for 3 - 4 minutes or until browned all over. Transfer to a plate and slice in half or quarters diagonally.

Add onion and apple to the pan, cook for 2 minutes or until the onion has softenend. Add flour, curry powder and mustard. Stir to mix. Gradually add stock and bring to the boil. Add sausages and capsicums. Reduce heat to medium low and simmer uncovered for 15 minutes or until sauce thickens. Serve with 1/2 cup rice each.


Stats for Peppercorn Food Company Extra Lean Beef Sausages
500g = 7 sausages (72g per serve), Each serve: Energy: 448kJ Protein 9.6g Fat, total: 5.8g Fat, saturated: 2.2g Carbohydrate: 4.0g Sugars: 0.9g Sodium: 324mg Iron: 1.1mg

Wednesday, September 16, 2009

Chicken with Spinach and Ricotta

I realise that it has been a few days between posts but after having such a big weekend and then worrying about Oliver as he has been sick, since Monday we have been waiting the results of a blood test checking for all the obvious. Thankfully today's doctor's appointment delivered good news with the fact he has just had a viral infection and not any of the bad things that have been floating around in my head! It's hard being a parent especially when something is wrong with your child... your heart breaks.

So I finally cooked a proper dinner and I have to say it was very nice. I love chicken and to have it filled is just heaven especially when the filling can practically be anything that you want. I had some low fat riccotta in the fridge and of course baby spinach leaves, which I do try and sneak into any meal. Knowing that both the kids like spinach and ricotta it was a natural choice for the filling.

Although an easy recipe, it was a little fiddly enclosing the filling in the chicken but with a little patience it was quite do-able. The filling was a nice clean flavour as I believe spinach and cheese compliment each other quite well. After eating both Noel and I suggested that sun-dried tomatoes would also be nice with the spinach and cheese, and would add another depth to the taste. Next time, for sure!


Chicken with Spinach and Ricotta

Serves: 4

Points per serve: 4
4 skinless chicken breast fillets
100 grams baby spinach leaves
8 tablespoons low fat riccotta
salt
freshly ground black pepper
toothpicks
cooking spray

Cut a large pocket in each chicken fillet, be careful not to cut through either side of the chicken.

Place 1/4 of the spinach (25 grams) in each pocket and top with 2 tablespoons ricotta, ensuring both are firmly in the pocket. Season with salt and pepper.

Secure each pocket with tootpicks, forming a tight seal. Place in the refrigerator for 30 minutes.

Preheat the oven to 180 degrees Celcius.

Spray a large frying pan with cooking spray and heat. Cook chicken fillets for a few minutes each side until browned and sealed.

Place chicken on a lined baking tray and cook in the oven for 20 - 30 minutes or until cooked trough. Remove toothpicks prior to serving.

(click here for a printable version of this recipe)
Friday, September 11, 2009

Chicken In Pyjamas (Chicken Parmigiana)

"Parmigiana" is a big word for little children and both of mine have called this dish Chicken in Pyjamas for as long as I can remember. It's quite funny really as the chicken does look all snug and wrapped up in it's topping that I suppose it does actually resemble Chicken in Pyjamas... lol!!

There are several versions on how to cook this, especially in the pubs and bistros and all the ones I have tried are nice. Some breadcrumb the chicken fillet, some use bottled pasta sauce, some have ham, some don't, and the list could go on ... like every dish I think it comes down to taste and at times your region. Personally I prefer the chicken to be uncrumbed, topped with ham and a homemade tomato sauce, then finished off with cheese. But as the old saying goes "each to their own", right?

Besides the fact that my version of cooking Parmigiana is lower in fat/calories due to it not being crumbed removing that step makes this quite a quick and easy dish to prepare and cook. But by all means please feel free to crumb your chicken fillets.

Anyway this is how I made it and we all enjoyed it.... sorry about the plating, it could have been neater!! It was late and we were hungry. LOL - that's the problem with us food bloggers - making our family wait to eat is sometimes VERY VERY HARD!


Chicken Parmagiana

Serves: 4
Points per serve: 5

or 1 cup passata/pasta sauce
cooking spray
4 x chicken breast fillets, 125 grams each approx.
4 slices lite ham
100 grams grated low fat tasty cheese

Prepare Homemade Tomato Sauce as per recipe.

Preheat oven to 180 degrees Celcius.

Using a meat mallet, pound each chicken fillet to the same thickness. I find this easy to do between two sheets of baking paper.

Cover a baking tray with foil and spray with cooking spray. Place chicken fillets on to baking tray. Place a slice of ham onto each chicken fillet. Top with a quarter of the homemade tomato sauce and sprinkle evenly with grated cheese.

Cook in oven for 15 - 20 minutes or until chicken is cooked through and cheese is golden.

(click here for a printable version of this recipe)

Thursday, September 10, 2009

Satay Beef with Noodles

Tonight's dinner was a request.. Oliver wanted Beef Stir Fry and Alexandria automatically followed up with Satay. So what better way to please both my children than to have Satay Beef with Noodles.

Unlike most Satay Sauces this is quite low in fat. The cream has been replaced by Low Fat Evaporated Milk but still had the creamy texture. In fact, you could just boil all the sauce ingredients and make a stand alone Satay Sauce.

Satay Beef with Noodles

Serves: 6
Points per serve: 6

cooking spray
500 grams lean beef strips
250 grams dried noodles, of your choice
1/2 cup lite crunchy peanut butter
2 tablespoons soy sauce
2 teaspoons ground coriander
1 teaspoon ground cumin
1 teaspoon tumeric
1/4 teaspoon chilli powder, optional
1 x 375 ml Lite & Creamy Evaporated milk
2 teaspoons crushed garlic
1 brown onion, sliced
1 head of broccoli, cut into small florets
2 carrots, thinly slice on diagonal
1/2 red capsicum, sliced
1/2 green capsicum, sliced
1 x 400 gram baby corn spears, drained

Spray a wok or large frying pan with cooking spray and heat over a high heat. Cook beef strips, in batches, until browned and sealed. Remove to a plate.

Bring a large pan of water to the boil and cook noodles according to the packet instructions. Drain from water when just done, rinse with cold water. Do not overcook.

Combine peanut butter, soy sauce, coriander, cumin, turmeric, chilli powder (if using) and evaporated milk in a jug, mixing well.

Respray wok or frying pan with cooking spray and over a high heat cook garlic, onions, broccoli and carrots for 3 - 5 minutes or until vegetables start to soften. Add capsicum and cook for a further 3 - 5 minutes. Add the corn spears.

Add all the sauce mixture and stir to combine. Bring to the boil and return beef to the pan. Cook for 2 - 3 minutes until sauce starts to thicken. Add noodles and toss to combine and noodles are heated through.

(click here for a printable version of this recipe)

Wednesday, September 9, 2009

Homemade Tomato Sauce

This isn't going to be a very elaborate recipe but it's a quick tomato sauce that never fails. I have used it not only as a sauce but also as a side condiment and it tastes good on a Chicken Parmigiana or other dishes that require tomato sauce.

This sauce is not only quick and easy but it can be altered to suit your tastes and needs. Adding chilli flakes make it a little spicy, but you could add cumin and corinader to make it a little more flavoursome, some fresh basil to give it more of a meditterean feel, or any fresh herbs for that matter. Adding extra vegetables, such a capsicum, also gives it an extra twist.

In fact this recipe is a something that my mam used to serve quite often, I am sure she still makes it today. Her take on the recipe is that she adds thinly sliced celery to hers.


Homemade Tomato Sauce

Serves: 4
Points per serve: 1/2

cooking spray
1 brown onion, finely diced
1 teaspoon crushed garlic
1 x 400 gram can diced tomatoes
1 tablespoon dried oregano
1 teaspoon dried chilli flakes, optional
freshly ground black pepper, to taste
salt, to taste

Spray a small frypan or saucepan with cooking spray and heat over medium to low heat. Add onions and garlic and cook for 10 - 15 minutes or until onions are very soft and golden. Add tomatoes, oregano, chilli (if using) and season with salt and pepper. Mix well and simmer for another 10 - 15 minutes or until sauce has thickened.

Sauce will keep in an airtight container for 2 - 3 days in the fridge or can be frozen.

Tuesday, September 8, 2009

Moroccan Savoury Mince

I have seen this recipe on a few forums and it has been recommended by several people now so I thought it's about time I gave it a go. This is another recipe from the Symply To Good To Be True Cookbooks.

We love experimenting with flavours, especially different herbs and spices and as this recipe called for Moroccan seasoning, fresh mint, lemon and apples I have to admit to being very intrigued. We had Lamb Tagine recently, which also used Moroccan seasoning and was nice but thinking back could have done with some more flavourings.

The recipe actually listed lean lamb mince, but I used beef as I didn't have lamb however you could use beef as I have, chicken or pork as long as it was lean of course.

Did I mention that this is another quick and easy recipe.... all cooked and served in under 30 minutes is always a blessing. The aroma while it was cooking filled the house and told us that this was going to taste wonderful and it did. The kids had seconds and thirds so it cannot have been that bad at all!


Moroccan Savoury Mince
(recipe source Symply To Good To Be True #4)

Serves: 4
Points per serve: 5

cooking spray
500g lean lamb mince
1 teaspoon crushed garlic
2 teaspoons Moroccan seasoning
1 teaspoon cinnamon
1 x 415g can chopped tomatoes
2 teaspoons chicken stock powder
1 tablespoon tomato paste
1/4 cup lemon juice
1 teaspoon grated fresh lemon rind
1 x 400g can chickpeas, drained
1 cup apple, peeled and diced
3 tablespoons fresh mint, chopped
1/2 cup water
1/8 teaspoon chilli powder, optional

Coat a large non-stick saucepan with cooking spray and cook minced until browned and cooked through. Drain liquid from mince.

Add garlic, Moroccan seasoning and cinnamon, stirring to combine, cook for 2 - 3 minutes or until fragrant. Add all remaining ingredients to the pot, stir well and bring to the boil. Once boiled, reduce heat and simmer for 10 minutes.

(click here for a printable version of this recipe)

Monday, September 7, 2009

Garlic Prawns with Vegetables

We decided to have something quick and easy tonight as I had a late appointment with a dietician to discuss my Type II Diabetes and my lifestyle. The whole family went to the appointment as I thought it good that we all heard what she had to say.... needless to say some of the cooking we do has to change a little but otherwise she was quite happy with the food we eat.

Our quick and easy dinner tonight was Garlic Prawns with Vegetables served with steamed rice. Now I am a HUGE fan of garlic prawns made either with a creamy sauce or as we did tonight with an asian influence, so I was quite happy when Noel suggested garlic prawns and also offered to cook.

We used fresh garlic for the intensity (but crushed bottled variety would be fine) and the vegetables could be changed to suit your tastes. Although the ingredients are very minimal the taste is amazing and will tantilize your tastebuds.


Garlic Prawns with Vegetables

Serves: 2 as a main
4 as an entree
Points per main: 4
per entree: 2

500 grams raw prawns, peeled
cooking spray
4 cloves of garlic, chopped
200 grams broccoli, cut into small florets
200 grams snow peas
3 spring onions, chopped
1/2 cup dry white wine
1 cup water
1 tablespoon chicken stock powder
ground white pepper to taste
1 tablespoon cornflour


Clean prawns and devein. Soak in a bowl of cold water for 10 - 15 minutes, this will help reduce the saltiness of the prawns. Drain.

In a wok or large frypan spray with cooking spray and heat over high heat. Add the garlic and broccoli, cooking for 3 - 4 minutes or until the broccoli is starting to soften. Add the prawns and spring onions, stirfry for 2 minutes or until starting to turn pink. Add the snow peas.

Combine the wine, water, stock powder, pepper and cornflour. Add to pan and stir fry until sauce is boiling and has thickened slightly or to your liking. Serve immediately.

(click here for a printable version of this recipe)

Friday, September 4, 2009

Chicken, Capsicum and Tomato Quesadillas

Having had a delicious roast chicken the night before I needed to find something to do with the left over chicken meat.

Confession time: many of you don't know this of me but I hate having the same thing two nights in a row, freezing it for lunches or quick meals is okay, but never eating it again the next night. While this doesn't bother others in our house it does bother me!

I have read on a few blogs about Quesadillas. We don't frequent Mexican restaurants that often and have only really eaten the more commonly known Mexican dishes such as tacos, burritos, enchiladas, chilli, etc., so I have to say that the Quesadillas have intrigued me for some time now. Especially the mouthwatering Quesadilla recipes over at Closet Cooking and For the Love of Cooking..... do yourself a flavour favour and have at look at both these sites.

Anyway my mind was made up to have a go at making these so here is my take on this dish, one which I must say I really enjoyed and cannot wait to experiement a little more with flavours and fillings.


Chicken, Capsicum and Tomato Quesadillas

Serves: 2
Points per serve: 5.5

2 light tortillas
1 tablespoon tomato paste
1 teaspoons taco seasoning
60 grams cooked chicken meat
1/2 tomato, diced
1/4 red capsicum, diced
1/4 red onion, finely sliced
60 grams low fat tasty cheese, grated
handful fresh coriander leaves

Combine tomato paste and taco seasoning and mix well. Spread evenly over one tortilla. Top with chicken, tomato, capsicum, red onion and grated cheese. Top with other tortilla.

Heat a frying pan over high heat and spray with cooking spray. Reduce to low heat. Gently place quesadilla into the frying pan and cook for 3 - 5 minutes or until golden.

Flip quesadilla over ( I used a plate and then slid it back into the frying pan) and cook for a further 3 - 5 minutes or until golden and cheese has melted.

Cut into triangles and serve.

(click here for a printable version of this recipe)

Snickerdoodle Blossums

Before you ask I have no idea why these are called Snickerdoodle Blossums! However, I do know that a Snickerdoodle itself is basically a sugar cookie incorporating cinnamon.

I first saw these Snickerdoodle Blossums on Denise's blog and knew that they would be a hit at our house. Denise, like me, has two young children and she seems to be always baking.... pop over to her blog, Keeper Worthy Recipes, I am sure you will enjoy yourself.

The smell in the house whilst these were cooking was just amazing - somewhat like hot cinnamon donuts. Which is pretty much what they tasted like and the added Hershey's Kiss was the icing on the cake!!

Like Denise I used a patty cake (shallower than a cupcake) baking pan and not the baking trays as the original recipe called for.

These were very easy to make and even easier to eat......


Snickerdoodle Blossums
.


Makes: 48
Points per serve: WW Danger Beware
.

1/2 cup granulated sugar
1/2 cup firmly packed brown sugar
1 cup butter, softened
1 egg
1 teaspoon vanilla extract
1/4 teaspoon salt
2 cups all-purpose flour
1 teaspoon bicarbonate of soda
1/4 cup sugar
1 tablespoon ground cinnamon
48 Hersheys kisses, unwrapped

Heat oven to 190 degrees Celcius.

Combine 1/2 cup sugar, brown sugar and butter in large mixer bowl. Beat at medium speed until creamy. Add egg, vanilla extract and salt, continue beating until well mixed. Reduce speed to low, add flour and bicarbonate of soda. Beat until well mixed.

Shape dough into 1-inch balls. If dough is too soft, cover and refrigerate 30 minutes to 1 hour. Combine 1/4 cup sugar and ground cinnamon in a small bowl. Roll dough balls in cinnamon sugar mixture.

Place 2 inches apart onto greased cookie sheets or patty pans. Bake for 10 - 12 minutes or until very lightly golden brown. Immediately press 1 chocolate kiss in center of each cookie and sprinkle remaining cinnamon sugar over them while they're still warm. Remove from cookie sheets; cool completely on a wire rack.


(click here for a printable version of this recipe)

Thursday, September 3, 2009

Roast Chicken with Lemon and Rosemary Potatoes

I have to admit we do quite a few roast dinners but rarely a roast chicken. I cannot explain why that is - we just don't. Being home from work today I decided that we would have a roast chicken dinner tonight.
.
Of course, I just couldn't pop it in the oven and cook it... I had to experiment. After reading a few (well lots) of recipes I came finally across a Jamie Oliver recipe that took my fancy. Not only did the picture look nice the use of fresh herbs really captured my attention... as everyone knows I love fresh herbs.


Roast Chicken with Lemon and Rosemary Roast Potatoes
(recipe adapted from Jamie Oliver)
.
Serves: 8
Points per serve: 7.5
.
1 x 2 kilogram whole chicken
sea salt
freshly ground black pepper
2 kilograms, peeled
1 large lemon
1 whole bulb of garlic, broken into cloves
a handful of fresh thyme
olive oil
sprinkle sweet paprika
a handful of fresh rosemary sprigs, leaves picked
.
Rinse and dry the chicken. Rub the chicken inside and out with a generous amount of salt and freshly ground black pepper. Cover the chicken and leave in the fridge until you're ready to start cooking it for lunch or dinner.
.
About 30 minutes before you plan to cook the chicken remove it from the bench and allow it to come to room temperature.
.
Preheat your oven to 190 degrees Celcius.
.
Bring a large pan of salted water to the boil. Cut the potatoes into pieces, put them into the water with the whole lemon and the garlic cloves, and cook for 12 minutes. Drain and allow to steam dry for 1 minute, then remove the lemon and garlic. Toss the potatoes in the pan while still hot so their outsides get chuffed up and fluffy.

While the lemon is still hot, carefully stab it about 10 times. Pat the chicken with kitchen paper and rub it all over with olive oil and sprinkle over the sweet paprika. Push the garlic cloves, the whole lemon and the thyme into the cavity, then put the chicken into a roasting tray and cook in the preheated oven for around 45 minutes. Remove the chicken to a plate. Drain most of the fat from the roasting tray, leaving around a tablespoon.
.
Toss the potatoes into this with the rosemary leaves. Shake the tray around, then make a gap in the centre of the potatoes and put the chicken back in. Cook for a further 45 minutes, or until the chicken is cooked and the potatoes are nice and golden. Ensure juices run clear.....


(click here for a printable version of this recipe)